Hello! Welcome back to our course on advanced Go development.
In the last module, you did some exceptional work building a complete, interface-driven data access layer. You now have a PostgresStore that fully implements the Storage interface, complete with robust transaction handling for complex operations like transferring funds. That persistence layer is ready.
Now, it's time to build the API layer that will expose this functionality to the world.
Your Goal for Today
Learning Outcome: Design and implement a REST API server using the chi router with clean route grouping.
Today, we'll construct the skeleton of our REST API. We will focus on:
- Setting up a basic HTTP server.
- Introducing the
chirouter and its core features. - Structuring our API code for maintainability.
- Defining clear and organized API routes for our resources.
By the end of this lesson, you'll have a running server with well-defined endpoints, ready for us to implement the request and response logic in our next session.
1. Choosing and Setting Up Your Router
For our project, we'll use chi, a popular, lightweight, and idiomatic router for Go. Its key advantage is its 100% compatibility with the standard net/http package, which means you can leverage a vast ecosystem of existing middleware and tools. It's an excellent choice for building composable and maintainable APIs.
First, let's add it to your project. In your project's root directory, run:
go get -u github.com/go-chi/chi/v5
This command will download the chi package and update your go.mod and go.sum files, making the router available to your application. This process should be familiar from when you added pgx and other dependencies in previous modules.
2. A Basic HTTP Server with chi
Let's start by creating the simplest possible server. In your cmd/api/main.go file (or create it if it doesn't exist), you can write the following:
package main

import (
	"log"
	"net/http"

	"github.com/go-chi/chi/v5"
	"github.com/go-chi/chi/v5/middleware"
)

func main() {
	router := chi.NewRouter()

	// A good base middleware stack
	router.Use(middleware.RequestID)
	router.Use(middleware.RealIP)
	router.Use(middleware.Logger)
	router.Use(middleware.Recoverer)

	router.Get("/", func(w http.ResponseWriter, r *http.Request) {
		w.Write([]byte("ok"))
	})

	log.Println("Starting server on :8080")
	if err := http.ListenAndServe(":8080", router); err != nil {
		log.Fatalf("could not start server: %v", err)
	}
}
Here's what this code does:
chi.NewRouter(): Initializes a new router instance.router.Use(...): Attaches middleware to the router. Middleware are handlers that process requests before they reach your main business logic.chiprovides several useful ones out of the box, like a logger that prints request details and a recoverer that prevents panics from crashing the server.
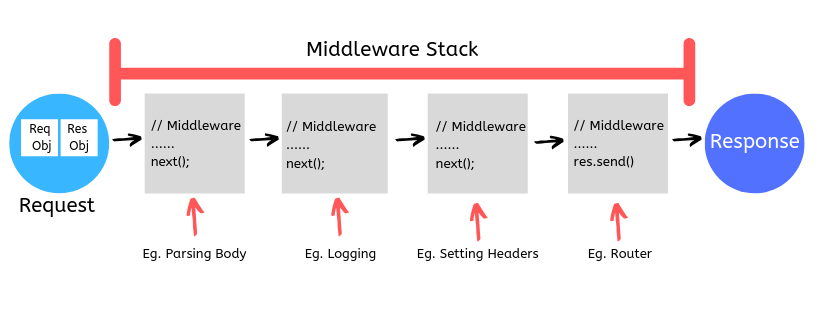
router.Get("/", ...): Defines a route for the root path/that responds to HTTP GET requests.http.ListenAndServe(":8080", router): Starts a standard Go HTTP server on port 8080, using ourchirouter to handle all incoming requests.
You can run this now (go run ./cmd/api) and test it with curl http://localhost:8080. You should see "ok" as the response and a log line in your terminal from the middleware.Logger.
3. Structuring the API
While the above works, putting everything in main.go quickly becomes unmanageable. Given your experience in software engineering and interest in system design, you know the value of a clean structure. We'll follow a pattern that promotes separation of concerns and dependency injection.
We will create a server package to encapsulate all API-related logic. This package will contain:
- A
Serverstruct to hold dependencies (like the router and ourStorageinterface). - Handler methods attached to the
Serverstruct. - Route registration logic.
The video below demonstrates a very similar pattern, refactoring a simple main function into a more structured App type. This is exactly the direction we are headed.
Build a Microservice with Go #2 - Routes & Handlers
Watch this section from the 'Build a Microservice with Go' series by Net Ninja. It shows how to move from a flat main.go to a structured application type. Focus on the 'why'—how this structure helps manage dependencies and organize the code.
Watch from the beginning of the video until 06:00. Pay attention to how the App struct is created, how the router is added as a dependency, and how the Start method encapsulates the http.ListenAndServe call.
Applying this pattern, let's create a new directory internal/server and a file internal/server/server.go.
// internal/server/server.go
package server

import (
	"fmt"
	"log"
	"net/http"

	"github.com/go-chi/chi/v5"
	"github.com/go-chi/chi/v5/middleware"
	// Make sure to use the correct import path for your storage interface
	"your_module_path/internal/storage"
)

type Server struct {
	listenAddr string
	store      storage.Storage
	router     *chi.Mux
}

func NewServer(listenAddr string, store storage.Storage) *Server {
	s := &Server{
		listenAddr: listenAddr,
		store:      store,
		router:     chi.NewRouter(),
	}

	// Base middleware
	s.router.Use(middleware.RequestID)
	s.router.Use(middleware.RealIP)
	s.router.Use(middleware.Logger)
	s.router.Use(middleware.Recoverer)

	// Register routes
	s.registerRoutes()

	return s
}

func (s *Server) Start() error {
	log.Printf("Starting server on %s", s.listenAddr)
	return http.ListenAndServe(s.listenAddr, s.router)
}

// We will implement this next
func (s *Server) registerRoutes() {
	s.router.Get("/", func(w http.ResponseWriter, r *http.Request) {
		fmt.Fprintf(w, "Welcome to the Simple Bank API!")
	})
}
Now, your main.go becomes much cleaner. It's only responsible for initialization and wiring dependencies together.
// cmd/api/main.go
package main

import (
	"context"
	"log"

	"github.com/jackc/pgx/v5/pgxpool"
	// Use your actual module paths
	"your_module_path/internal/server"
	"your_module_path/internal/storage/postgres"
)

func main() {
	// 1. Database connection (from previous lessons)
	connStr := "user=postgres password=secret host=localhost port=5432 dbname=simple_bank sslmode=disable"
	pool, err := pgxpool.New(context.Background(), connStr)
	if err != nil {
		log.Fatalf("Unable to connect to database: %v\n", err)
	}
	defer pool.Close()

	store := postgres.NewPostgresStore(pool)

	// 2. Create and start the server
	apiServer := server.NewServer(":8080", store)
	if err := apiServer.Start(); err != nil {
		log.Fatalf("could not start server: %v", err)
	}
}
This structure is powerful. The Server explicitly declares its dependencies (storage.Storage), making the system easy to understand and test.
4. Clean Route Grouping
This is the core of today's lesson. As an API grows, you need to organize routes logically. A flat list of dozens of routes in one function is a maintenance nightmare. chi provides an elegant solution with sub-routers.
The router.Route() method allows you to define a set of routes under a common path prefix.
chi as HTTP Framework - Jonny Langefeld
The article 'How to write a Go API: The Ultimate Guide' has an excellent, concise section on using chi. We'll focus on how it builds its request tree.
Read section 8, 'chi as HTTP Framework'. Pay close attention to the buildTree function. Notice how r.Route("/articles", ...) is used to group all article-related endpoints together. This nested structure is exactly what we mean by 'clean route grouping'.
Let's apply this to our registerRoutes method. We'll start by defining stub handlers. We don't need their logic yet; that's for the next lesson.
First, create a new file internal/server/handlers.go to hold the handler functions.
// internal/server/handlers.go
package server

import "net/http"

// A handler for creating a new account
func (s *Server) handleCreateAccount(w http.ResponseWriter, r *http.Request) {
	// Implementation in the next lesson
}

// A handler for getting a list of accounts
func (s *Server) handleListAccounts(w http.ResponseWriter, r *http.Request) {
	// Implementation in the next lesson
}

// A handler for getting a single account by its ID
func (s *Server) handleGetAccountByID(w http.ResponseWriter, r *http.Request) {
	// Implementation in the next lesson
}
Now, update registerRoutes in server.go to use these handlers and the Route method.
// internal/server/server.go

// ... (rest of the Server struct and NewServer function)

func (s *Server) registerRoutes() {
	s.router.Get("/", func(w http.ResponseWriter, r *http.Request) {
		fmt.Fprintf(w, "Welcome to the Simple Bank API!")
	})

	// Group routes for the /accounts resource
	s.router.Route("/accounts", func(r chi.Router) {
		// POST /accounts
		r.Post("/", s.handleCreateAccount)
		// GET /accounts
		r.Get("/", s.handleListAccounts)

		// Sub-router for routes that include an account ID
		r.Route("/{accountID}", func(r chi.Router) {
			// GET /accounts/{accountID}
			r.Get("/", s.handleGetAccountByID)
			// You would add PUT, DELETE handlers here as well
		})
	})

	// You can add other resource groups here, e.g., /transfers
}
This approach is extremely clean:
- All routes for a specific resource (
/accounts) are grouped together. - Common path prefixes are not repeated.
- The code structure mirrors the API path structure, making it intuitive to read.
- You can even apply middleware to specific groups (e.g., an authentication middleware just for
/accounts).
To see this in action, you can add a simple fmt.Println inside one of your stub handlers, run the server, and use curl to hit the endpoint (e.g., curl -X POST http://localhost:8080/accounts). You will see your message printed in the server logs.
Conclusion
Excellent work today! You have successfully laid the foundation for our REST API. You didn't just write code; you designed a structure. This Server setup, with its clear dependencies and cleanly grouped routes, is a professional pattern that will scale as our application grows more complex.
Key Takeaways:
chiis a powerful, idiomatic router that integrates seamlessly with Go's standard library.- Middleware is used to handle cross-cutting concerns like logging and error recovery.
- Structuring your API in a
serverpackage with aServerstruct promotes dependency injection and makes yourmainfunction a clean composition root. router.Route()is the key to clean route grouping, allowing you to organize your API endpoints in a way that is logical, readable, and maintainable.
Next Up
Our server is running and our routes are defined, but our handlers are empty. In the next lesson, we will breathe life into them. We'll tackle implementing structured JSON request parsing and response writing, which will involve decoding incoming data, interacting with our Storage layer, and sending back properly formatted JSON responses.