Hello! Welcome to the next lesson in our journey to build an advanced Go application.
In the last lesson, you mastered the fundamentals of database interaction with pgx. You can now create, read, and list records from your PostgreSQL database. However, the operations we've implemented so far are self-contained. A CreateAccount call is a single INSERT, and GetAccount is a single SELECT.
Real-world applications often involve more complex operations. Consider a bank transfer: you must debit money from one account and credit it to another. This involves at least two separate UPDATE statements. What happens if the debit succeeds, but the credit fails due to a network issue or a database constraint? You've just made money disappear! The system's data is now inconsistent and incorrect.
To solve this, we need to group these operations into a single, indivisible unit of work that either succeeds completely or fails completely, leaving the database unchanged. This unit is called a transaction.
Today's Learning Outcome: Manage database transactions with commit and rollback semantics using pgx.
By the end of this lesson, you'll understand the theory behind database transactions and implement the core money-transfer logic for our application safely and robustly.
The "All or Nothing" Principle: ACID
Database transactions are built on a set of properties known collectively as ACID, which guarantees data integrity even in the face of errors or concurrent access. As someone with a computer science background, you'll find these formal properties familiar.
- Atomicity: All changes within a transaction are treated as a single "atom" or unit. Either all of them are applied, or none of them are. This is the "all or nothing" principle.
- Consistency: A transaction brings the database from one valid state to another. All database rules, like constraints and triggers, must be satisfied.
- Isolation: Concurrent transactions should not interfere with each other. The result of running multiple transactions at the same time should be the same as if they were run sequentially.
- Durability: Once a transaction has been successfully committed, its changes are permanent and will survive any subsequent system failure, like a power outage or crash.
The following video provides an excellent explanation of these concepts using a practical banking example.
[Backend #6] A clean way to implement database transaction in Golang
Watch this segment from TECH SCHOOL's video to get a clear, concise overview of what a transaction is, why it's needed, and what the ACID properties mean.
Starting around 20 seconds in, watch the transaction overview. Pay close attention to the breakdown of the money transfer example and the explanation of each ACID property. The video also introduces the fundamental SQL commands: BEGIN, COMMIT, and ROLLBACK.
Implementing Transactions with pgx
In Go, the pgx library provides a clean API to manage the transaction lifecycle (BEGIN, COMMIT, ROLLBACK). The standard pattern involves a few key steps.
The article "Getting Started with PostgreSQL in Go using PGX" provides a perfect code example that demonstrates this fundamental pattern.
Getting Started with PostgreSQL in Go using PGX
This article demonstrates the classic, manual approach to handling transactions. The example archives and then deletes tasks, a two-step process that must be atomic.
Read the section titled 'Working with transactions' covering database transactions. Analyze the moveAllTasksToArchive function and note these four critical steps: pool.Begin(ctx) starts the transaction. defer tx.Rollback(ctx) sets up a safety net. If the function returns at any point before tx.Commit() is called (e.g., due to an error), this defer statement ensures the transaction is aborted. tx.Exec(ctx, ...) is used to run queries within the transaction's context. tx.Commit(ctx) is the final step, making the changes permanent. If Commit itself fails, the preceding Rollback will still be deferred, but a successful commit prevents the deferred rollback from having any effect.
To see this in action and understand the consequences of not using a transaction, the next video is invaluable. It contrasts a transactional batch insert with a non-transactional one, clearly showing how data integrity is compromised without atomicity.
Learning Golang: Relational Databases - Transactions with PostgreSQL
This video by Mario Carrion will walk you through implementing a transaction for a batch insert. The most insightful part is when he shows what happens when one of the inserts fails, both with and without a transaction.
Watch from 1:44 to 16:33. This covers: The concept of transactions and the BEGIN, COMMIT, ROLLBACK SQL commands. Implementing multiple inserts within a transaction and using defer tx.Rollback. Demonstrating how a single failure correctly rolls back the entire transaction. Showing what goes wrong without a transaction, leading to partial, inconsistent data.
A More Robust Pattern: The Transaction Executor
The manual approach is clear, but it mixes transaction management boilerplate (Begin, Commit, Rollback) with business logic (the actual queries). For a complex application, a cleaner and more reusable pattern is to abstract the transaction lifecycle into its own function.
This powerful pattern involves a generic "executor" function that handles the Begin, defer Rollback, and Commit logic. This executor accepts a callback function which contains the specific database operations for a given unit of work.
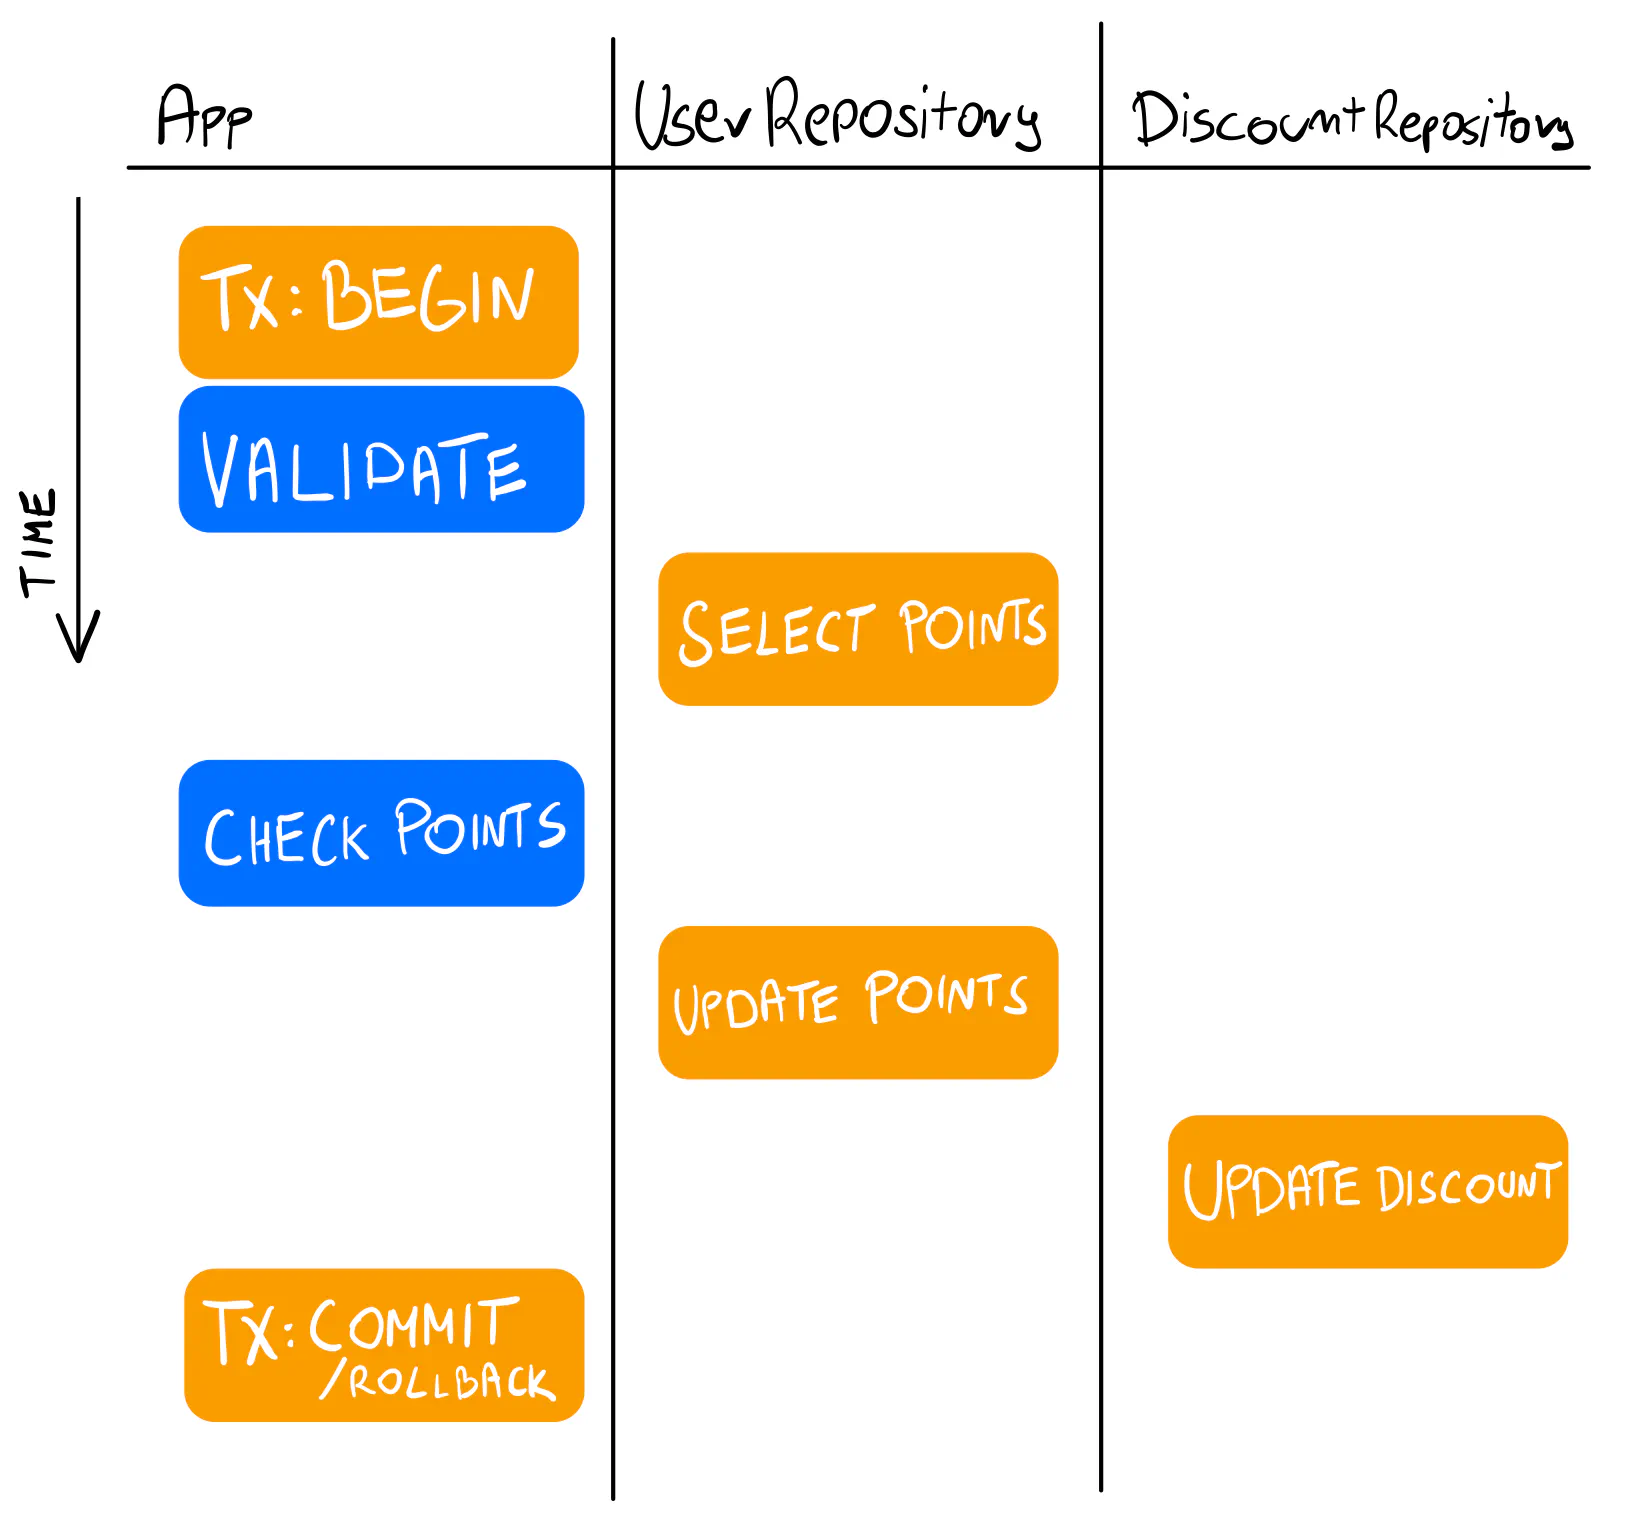
Let's implement this pattern in our PostgresStore.
-
Add the Executor Function:
Add the following unexported method to yourPostgresStore. This function will be the foundation for all our transactional operations.// In your repository/storage file import ( "context" "fmt" ) // executeTx runs a function within a database transaction. // If the function returns an error, the transaction is rolled back. Otherwise, it's committed. func (s *PostgresStore) executeTx(ctx context.Context, fn func(*PostgresStore) error) error { tx, err := s.db.Begin(ctx) if err != nil { return err } // Use a new PostgresStore with the transaction object qtx := &PostgresStore{db: tx} // We use pgx.Tx which satisfies our Querier interface err = fn(qtx) if err != nil { if rbErr := tx.Rollback(ctx); rbErr != nil { return fmt.Errorf("tx err: %v, rb err: %v", err, rbErr) } return err } return tx.Commit(ctx) }You might notice a challenge here:
PostgresStorehas adbfield of type*pgxpool.Pool, butBegin()returns apgx.Tx. To make this work cleanly, we need to abstract the database operations. Let's adjust our setup. -
Refactor for Testability and Flexibility:
First, define an interface that includes all the methods that both*pgxpool.Poolandpgx.Txprovide.// In your repository/storage file, near the top // Querier defines the methods needed for both database pools and transactions. type Querier interface { Exec(context.Context, string, ...interface{}) (pgconn.CommandTag, error) Query(context.Context, string, ...interface{}) (pgx.Rows, error) QueryRow(context.Context, string, ...interface{}) pgx.Row }Note: You'll need to import
github.com/jackc/pgx/v5/pgconn.Now, change your
PostgresStoreto use thisQuerierinterface instead of the concrete*pgxpool.Pool.// Change this: // type PostgresStore struct { // db *pgxpool.Pool // } // To this: type PostgresStore struct { db Querier }And update your
NewPostgresStoreconstructor:// Your constructor should still accept the pool, but the struct holds the interface. func NewPostgresStore(dbpool *pgxpool.Pool) *PostgresStore { return &PostgresStore{db: dbpool} }Finally, our
executeTxfunction needs a slight adjustment to pass the original*pgxpool.Poolfrom thePostgresStore.// Add the connection pool to the PostgresStore struct type PostgresStore struct { db Querier pool *pgxpool.Pool // Keep a reference to the pool to begin transactions } // Update the constructor func NewPostgresStore(dbpool *pgxpool.Pool) *PostgresStore { return &PostgresStore{db: dbpool, pool: dbpool} } // Update the executeTx method to use the pool func (s *PostgresStore) executeTx(ctx context.Context, fn func(*PostgresStore) error) error { tx, err := s.pool.Begin(ctx) if err != nil { return err } qtx := &PostgresStore{db: tx, pool: s.pool} err = fn(qtx) if err != nil { if rbErr := tx.Rollback(ctx); rbErr != nil { return fmt.Errorf("tx err: %v, rb err: %v", err, rbErr) } return err } return tx.Commit(ctx) }This refactoring is a crucial step in professional Go development. By depending on an interface (
Querier), your code becomes more flexible and easier to test. YourCreateAccount,GetAccount, etc., methods don't need to change at all; they already operate ons.db, which now transparently works whether it's a connection pool or a transaction.
Implementing the Transfer Transaction
Now we can use our executeTx helper to build the TransferTx method. This function will orchestrate the entire money transfer within a single atomic operation.
First, let's define the parameters and the result for our transfer.
// In your repository/storage file

type TransferTxParams struct {
	FromAccountID int64 `json:"from_account_id"`
	ToAccountID   int64 `json:"to_account_id"`
	Amount        int64 `json:"amount"`
}

type TransferTxResult struct {
	Transfer    Transfer `json:"transfer"`
	FromAccount Account  `json:"from_account"`
	ToAccount   Account  `json:"to_account"`
}
Note: You will need to define the Transfer struct based on the transfers table schema from our previous migration lesson.
Now, let's implement the TransferTx method using our executeTx helper.
// In your repository/storage file

// You'll need the SQL queries from the previous lesson, plus two new ones.
const createTransfer = `-- name: CreateTransfer :one
INSERT INTO transfers (
  from_account_id,
  to_account_id,
  amount
) VALUES (
  $1, $2, $3
) RETURNING id, from_account_id, to_account_id, amount, created_at
`

const updateAccountBalance = `-- name: UpdateAccountBalance :one
UPDATE accounts
SET balance = balance + $1
WHERE id = $2
RETURNING id, owner, balance, currency, created_at
`

func (s *PostgresStore) TransferTx(ctx context.Context, arg TransferTxParams) (TransferTxResult, error) {
	var result TransferTxResult

	err := s.executeTx(ctx, func(q *PostgresStore) error {
		var err error

		// 1. Create the transfer record
		result.Transfer, err = q.CreateTransfer(ctx, CreateTransferParams{
			FromAccountID: arg.FromAccountID,
			ToAccountID:   arg.ToAccountID,
			Amount:        arg.Amount,
		})
		if err != nil {
			return err
		}

		// 2. Debit from_account
		result.FromAccount, err = q.UpdateAccountBalance(ctx, UpdateAccountBalanceParams{
			Amount: -arg.Amount,
			ID:     arg.FromAccountID,
		})
		if err != nil {
			return err
		}

		// 3. Credit to_account
		result.ToAccount, err = q.UpdateAccountBalance(ctx, UpdateAccountBalanceParams{
			Amount: arg.Amount,
			ID:     arg.ToAccountID,
		})
		if err != nil {
			return err
		}

		return nil
	})

	return result, err
}
Note: You will need to create the CreateTransfer and UpdateAccountBalance methods on your PostgresStore, similar to how you created CreateAccount in the last lesson. They will use QueryRow and scan the results into the respective structs. The TransferTx function shows how these individual methods are composed together inside a transaction.
This implementation is clean and robust. The business logic of the transfer is neatly contained within the callback function, while the executeTx helper handles the transactional machinery. If any step fails, the entire operation is rolled back automatically.
The Idiomatic pgx Way: BeginFunc
The callback pattern is so common and useful that pgx provides a built-in function for it: pgxpool.BeginFunc. It handles the Begin/Commit/Rollback lifecycle automatically based on the error returned by the function you provide.
Let's watch a final clip that shows how to refactor the manual transaction code to use this idiomatic helper.
Learning Golang: Relational Databases - Transactions with PostgreSQL
The BeginFunc helper in pgx is a more concise and idiomatic way to implement the executor pattern we just built. This clip shows a direct refactoring from the manual method to BeginFunc.
Watch the code refactoring. The video demonstrates refactoring the previous code to use the pgx-native BeginFunc. Notice how it simplifies the code by removing the explicit Begin, Commit, and Rollback calls.
While we will stick with our custom executeTx helper for now because it makes the mechanics explicit, it's valuable to know that pgx provides this functionality out of the box for future projects.
Conclusion
Fantastic work today. You have tackled one of the most critical concepts in database programming. By ensuring atomicity, you are building a system that is resilient to errors and maintains data integrity.
Key Takeaways:
- Transactions guarantee ACID properties, with Atomicity (all or nothing) being the most immediate concern for application logic.
- The standard Go pattern for manual transactions is
Begin,defer Rollback, execute operations, and finallyCommit. - A more robust and reusable approach is to abstract the transaction lifecycle into a generic executor function that takes a callback with the business logic.
- Refactoring your store to depend on a
Querierinterface rather than a concrete*pgxpool.Poolmakes it possible to run the same repository methods within a transaction or directly on the pool. pgxprovides an idiomatic helper,BeginFunc, that implements the callback pattern for you.
Next Up
You now have all the fundamental database operations in place: creating records, reading single records, listing multiple records, and executing multi-step operations within an atomic transaction.
In the next lesson, we will put the final polish on our data access layer. You will implement the full PostgreSQL-backed repository that satisfies the Storage interface we designed earlier. This will complete our data access component, making it a self-contained, testable, and reusable piece of our architecture, ready to be wired into our REST API.