Introduction
In our last lesson, you created the architectural blueprint for your freelance portfolio by defining its sitemap and page hierarchy. With that structure in place, we can now move from planning to construction. Today, we'll focus on building the most critical page in your portfolio: the case study. This is where you transform your project work from a simple collection of screens into a compelling narrative that demonstrates your value to a potential client.
Your background in audit has trained you to document processes and justify outcomes with rigorous logic. We'll apply that same mindset here. A case study isn't just a gallery of pretty images; it's a persuasive report that walks a client through your problem-solving journey, showing them how you think and why your design decisions led to a successful result. This lesson will guide you through building a polished case study page that effectively integrates that narrative with powerful visuals.
1. The Anatomy of a Powerful Case Study
Before you start writing or designing, it's essential to understand the fundamental structure that makes a case study effective. Just as a financial report has standard sections, a design case study follows a proven framework that recruiters and clients expect to see: Problem, Process, Solution, and Outcome.
This structure tells a clear story from beginning to end.
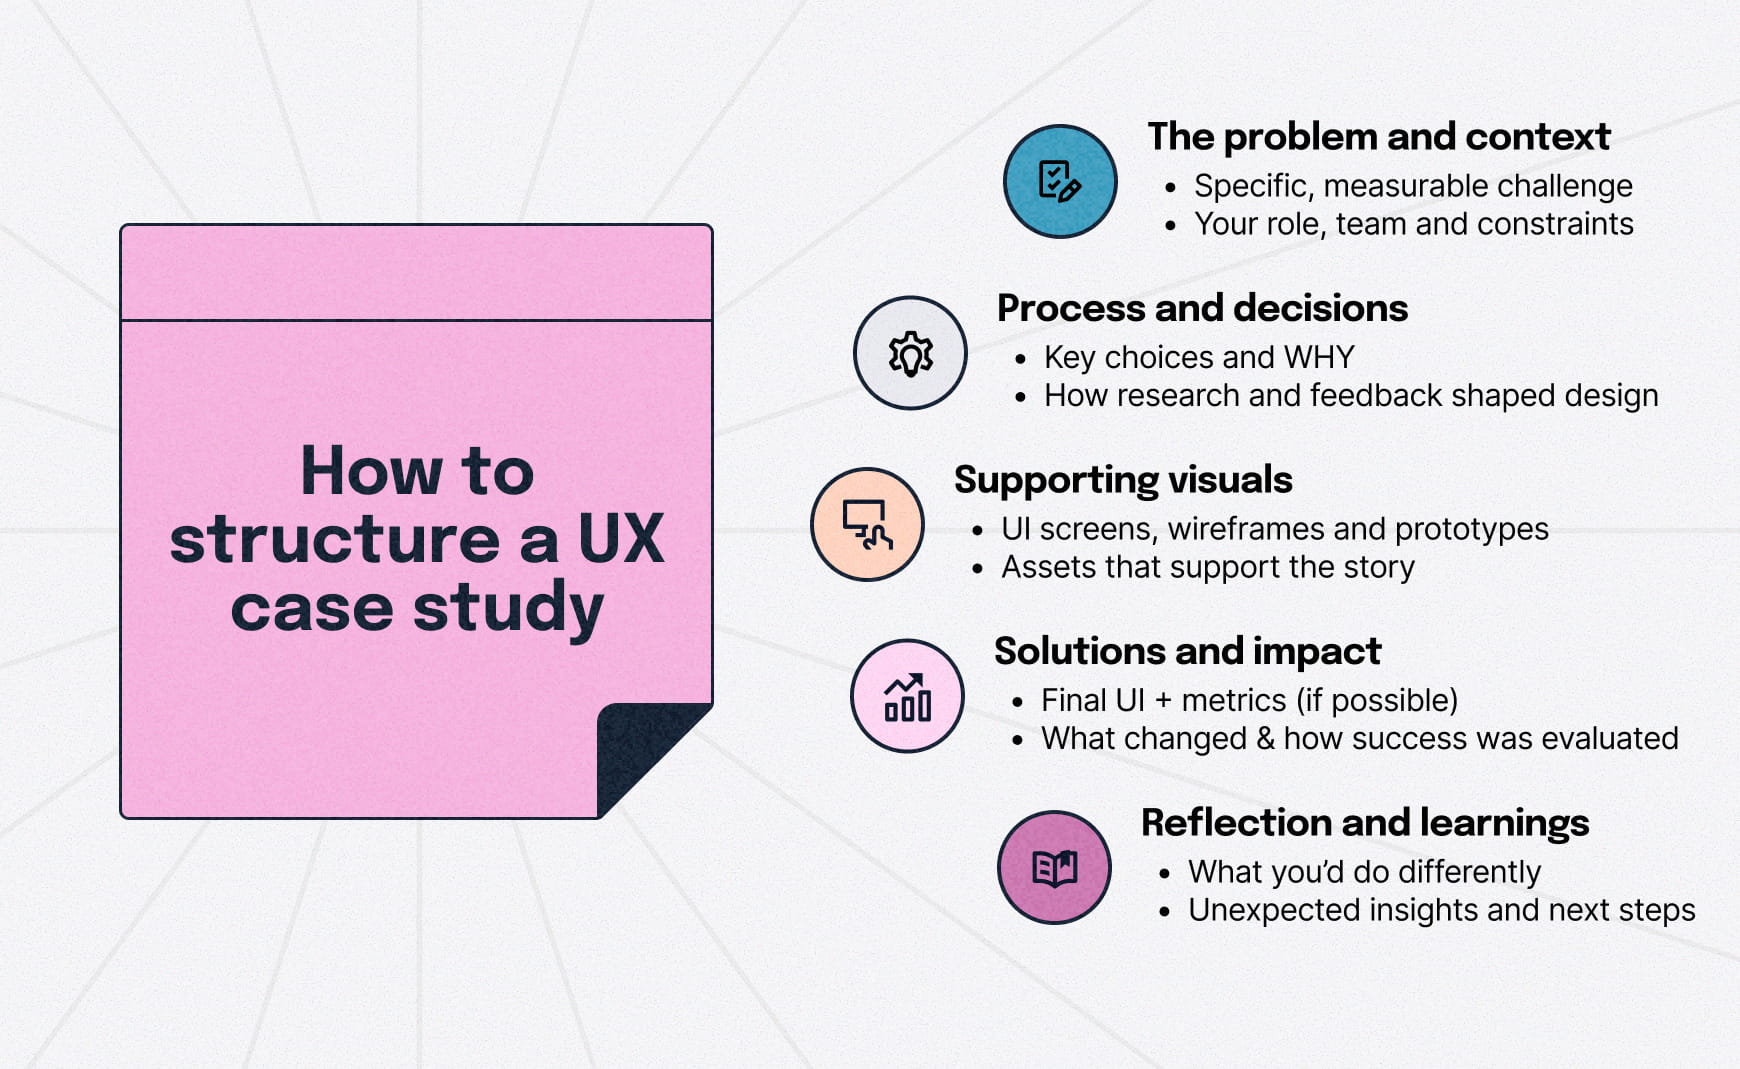
To see how these sections come together in practice, we'll watch a designer deconstruct one of her own high-performing case studies.
How to build a UX design case study for Beginners | Step-by-step guide + walkthrough | Free template
In this video, "How to build a UX design case study for Beginners," designer Erin Kate provides a detailed walkthrough of her portfolio. Her approach is perfect for understanding how to structure your narrative.
First, watch the introduction from the walkthrough begins to set the context. Then, focus on the section from the initial sections. Notice how she immediately establishes the core project details: The final product image (the hook) The problem statement (the "how might we...") The project overview (Role, Scope, Process, Tools) This initial framing is crucial for giving your reader a concise summary before they dive into the details.
2. Weaving the Narrative: From Problem to Process
With the core structure in place, the next step is to write the narrative for each section. Your goal is to guide the reader through your thought process, connecting each step logically.
Starting with the "Why": The Problem and the Hook
A common mistake is to bury the most exciting parts of your project deep within the case study. The best portfolios "start with the end." They immediately present the beautiful final designs and state the problem clearly. This grabs the reader's attention and makes them want to learn how you achieved the result.
10 great design portfolios (annotated & explained) - Learn UI Design
This article from Learn UI Design analyzes several excellent portfolios. We'll focus on a few examples that master the art of starting strong and balancing text with visuals.
First, read about Bettina Bergendahl's Portfolio. Her transition from finance to design is very similar to your own journey, and her portfolio is a fantastic model. Note how she "starts with the end," showing the final product before diving into the process. Next, look at the examples for Luca Orio and Thomas Quigley. Both demonstrate how to present final designs up front with minimal, impactful text. This visual-first approach is highly effective.
The "Messy Middle": Documenting Your Process
This section is your opportunity to showcase your UX thinking. It’s where you "show your work." For someone with your audit background, this should feel natural. You need to present the evidence (research, wireframes, tests) and explain the rationale behind your decisions.
Crucially, you must avoid simply listing activities. Instead, connect each activity to a specific design decision. For example:
- "Our user survey revealed that 75% of users felt the checkout process was too long. Because of this insight, I redesigned the flow from five steps to three."
- "Through competitive analysis, I found that top competitors used a prominent search bar. This informed my decision to place the search bar centrally in the header."
Watch how Erin Kate demonstrates this by presenting research findings visually.
How to build a UX design case study for Beginners | Step-by-step guide + walkthrough | Free template
Let's return to Erin Kate's case study walkthrough. She excels at making the process section engaging and scannable.
Watch the following segments: Presenting research: Notice her use of SWOT analysis visuals and, more importantly, data visuals like pie charts from user surveys. This is a powerful way to present research findings. Introducing the user: See how she introduces personas and user journeys, using visuals to keep the reader engaged and framing it as empathetic, human-centered design. Showing the design process: This clip shows how to present low-fidelity and mid-fidelity wireframes as part of the story, leading into testing.
3. Integrating Visuals: Show, Don't Just Tell
A case study is a visual document. Your narrative provides the "why," but the visuals provide the proof and the "wow." A polished case study uses a variety of visuals to break up text and make the content more engaging and convincing.
Key Visuals to Include:
- High-Fidelity Mockups: Display your final screens in realistic device mockups (e.g., inside a phone or laptop frame).
- Annotated Screenshots: Point out specific UI elements or features and explain the rationale behind them.
- Before-and-After Comparisons: This is one of the most effective ways to demonstrate the value of your redesign.
- User Flow Diagrams or Wireframes: Show the structure and thinking behind your final designs.
- Video Walkthroughs or Prototypes: An embedded video or a link to a clickable Figma prototype allows clients to experience the design interactively. This is highly recommended.
This professional case study from UXDA is a masterclass in using visuals to tell a story.
Case Study: Bugatti-Caliber UX Design for Wealth Management
This case study by UXDA is an excellent example of a polished, long-form narrative. It showcases how a design agency presents its work to high-value clients.
Read the introduction to understand the problem statement. Then, look at the Solution section, noting how they use the "Bugatti" metaphor to frame their design. Finally, examine the "Creating an emotional connection" subsection. Pay close attention to the before-and-after image. It's a simple but incredibly powerful visual that instantly communicates the impact of their work.
4. Assembling the Page: Layout and Presentation
Once you have your narrative and your visuals, the final step is to build the page on your chosen platform (Behance, Webflow, etc.). While the technical steps will vary, the principles of good presentation are universal.
Your goal is to create a page that is scannable, visually appealing, and easy to read.
How to design your UI/UX case study | Portfolio tips + detailed walkthrough
This video by Rachel How, "How to design your UI/UX case study," provides excellent tips on presentation and common mistakes to avoid.
Watch these key sections: Common beginner mistakes: Pay special attention to her points about not just showing end designs and ensuring your presentation is polished (no typos, good alignment). This relates directly to the attention to detail you honed in your audit career. Structuring the page: She shows her process of documenting in Notion and then building in Webflow, highlighting the importance of a meaningful title, project overview, and clear roles. Showcasing impact: This is a critical section. Note her emphasis on including metrics, data visualization, and before/after comparisons to prove the value of your work.
Key Principles for Your Page Layout:
- Strong Hero Section: Start with a compelling title, a 1-2 sentence summary of the project, and a stunning hero image of your final design.
- Clear Headings: Use a clear typographic hierarchy (H1, H2, H3) to break your case study into the sections we've discussed (Problem, Research, Design, Outcome).
- Balance Text and Images: Alternate between blocks of text and large, high-quality images. Don't be afraid of white space.
- Tell the Story Chronologically: After the initial hook, guide the user through your process from start to finish.
- End with a Strong Conclusion: Summarize the project's success and include a "Lessons Learned" or "Reflection" section. This shows maturity and a growth mindset.
How to build a UX design case study for Beginners | Step-by-step guide + walkthrough | Free template
Finally, let's look at how Erin Kate concludes her case study.
Watch the section on the final sections. She discusses presenting the high-fidelity mockups and, importantly, ending with a "What this project taught me" section. This reflective conclusion is a powerful way to end your story.
Conclusion
You now have a complete blueprint for transforming a project into a polished, persuasive case study. By structuring your work within the Problem-Process-Solution-Outcome framework, you create a narrative that is both easy to follow and highly effective at demonstrating your skills. Remember to "start with the end" to hook your reader, use a rich variety of visuals to support your story, and present it all in a clean, scannable layout. Your unique background gives you an edge in articulating the business impact of your design choices, so be sure to emphasize that in your narrative.
Key Takeaways:
- A case study is a strategic narrative designed to showcase your problem-solving skills to clients.
- Follow the standard structure: Problem, Process, Solution, and Outcome.
- Grab attention immediately by showing your final, polished designs upfront.
- Integrate a variety of high-quality visuals (mockups, diagrams, before/afters) to make your story engaging and convincing.
- Connect every process step (research, wireframing) to a specific design decision and, ultimately, to the project's outcome.
- Conclude with project impact (metrics if possible) and a personal reflection on what you learned.
Preview of the Next Lesson:
With your first case study page planned, you've built the most important pillar of your portfolio. The next step is to introduce the architect behind the work—you. In our next lesson, you will write a concise 'About Me' page that highlights your unique background in finance and creative entrepreneurship, helping you connect with clients on a personal level and frame your non-traditional path as a unique strength.