Introduction
In our last lesson, you successfully translated your creative paper sketches into a structured, mid-fidelity wireframe in Figma. You now have a solid blueprint showing what content will be on your product page and where it will be located. However, this static layout doesn't tell the full story. It doesn't explain how an element should behave when a user interacts with it, or the specific rules governing the content.
This lesson is about adding that crucial layer of communication. You will learn to annotate your wireframes to clearly communicate interaction behavior and content specifications to stakeholders like clients, developers, and copywriters. Your background in finance and audit has trained you to be meticulous and to document assumptions and logic so that reports are unambiguous. We'll apply that same principle of precision here, ensuring your design intent is crystal clear and nothing gets lost in translation.
What Are Wireframe Annotations?
At its core, an annotation is simply a note that provides extra context. It turns a static picture into an actionable set of instructions. Before we dive into the "how" in Figma, let's establish a strong conceptual understanding of what annotations are for and who they serve.
How to use wireframe annotations (even if you're not a ...
This article from Balsamiq provides an excellent, tool-agnostic overview of the role and types of annotations in the design process.
Please read from the beginning down to the end of the "5 Wireframe annotation examples" section. As you read, focus on: The definition of an annotation as a "sticky note on a blueprint." The five audiences for wireframes and how annotations serve each of them. The five specific examples of annotations (Design, User Flow, Accessibility, Functionality, Navigation). This will give you a great framework for the types of notes you'll be adding.
As you can see, annotations can take many forms. They can be simple callouts, or they can be organized into structured tables—a format that may feel familiar from your audit work. These examples show two common ways to document content specifications and design rationale.

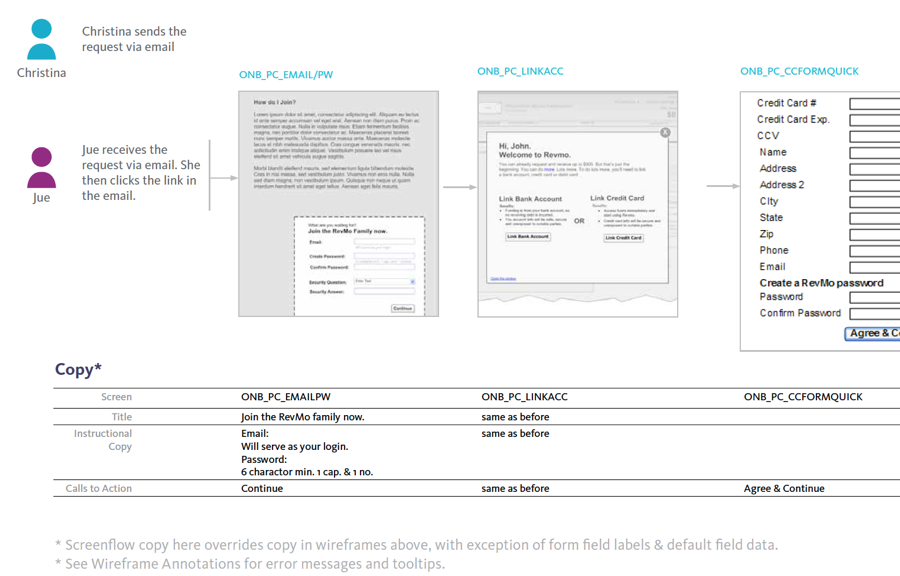
A Framework for What to Annotate
Based on the readings and standard industry practice, we can categorize annotations into several key areas. When you're annotating a wireframe, think about what you need to explain across these categories:
- Interaction Behavior: What happens on click, hover, tap, or swipe? Describe animations, transitions, and state changes (e.g., a button changing from
defaulttodisabled). - Content Specifications: What are the rules for the content? This includes character limits, image dimensions, alt text for images, and whether the text is a placeholder or final copy.
- User Flow & Navigation: Where does this action take the user? Does this button lead to a new page, open a pop-up (modal), or reveal a hidden section?
- Business Logic & Rules: Are there any conditional rules? For example, "Show 'Sale' badge only if the product is discounted" or "This section is only visible to logged-in users."
- Accessibility: How will users with disabilities navigate this? Specify the heading structure (H1, H2, etc.), the tab order for keyboard navigation, and the reading order for screen readers.
Annotating for Developer Handoff
One of the most critical audiences for your annotations will be the developers who build your design. They need to translate your visual layout into functional code, and your notes are the bridge that makes this possible. The following video is a masterclass in creating developer-focused annotations.
Figma Developer Handoff Masterclass | Best Practices & More!
This video from UI Collective demonstrates best practices for annotating designs specifically for developers, covering a wide range of essential details.
We'll break this detailed video into three parts. Don't worry about memorizing everything; focus on understanding the type of information a developer needs. Interactive Elements: Watch the sections on Buttons and Links and Input Details. Notice how it clarifies the function (is it a link or a button?) and the specific properties of a form field. Content and Structure: Watch the sections on Headings and Images. Pay close attention to the distinction between the visual style of a heading and its semantic level (H1, H2), and the importance of descriptive alt text for images. Flow and Accessibility: Watch the sections on Focus Order and Reading Order. This demonstrates how to specify the navigation flow for keyboard-only users and screen reader users, which is crucial for building inclusive products.
Practical Annotation in Figma's Dev Mode
Now that you understand what and why to annotate, let's look at how to do it efficiently inside Figma. While you can always use simple text boxes and arrows, Figma's Dev Mode provides dedicated tools for this process.
Figma tutorial: Collaboration and handoff in Dev Mode
This official tutorial from Figma demonstrates the modern workflow for annotating designs and preparing them for handoff using Dev Mode.
Watch from prepping the design. This short clip will show you two key actions: Using the measure tool to specify spacing. Using the annotation tool to add contextual notes and pin specific properties (like a color value) to an element. Marking a section as "Ready for dev" to signal to your team that it's ready for review.
Your Turn: Annotate Your Wireframe
It's time to apply these concepts to your "Custom Wedding Hoops" product page wireframe. Your goal is to add a layer of clear, concise communication that leaves no room for guessing.
Task:
Open the mid-fidelity wireframe you created in the last lesson. Toggle on Dev Mode (use the toggle at the top-right of your screen or the shortcut Shift + D). Now, add annotations to clarify the following:
-
"Add to Cart" Button:
- Add an annotation explaining the interaction: "On click, this button should add the product to the cart and display a 'Successfully Added!' confirmation message."
- Add a note about its state: "The button should be disabled until the user has selected all required customization options."
-
Product Image Gallery:
- Annotate the main image placeholder. Specify a content rule: "Main image should be a 1:1 square aspect ratio."
- Add an accessibility note: "Alt text is required. Example: 'Custom-embroidered wedding hoop with couple's names and wedding date.'"
-
Customization Options (e.g., dropdowns for thread color, hoop size):
- Annotate one of the dropdowns. Describe the interaction: "On click, this opens a dropdown menu listing all available options."
- Specify the keyboard navigation (Focus Order) for the key interactive elements. Use the annotation tool to add numbered labels (1, 2, 3...) to define a logical tab sequence (e.g., 1. Main Image, 2. Size Dropdown, 3. Color Dropdown, 4. Add to Cart button).
-
Product Title:
- Annotate the product title to specify its semantic heading level: "This is the primary page heading (H1)."
Feel free to use the annotation tool, the measure tool, or even add a separate text block with a "Notes" table if you prefer that structure. The goal is clarity.
Conclusion
Excellent work. You've now transformed your static wireframe into a dynamic and communicative document. By adding annotations, you've anticipated questions, clarified functionality, and created a source of truth for your entire team. This skill is invaluable for a freelancer, as it demonstrates professionalism, reduces project risk, and leads to a much smoother collaboration with clients and developers.
Key Takeaways:
- Annotations are essential notes that explain the how and why behind your design, bridging the gap between layout and functionality.
- They serve multiple stakeholders, including developers, clients, copywriters, and your future self.
- A structured approach involves annotating key areas like interaction behavior, content rules, user flow, and accessibility.
- Figma's Dev Mode provides dedicated tools like annotations and measurements to streamline the handoff process.
Preview of the Next Lesson:
Your wireframe is now fully specified and ready to be reviewed. In the next lesson, "Conduct a wireframe usability walkthrough with a peer," you will present this annotated wireframe to another person to get feedback. The annotations you created today will be your guide, helping you explain the intended user experience and gather crucial insights before moving to high-fidelity design.