Hello! Welcome back to our life simulation game project.
In the last lesson, we brought our characters to life by triggering animations from the interaction menu. When a player selects "Sit," the character visually performs the action. This was a fantastic step in creating believable feedback. However, the action is currently just for show—it has no effect on the character's underlying simulation state.
Today, we will complete the interaction loop. Our goal is to send an interaction command to Rust to update the character's needs and mood upon completion. By the end of this lesson, when your character finishes sitting down, their 'Energy' and 'Fun' needs in the Rust backend will actually increase, and the UI will reflect this change.
This lesson connects the Unity frontend action to the Rust backend simulation, making the game's systems truly interactive.
1. Defining Interaction Effects in Your Data
First, we need to teach our game what an interaction actually does. Just like we defined the animationName in our data, we'll now define the effects. This keeps our design data-driven and easy for us (or modders) to change later.
Open your interactions.json file. Let's add an effects array to the interaction_sit entry. We'll specify that sitting increases energy and provides a small amount of fun.
{
  "id": "interaction_sit",
  "displayName": "Sit",
  "animationName": "SitDown",
  "effects": [
    { "need": "energy", "value": 25.0 },
    { "need": "fun", "value": 5.0 }
  ]
}
Now, let's update our Rust data structures in the backend to understand this new data. You'll need to define a new Effect struct and add a vector of these effects to your InteractionData struct.
// In your Rust project (e.g., in a data_models.rs or lib.rs file)
use serde::{Deserialize, Serialize};


#[derive(Serialize, Deserialize, Debug, Clone)]
pub struct Effect {
    pub need: String, // "energy", "fun", etc.
    pub value: f32,
}


#[derive(Serialize, Deserialize, Debug, Clone)]
pub struct InteractionData {
    pub id: String,
    pub display_name: String,
    pub animation_name: String,
    pub effects: Vec<Effect>,
}

// Ensure your other structs are updated as needed.
Your serde-based JSON loader will now correctly parse these effects into your Rust data model.
2. Handling the Interaction Command in Rust
With the data defined, let's create the Rust function that will receive the command from Unity and apply the effects. This function will be exposed through the FFI.
A good practice when exporting functions is to prefix them to avoid name collisions with other libraries, a tip highlighted in the Resolution Games article on Rust and Unity. We'll use the prefix sim_.
In your lib.rs file, add the following function:
use std::ffi::{c_char, CStr};
// Make sure you have your GameState, Character, Needs, etc. structs accessible.


#[no_mangle]
pub extern "C" fn sim_execute_interaction(interaction_id_ptr: *const c_char) {
    // 1. Safely convert the C string from Unity to a Rust string slice.
    let interaction_id = unsafe {
        if interaction_id_ptr.is_null() {
            return; // Or handle error appropriately
        }
        CStr::from_ptr(interaction_id_ptr).to_str().unwrap_or("")
    };

    if interaction_id.is_empty() {
        return;
    }

    // 2. Access your game state.
    // NOTE: This assumes you have a mutable static GAME_STATE or a similar singleton pattern
    // from our earlier lessons to hold the global state.
    let game_state = &mut GAME_STATE.lock().unwrap();

    // 3. Find the interaction data.
    let interaction = match game_state.interactions.iter().find(|i| i.id == interaction_id) {
        Some(i) => i.clone(), // Clone to avoid borrowing issues
        None => return, // Interaction not found
    };

    // 4. Get the active character and apply effects.
    // For now, let's assume we're always affecting the first character.
    if let Some(character) = game_state.characters.get_mut(0) {
        for effect in &interaction.effects {
            match effect.need.as_str() {
                "energy" => character.needs.energy = (character.needs.energy + effect.value).min(100.0),
                "fun" => character.needs.fun = (character.needs.fun + effect.value).min(100.0),
                "hunger" => character.needs.hunger = (character.needs.hunger + effect.value).min(100.0),
                "social" => character.needs.social = (character.needs.social + effect.value).min(100.0),
                _ => {} // Ignore unknown needs
            }
        }
        // 5. Recalculate mood based on new need values (using logic from Module 5).
        character.recalculate_mood();
    }
}
This function provides the core logic: it receives an ID, finds the corresponding interaction, and updates the character's state. Rebuild your Rust library (cargo build) so Unity can access this new function.
3. A Better Tool: Animation Events
In the last lesson, we used a StateMachineBehaviour to return to Idle. While it worked, it's not ideal for triggering events at a specific point in an animation. A more precise and powerful tool for this is the Animation Event.
An Animation Event allows you to call a function on a script at any frame of your animation clip. This is perfect for our use case: we want to apply the interaction's effects the moment the character has finished the action (e.g., is fully seated).
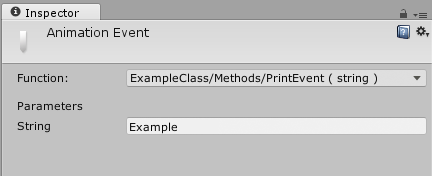
We will use this tool to call a C# function that, in turn, calls our Rust backend.
4. Wiring It All Together in Unity
Let's implement the C# side of this flow. This involves a bit of refactoring to create a cleaner and more robust system.
Step A: Refactor for a Cleaner Return to Idle
First, let's improve our animation system. The OnAnimationComplete script was a good learning step, but we can now centralize the logic.
- In the Unity Animator window, select the
SitDownstate. - In the Inspector, find the
OnAnimationComplete (Script)component and remove it. - We will now handle the return to the
Idlestate from our new command handler.
Step B: Create an Interaction Command Handler
Create a new C# script named InteractionHandler.cs and attach it to your character prefab. This script will be responsible for sending the final command to Rust.
using UnityEngine;

public class InteractionHandler : MonoBehaviour
{
    // A reference to the manager that plays animations.
    private CharacterAnimatorManager animatorManager;
    // A reference to your FFI bridge script.
    private RustBridge rustBridge;

    // We store the ID of the interaction currently being performed.
    private string currentInteractionID;

    void Awake()
    {
        animatorManager = GetComponent<CharacterAnimatorManager>();
        rustBridge = FindObjectOfType<RustBridge>(); // Or however you access your bridge
    }

    /// <summary>
    /// Called by the CharacterAnimatorManager to set the context for the next interaction.
    /// </summary>
    public void SetCurrentInteraction(string interactionID)
    {
        currentInteractionID = interactionID;
    }

    /// <summary>
    /// This public function will be called by our Animation Event.
    /// </summary>
    public void OnAnimationActionPoint()
    {
        if (string.IsNullOrEmpty(currentInteractionID)) return;

        Debug.Log($"Interaction '{currentInteractionID}' reached its action point. Sending command to Rust.");

        // 1. Send the command to Rust.
        rustBridge.ExecuteInteraction(currentInteractionID);

        // 2. Return the character to the Idle state.
        if (animatorManager != null)
        {
            // We pass null for the interaction data because idling has no specific effects here.
            animatorManager.PlayAnimation(null);
        }

        // 3. Clear the ID so we don't accidentally re-trigger it.
        currentInteractionID = null;
    }
}
Step C: Update Your FFI Bridge and Animator Manager
-
FFI Bridge: Open your C# script that contains the
DllImportstatements (e.g.,RustBridge.cs) and add the declaration for our new Rust function.// In RustBridge.cs or similar using System.Runtime.InteropServices; // ... other DllImports [DllImport("your_rust_library_name")] private static extern void sim_execute_interaction(string interactionId); public void ExecuteInteraction(string interactionId) { sim_execute_interaction(interactionId); }P/Invoke will automatically handle converting the C#
stringto a*const c_charfor Rust. -
Animator Manager: Modify
CharacterAnimatorManager.csto communicate with theInteractionHandler.// In CharacterAnimatorManager.cs private InteractionHandler interactionHandler; void Awake() { // ... existing Awake code interactionHandler = GetComponent<InteractionHandler>(); } // Modify PlayAnimation to accept the full InteractionData public void PlayAnimation(InteractionData data) { string animationName = "Idle"; // Default to Idle string interactionID = null; if (data != null && !string.IsNullOrEmpty(data.animationName)) { animationName = data.animationName; interactionID = data.id; } // Set the context on the handler if(interactionHandler != null) { interactionHandler.SetCurrentInteraction(interactionID); } int stateHash = GetAnimationHash(animationName); animator.CrossFade(stateHash, 0.2f); } -
Selection Manager: Finally, update
SelectionManager.csto pass the entireInteractionDataobject to the animator manager.// In SelectionManager.cs, inside the radial menu callback System.Action callback = () => { Debug.Log($"Executing interaction: {data.displayName}"); if (playerAnimatorManager != null) { // This now passes the full data object! playerAnimatorManager.PlayAnimation(data); } // The object state update can remain for now. if (interactable is ChairInteractable chair) { chair.SetOccupied(true); } };
Step D: Add the Animation Event in Unity
This is the final connection.
- Select your character prefab in the scene or project.
- Open the Animation window (
Window > Animation). - From the dropdown menu in the Animation window, select the
SitDownanimation clip. - Drag the timeline scrubber to the frame where you want the effects to apply (e.g., the very last frame).
- Click the Add Event button (it looks like a small marker with a
+). A white marker will appear on the timeline. - With the new event marker selected, go to the Inspector.
- In the Function dropdown, find and select
OnAnimationActionPoint ()from yourInteractionHandlerscript.
Now, run your game. When you click the chair and select "Sit," the following should happen:
- The character plays the
SitDownanimation. - At the end of the animation, the event fires
OnAnimationActionPoint. - A debug message appears, and the command is sent to Rust.
- Rust updates the character's needs. Your UI bars for Energy and Fun should increase!
- The character smoothly transitions back to the
Idleanimation.
Conclusion
Congratulations! You have successfully built a complete interaction loop. A player's choice in the UI now triggers a visual change in Unity, which in turn drives a state change in the Rust simulation backend. This is the fundamental gameplay loop of our life simulation game.
Key Takeaways:
- Data-Driven Effects: We defined the consequences of an interaction (need changes) in our JSON data, making our system flexible.
- Completing the FFI Loop: You exposed a new Rust function and called it from C# to modify the core game state.
- Animation Events: You learned to use Unity's Animation Events to trigger logic at precise moments, a crucial technique for synchronizing gameplay with visuals.
- Refactoring: We improved our animation system by removing the
StateMachineBehaviourand centralizing logic in theInteractionHandler, leading to a cleaner design.
In our next lesson, we will expand on this foundation. We will begin implementing the social side of the simulation by tracking relationships between characters. The interaction system you just built will be the mechanism we use to trigger social interactions that build or break these relationships.