Hello! Welcome to the first lesson of Module 4.
In the previous module, you successfully built a complete character creation system, culminating in saving a character's data profile to a JSON file. We now have the who of our simulation defined. This lesson begins the process of defining the where and the what—that is, the world our characters will inhabit and their physical appearance within it.
Today, we'll focus on sourcing and preparing the visual assets for our game. The learning outcome for this lesson is to import and configure 3D character models from Mixamo and environment assets from Poly Haven. This is a fundamental step in game development, bridging the gap between abstract data and a living, visible 3D world. By the end of this lesson, you'll have a tangible, textured character model ready to be spawned into a basic scene.
1. Sourcing Your Character: An Introduction to Mixamo
First, we need a 3D model to represent the characters you'll be creating. A fantastic free resource for this is Adobe's Mixamo, which offers a library of pre-rigged 3D characters and thousands of animations. For our project, this is the perfect place to get started.
Your first step is to download a base character model. This model will serve as the template for all characters in the game. Later, you can explore using different models, but for now, a single, generic model is ideal for prototyping.
The following video from iHeartGameDev provides an excellent walkthrough of this process.
How to Animate Characters in Unity 3D | Importing Free Characters and Animations from Mixamo
This video will guide you through selecting a character on Mixamo and downloading it with the correct settings for Unity.
Please watch the following sections: Introduction to Mixamo (00:57 - 01:47): This explains how to sign up and select a generic character like 'Y-Bot' or 'X-Bot', which are great for our purposes. Download Settings (01:47 - 02:20): Pay close attention to this short segment. For now, we are only downloading the character model itself, not an animation. The key settings are: Format: FBX for Unity Pose: T-Pose (This is the default neutral pose for a character rig) After selecting the character, go to the 'Animations' tab, search for T-Pose, select it, and then click Download. When the download dialog appears, make sure you select With Skin.
The With Skin option is crucial. It ensures you are downloading the character's 3D mesh and textures along with its underlying skeleton (the "rig"). You only need to do this once for the base model.
2. Importing and Configuring the Character in Unity
Now that you have the downloaded FBX file, it's time to bring it into your Unity project and configure it correctly. This process involves a few specific steps in the Unity Inspector to ensure the model looks and behaves as expected.
Step 1: Import the FBX File
Create a logical folder structure in your Assets window, for example, Assets/Game/Characters. Drag and drop your downloaded FBX file into this folder.
When you drag the character into your scene, you'll immediately notice it's untextured (likely appearing plain white or grey). This is because the materials and textures are embedded within the FBX file and need to be extracted.
Step 2: Extract Materials and Textures
This is a critical step that often trips up developers. The following article provides a very clear, step-by-step guide to fixing the missing textures.
Importing and Animating 3D Models from Mixamo in Unity
This guide from Faramira will walk you through the essential steps of extracting materials and configuring the character's rig after importing it into Unity.
Please read the sections titled 'Extracting Textures and Materials' and 'Setting the Rig and Configuring the Animation'. Follow the instructions carefully: Select your imported character file in the Project window. Go to the Materials tab in the Inspector. Click Extract Textures... and choose a folder (e.g., Assets/Game/Characters/Textures). If you get a prompt about a normal map, click 'Fix Now'. Click Extract Materials... and choose a folder (e.g., Assets/Game/Characters/Materials).
After extracting, your character model in the scene should now appear fully textured.
Step 3: Configure the Rig
The "Rig" tells Unity how the character's skeleton is structured. For applying human-like animations, it's essential to set the Animation Type to Humanoid.
- Select your imported character file in the Project window.
- Go to the Rig tab in the Inspector.
- Set the Animation Type to Humanoid.
- For Avatar Definition, ensure Create From This Model is selected.
- Click Apply.
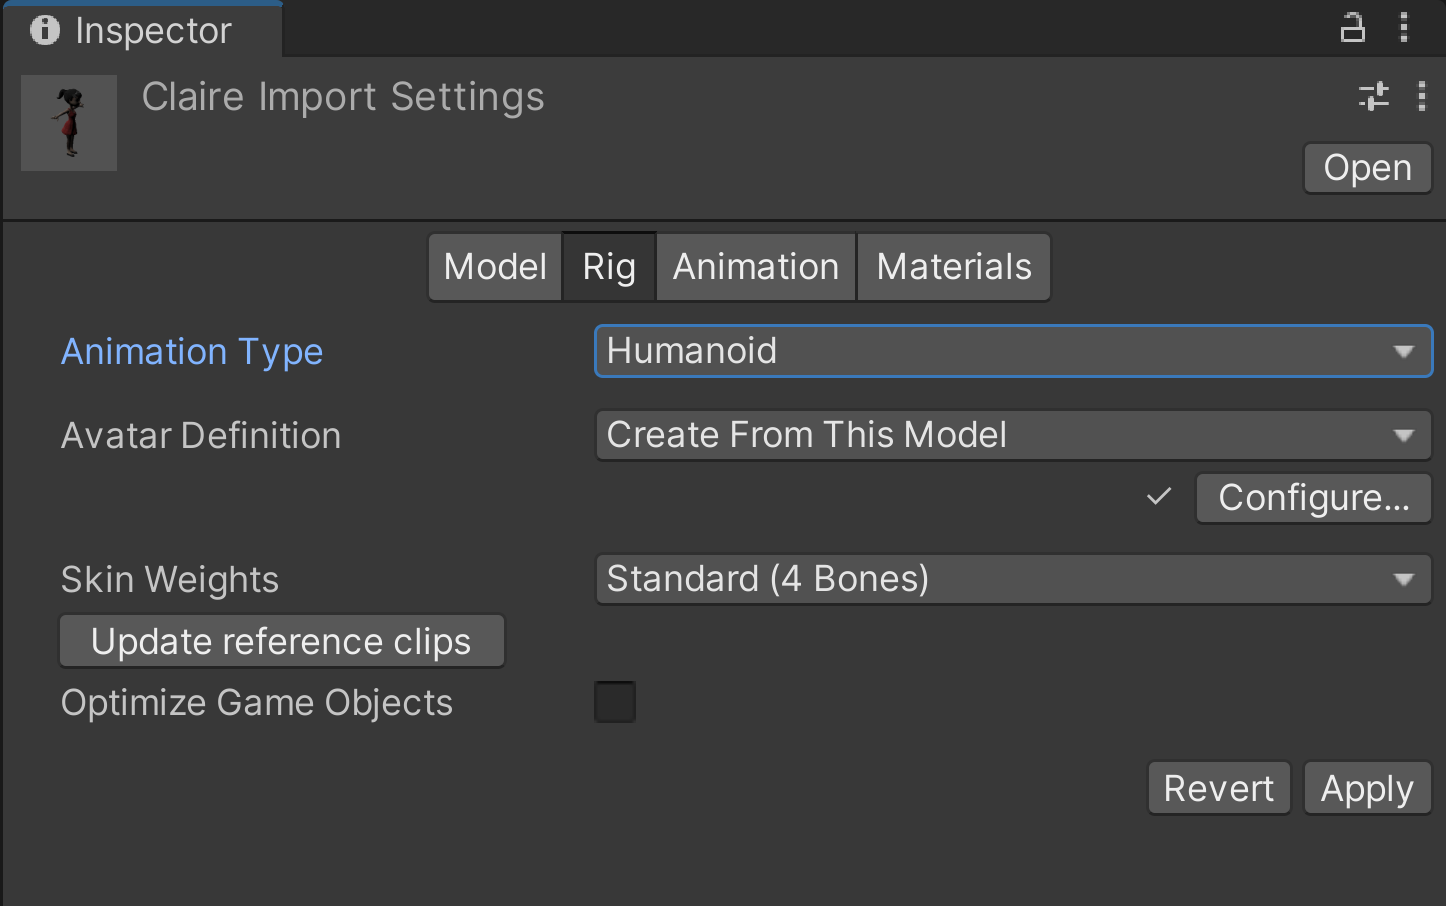
Your character model is now fully configured and ready to be animated. While we won't implement complex animation logic today, it's worth understanding how to get additional animations from Mixamo. Any subsequent animations (like walking, running, or idling) should be downloaded Without Skin. When you import these animation-only FBX files, you'll set their Rig Animation Type to Humanoid but set the Avatar Definition to Copy From Other Avatar, selecting the avatar created from your base character model. This ensures all animations use the same underlying skeleton.
3. Sourcing Environment Assets: An Introduction to Poly Haven
Just as Mixamo is a great source for characters, Poly Haven is an invaluable resource for high-quality, free environment assets. It provides Physically Based Rendering (PBR) textures, materials, and 3D models. PBR materials use a set of textures (maps) to realistically simulate how light interacts with a surface.
We'll start by grabbing a simple ground texture to build a test scene.
The following video from The RealTime Essentials provides a complete guide to finding, downloading, and using PBR materials from Poly Haven in Unity.
The Ultimate BEGINNERS GUIDE to Materials in Unity
This guide will walk you through the entire process of working with PBR materials, from downloading them on Poly Haven to applying them correctly in Unity.
Please watch these two key sections: Finding and Downloading Textures (06:51 - 09:54): Follow along to navigate Poly Haven, select a material (e.g., a concrete, dirt, or grass texture), and download the 2K version. Pay attention to the explanation of the different texture maps (diffuse/albedo, normal, etc.). Importing and Applying in Unity (09:54 - 13:34): This section covers: Importing the downloaded texture maps into your Unity project. Creating a new Material. Assigning the texture maps to the correct slots in the material's Inspector (especially Albedo and Normal Map). Correctly marking the normal map texture type to avoid errors.
4. Practical Application: Building a Test Scene
Let's put everything together to see a tangible result.
- Create a new, empty scene in Unity.
- Create a 3D Plane object (
GameObject -> 3D Object -> Plane) to serve as the ground. Scale it up if you wish (e.g., to X: 5, Y: 1, Z: 5). - Create a new material for the ground using the Poly Haven textures you just downloaded, following the steps from the video.
- Drag this new material onto the Plane in your scene.
- Drag your fully configured Mixamo character from the Project window into the scene and position it on top of the Plane.
You should now have a fully textured character standing on a realistically textured ground plane.

Conclusion
Excellent work! You've successfully sourced and configured the fundamental visual assets for your game. This is a vital skill for any game developer, allowing you to quickly prototype and build out worlds using freely available, high-quality resources.
Key Takeaways:
- Mixamo is your go-to resource for free, rigged 3D characters and animations.
- When importing a Mixamo character into Unity, you must Extract Textures and Extract Materials to make it appear correctly.
- Setting the character's Rig to Humanoid is essential for using standard human animations.
- Poly Haven provides high-quality PBR textures for creating realistic environment materials.
- PBR textures are applied in Unity by creating a Material and assigning the different texture maps (like Albedo and Normal) to the appropriate slots in the shader.
In our next lesson, we will build on this foundation. We'll set up a reusable Unity game scene with proper lighting and placeholders for world objects, creating the stage where your characters will soon come to life.