Hello! Welcome back to our module on supervised learning for classification.
In our last two lessons, you built and evaluated your first classifier, Logistic Regression. You learned how to interpret its predictions and, most importantly, how to measure its performance using a suite of metrics like accuracy, precision, recall, and the confusion matrix.
Today, we'll add a new and fundamentally different algorithm to your toolkit: K-Nearest Neighbors (KNN). It's one of the most intuitive machine learning algorithms. By the end of this lesson, you will be able to train a KNN classifier using scikit-learn and explain its core mechanism. We'll also apply the evaluation skills you just learned to see how well it performs.
1. The Core Mechanism of K-Nearest Neighbors
The central idea behind KNN is simple and can be summed up by the old saying: "You are the company you keep." To classify a new, unknown data point, KNN looks at the other data points in its neighborhood and makes a decision based on the majority.
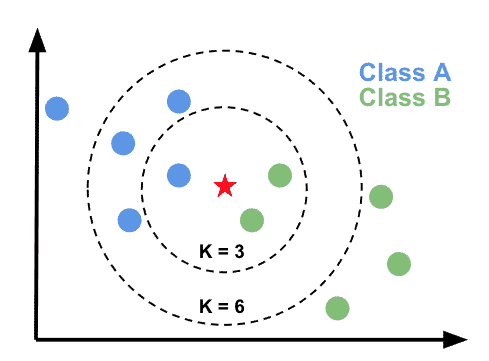
This simple idea has a few key components that define how the algorithm works.
A "Lazy" Learner
Unlike logistic regression, which learns a set of weights (coefficients) during the fit process, KNN doesn't really "learn" a model in the same way. Instead, it simply stores, or memorizes, the entire training dataset. This is why it's called a lazy learning or instance-based algorithm. The actual computation—finding the nearest neighbors—is deferred until a prediction is requested.
To get a deeper understanding of KNN's mechanics, including the crucial role of the 'K' parameter, watch the following video.
K-Nearest Neighbors (KNN) FROM SCRATCH in Python
This video from Harry Connor AI provides an excellent conceptual breakdown of KNN, explaining its lazy nature and the critical trade-offs involved in choosing K.
Watch from the beginning to 03:29. Focus on these key concepts: How KNN uses majority voting for classification. Why it's considered a 'lazy' and 'non-parametric' algorithm. The role of the distance metric (Euclidean distance). The consequences of choosing a 'K' that is too small (overfitting) or too large (underfitting).
As the video explained, the two most important elements to configure for a KNN model are:
-
The Number of Neighbors (K): This is a hyperparameter you must choose.
- A small K (e.g., K=1) makes the model highly sensitive to noise and outliers, potentially leading to overfitting.
- A large K makes the decision boundary smoother but can include points from other classes, leading to underfitting.
- A common practice is to start with an odd number for K (like 3, 5, or 7) to avoid ties in binary classification. We'll explore how to find the optimal K in a later module.
-
The Distance Metric: This defines what "nearest" means. The most common metric is Euclidean distance—the straight-line distance between two points. For two points and in an n-dimensional space, the formula is:
This is essentially the Pythagorean theorem generalized to more than two dimensions. While other metrics exist (like Manhattan or Cosine distance), Euclidean is the default in scikit-learn and a great starting point.
2. The Critical Importance of Feature Scaling
Because KNN relies entirely on distance, it's highly sensitive to the scale of your features.
Imagine you have a dataset with two features: age (ranging from 20-70) and salary (ranging from 50,000-200,000). When calculating the distance, the salary feature, with its much larger range, will completely dominate the calculation. The differences in age will become almost irrelevant.
To prevent this, you must scale your features before training a KNN model. This ensures that all features contribute equally to the distance calculation. A common technique is Standardization, which transforms each feature to have a mean of 0 and a standard deviation of 1.
The following article demonstrates this step in a practical workflow.
k-nearest neighbor algorithm using Sklearn - Python
This article from GeeksforGeeks shows a complete KNN workflow, including the crucial normalization step. We'll focus on that part.
Read only Section 2: Train-Test Split and Normalization. Note how StandardScaler from scikit-learn is used to scale the features after splitting the data. This is a best practice to avoid data leakage from the test set into the training process.
3. Practical Implementation with Scikit-learn
Now let's put it all together and build a KNN classifier. Your background in Python and familiarity with scikit-learn's interface will make this very straightforward. We'll follow a video tutorial that uses the Iris dataset, a classic dataset for classification tasks.
First, let's focus on the model training process.
Machine Learning Tutorial Python - 18: K nearest neighbors classification with python code
This video from 'codebasics' provides a great hands-on guide to implementing KNN in Python.
Watch from 03:29 to 09:13. This segment covers loading data, splitting it, and then instantiating and training the KNeighborsClassifier. Note that for simplicity, the video does not scale the features, but in your own projects, you should always include the scaling step we just discussed!
The core steps to train a KNN model are:
- Import necessary classes:
from sklearn.model_selection import train_test_split from sklearn.preprocessing import StandardScaler from sklearn.neighbors import KNeighborsClassifier - Split your data:
X_train, X_test, y_train, y_test = train_test_split(X, y, test_size=0.3, random_state=42) - Scale your features:
scaler = StandardScaler() X_train_scaled = scaler.fit_transform(X_train) X_test_scaled = scaler.transform(X_test) # Use the same scaler fitted on the training data - Initialize and train the model:
knn = KNeighborsClassifier(n_neighbors=5) # Initialize with K=5
knn.fit(X_train_scaled, y_train)
4. Evaluating the KNN Model
Once the model is trained, we can evaluate its performance using the metrics you learned in the previous lesson. This workflow—train, predict, evaluate—is central to applied machine learning.
Let's see how this is done in the video.
Machine Learning Tutorial Python - 18: K nearest neighbors classification with python code
Now, let's watch the evaluation part of the 'codebasics' tutorial. This will directly connect to what you learned in our last lesson.
Watch from 09:13 to 13:34. Pay attention to how the score() method is used for accuracy and how the confusion_matrix and classification_report provide a more detailed performance breakdown.
As you saw, evaluating the model involves:
- Making predictions on the scaled test set.
- Using scikit-learn's metrics functions with the true labels (
y_test) and the predicted labels.
from sklearn.metrics import confusion_matrix, classification_report, accuracy_score


# Make predictions
y_pred = knn.predict(X_test_scaled)


# Calculate accuracy
print(f"Accuracy: {accuracy_score(y_test, y_pred):.2f}")


# Display the confusion matrix
print("\nConfusion Matrix:")
print(confusion_matrix(y_test, y_pred))


# Display the classification report
print("\nClassification Report:")
print(classification_report(y_test, y_pred))
This process allows you to objectively assess your model and compare it to others, like the logistic regression model you built earlier.
Your Turn: Practice Exercise
Learning machine learning is like learning to swim; you have to get in the water. The codebasics video concludes with an excellent exercise that will help you solidify your understanding.
Machine Learning Tutorial Python - 18: K nearest neighbors classification with python code
I strongly encourage you to complete this exercise. It's the most important part of this lesson for building your practical skills.
Watch the exercise description from 14:00 to 15:36. Your task is to apply KNN to the digits dataset. Try to complete it on your own before looking at the solution. Remember to include the feature scaling step!
Advanced Tip: The exercise asks you to find the optimal value of K. You can do this by manually trying a few values, or you can use a more systematic approach like cross-validation. The GeeksforGeeks article (LINK), in its Section 4, shows how to write a loop with cross_val_score to plot accuracy for different K values. This is a powerful technique you will learn formally in a future module.
Conclusion
Fantastic work! You've successfully added another powerful classifier to your skillset. You not only know how KNN works under the hood but can also implement and evaluate it effectively using standard industry tools.
Key Takeaways:
- KNN is an intuitive instance-based or "lazy" learning algorithm.
- It classifies new data by taking a majority vote from its 'K' nearest neighbors.
- The core mechanism depends on the number of neighbors (K) and the distance metric (usually Euclidean).
- Feature scaling is mandatory for KNN to ensure all features contribute fairly to the distance calculation.
- The implementation workflow in scikit-learn involves
StandardScalerandKNeighborsClassifier.
Preview of the next lesson:
So far, we've seen a model based on a linear equation (Logistic Regression) and a model based on distance (KNN). In the next lesson, we will explore a third type: Decision Trees. This algorithm makes predictions by learning a hierarchy of "if/else" rules from the data, resulting in a model that is highly interpretable and easy to visualize.