Hello! Welcome back to our module on Configuration Management with Ansible.
In the previous lesson, you learned how to write idempotent playbooks using core Ansible modules. We built a complete playbook to configure a web server, but it was all contained within a single file. Just as you wouldn't write a complex application in a single source file, we need a better way to structure our automation as it grows.
This lesson directly addresses that challenge and corresponds to the learning outcome: Organize automation using Ansible Roles with a standard directory structure for reusability. We will explore how to break down monolithic playbooks into modular, reusable, and shareable components called Ansible Roles.
1. The Problem with Monolithic Playbooks
As your automation needs grow, a single playbook file can become hundreds or even thousands of lines long. It becomes difficult to read, maintain, and reuse parts of the logic for different projects.
This is where Ansible Roles come in. Roles enforce a standardized directory structure that separates your variables, tasks, templates, and other components into logical, self-contained units.
Day-04 | Ansible Role in 30 minutes | Write your First Ansible Role
To start, let's watch a short segment from the video "Day-04 | Ansible Role in 30 minutes" by Abhishek.Veeramalla. This will clearly illustrate the limitations of a single large playbook and introduce roles as the solution.
Watch from 00:51 to 09:39. Pay attention to the argument he makes for splitting a large playbook (e.g., one with 50 tasks and 20 variables) into smaller, manageable pieces to improve readability and maintainability.
As the video explains, roles allow you to abstract away complexity and focus on a specific function, like "install a web server" or "configure a database," without getting lost in the details of a massive YAML file.
2. The Standard Role Directory Structure
The power of Ansible Roles comes from their conventional, predictable file structure. When you call a role, Ansible knows exactly where to look for tasks, variables, and other content.
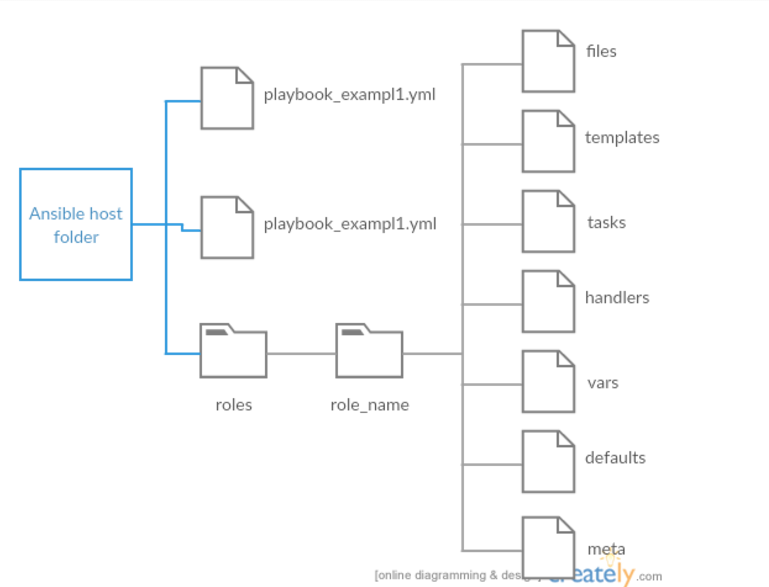
The official Ansible documentation provides the definitive guide to this structure.
Roles — Ansible Community Documentation
Let's read the official Ansible documentation to understand the purpose of each directory within a role. This is the source of truth for how roles are organized.
Read the section titled 'Role directory structure'. Focus on the purpose of each of the seven main directories: tasks, handlers, defaults, vars, files, templates, and meta.
To summarize the key directories you'll use most often:
tasks/main.yml: The main list of tasks to be executed by the role.handlers/main.yml: Handlers, which can be notified by tasks within this role.templates/: Contains template files (using Jinja2 syntax, ending in.j2) that will be processed and copied to the managed node.files/: For static files that are copied directly to the managed node without processing.vars/main.yml: Variables for the role. These have a high precedence and are not easily overridden by the user.defaults/main.yml: Default variables for the role. These have the lowest precedence, making them easy for a user to override.meta/main.yml: Metadata for the role, including dependencies on other roles.
3. Creating and Using a Role: A Practical Walkthrough
Theory is great, but let's put it into practice. We'll refactor the kind of monolithic playbook we discussed in the last lesson into a clean, reusable role.
Ansible provides a helpful command, ansible-galaxy, to generate the skeleton directory structure for you.
# This command creates a new directory 'apache' with all the standard subdirectories
ansible-galaxy init apache
Now, let's watch a video that demonstrates the entire refactoring process. It takes a simple playbook for installing Apache and converts it into a role, then shows how to call that role from a new, much simpler playbook.
Day-04 | Ansible Role in 30 minutes | Write your First Ansible Role
This video from Abhishek.Veeramalla will guide you through the entire process of creating, refactoring, and executing a role.
Watch the following segments to see the end-to-end workflow: Creating the Role Structure (11:56 - 14:57): See how ansible-galaxy role init <role_name> is used to instantly create the standard directory structure. This is the recommended starting point. Refactoring the Playbook (29:04 - 34:10): This is the core of the lesson. Observe how tasks and files are moved from the original playbook's location into their correct places within the new role's directory structure (tasks/main.yml, files/). Note how the original playbook is simplified to just call the role. Executing the Role (34:10 - 38:28): Finally, see how the new, simplified playbook is run. The video also neatly re-demonstrates idempotency by running the playbook a second time.
The process you just watched can be summarized as:
- Initialize: Create the role skeleton with
ansible-galaxy init <role_name>. - Move Tasks: Cut the tasks from your old playbook and paste them into
roles/<role_name>/tasks/main.yml. - Move Supporting Files: Move any static files to
files/and templates totemplates/. Adjust thesrcpaths in your tasks accordingly. - Move Variables: Place user-configurable variables in
defaults/main.ymland role-internal variables invars/main.yml. - Simplify the Playbook: Replace all the old task definitions in your main playbook with a simple
rolessection that calls your new role.
Example: The Refactored Playbook
After refactoring, your main playbook.yml might look as simple as this:
---
- hosts: webservers
  become: yes
  roles:
    - apache  # This assumes a role named 'apache' exists in a 'roles/' directory
All the complexity is now neatly encapsulated within the apache role.
4. Best Practices for Professional-Grade Roles
Creating a role is one thing; creating a good, reusable role is another. For someone with your background, adhering to professional best practices is the next logical step.
Good Practices for Ansible - GPA
The 'Good Practices for Ansible' guide from the Red Hat Community of Practice contains excellent advice for writing high-quality roles. Let's review some key sections.
Read the following sections to understand how to make your roles robust and reusable: Role Structure (Section 3.1.2): Reinforces the importance of a consistent file tree, which you've already learned. Naming parameters (Section 3.1.4): This is critical. Pay close attention to the recommendation of prefixing all role variables with the role's name (e.g., apache_port instead of just port) to avoid naming collisions. Vars vs Defaults (Section 3.1.15): Understand the strategy here. Use defaults/main.yml for any variable a user might want to override. Use vars/main.yml for internal, static values. Create a meaningful README file (Section 3.1.17): A role without documentation is not truly reusable. A good README should explain the role's purpose and list all configurable variables from defaults/main.yml.
These practices are what separate a quick script from a maintainable piece of automation infrastructure. Prefixing variables is especially important in complex plays where multiple roles are used, as all variables exist in a global namespace.
Conclusion
You have now learned how to transition from writing simple playbooks to organizing your automation into professional, reusable Ansible Roles. This is a foundational skill for managing configuration at scale.
Key Takeaways:
- Roles for Organization: Roles use a standard directory structure to break down complex automation into smaller, logical, and reusable units.
ansible-galaxy init: This command is the standard way to create the boilerplate directory structure for a new role.- Directory Purpose: Each directory (
tasks,templates,defaults, etc.) has a specific purpose, which Ansible understands by convention. - Refactoring is Key: The process involves moving tasks, files, and variables from a monolithic playbook into the appropriate directories within a role.
- Best Practices Matter: To create truly reusable roles, you must use clear naming conventions (like
rolename_variable), manage variable precedence withdefaultsandvars, and provide excellent documentation.
What's Next?
In this lesson, we saw the templates directory within a role. In our next lesson, "Generate dynamic configuration files using Jinja2 templates and filters," we will take a much deeper dive into the template module. You will learn how to use loops, conditionals, and filters within your .j2 files to create highly dynamic and intelligent configurations.