Introduction
In our last lesson, we explored git cherry-pick, a surgical tool for backporting specific fixes to release branches. This is crucial when you know what the fix is and where it needs to go. But what happens when the situation is reversed? You know a bug exists in your main branch, but you have no idea which of the last hundred commits is the culprit. Manually checking out and testing each one would be a slow and frustrating process.
This lesson tackles that exact problem. We'll dive into git bisect, a powerful command that automates the hunt for a bug-introducing commit. By the end of this lesson, you will be able to use git bisect to automatically identify the commit that introduced a bug, transforming a potential day of debugging into a task that takes mere minutes.
This command embodies a core principle you'll appreciate from your computer science background: using an efficient algorithm to solve a common, time-consuming problem.
The Core Concept: Binary Search for Bugs
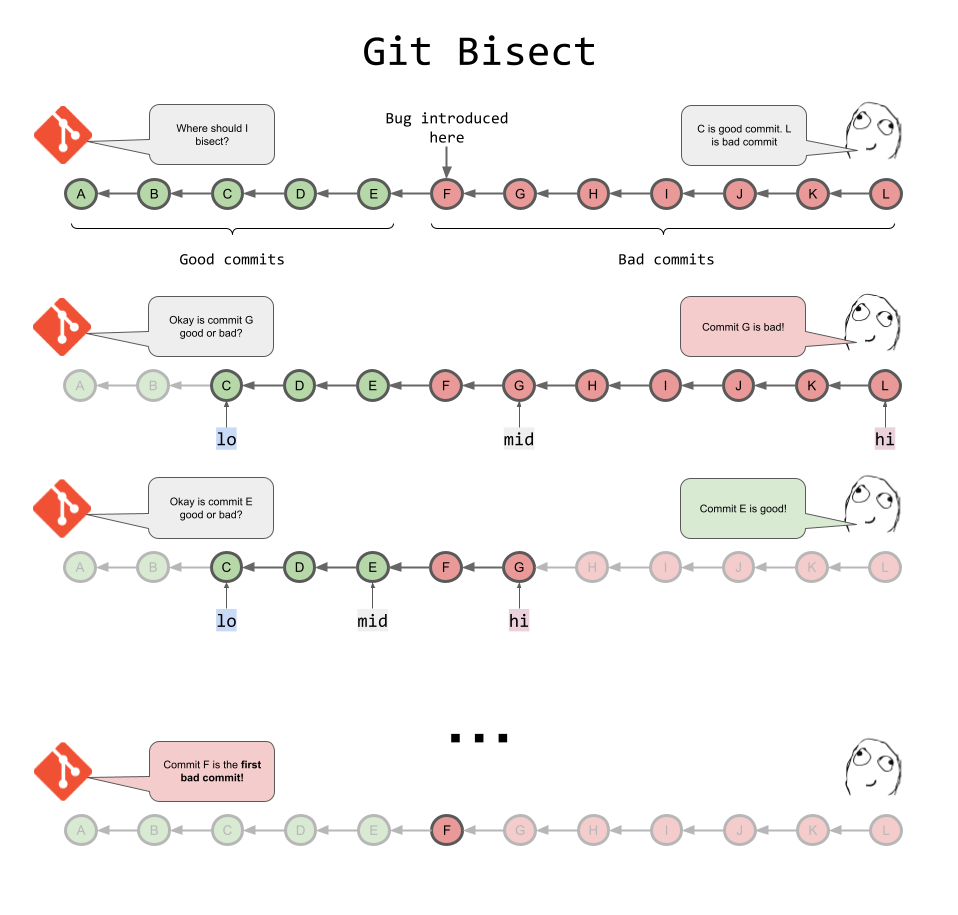
At its heart, git bisect performs a binary search on your commit history. You give it two points in history: a "bad" commit where the bug is present (usually your current HEAD) and a "good" commit where the bug is absent.
git bisect then:
- Checks out the commit in the middle of that range.
- Waits for you to test and tell it if this commit is "good" or "bad."
- Based on your input, it halves the search space and repeats the process on the new, smaller range.
This logarithmic approach is incredibly efficient. As the article "Master Git Bisect" notes, you can search through 100 commits in about seven steps, or 1000 commits in just ten.
The Manual Process: Finding Your Way with good and bad
Before we automate things, it's essential to understand the manual workflow. This process gives you full control and is the foundation for the automated version.
This flowchart provides a great visual overview of the steps involved.

To see this process in action, the following video provides a clear, practical demonstration.
How To Find ANY Bug with Git Bisect
This video, 'How To Find ANY Bug with Git Bisect' by Josef Bender, starts by walking through the manual git bisect process. This will give you a solid feel for the commands before we add automation.
Watch from the beginning to 03:07. Pay attention to the core commands: git bisect start, git bisect bad, git bisect good, and git bisect reset.
As you saw, the manual cycle consists of these key commands:
- Start the session:
# Start the bisect process git bisect start # Mark the current commit as bad git bisect bad HEAD # Mark a known-good commit (e.g., a tag or commit hash) as good git bisect good v1.2.0 - Test and iterate: Git will check out a commit for you. Run your tests to see if the bug is present.
# If the bug is still present git bisect bad # If the bug is gone git bisect good - Finish: Once Git has narrowed it down to the single offending commit, it will print the commit details. You can then end the session and return to your original branch.
git bisect reset
The Automation: git bisect run
Manually testing each step is effective, but it can become tedious. The true power of git bisect is unlocked when you automate it with git bisect run. This command takes a script or command as an argument and runs it on each commit it checks out.
The script's exit code determines the next step:
- Exit code 0: The commit is "good".
- Any non-zero exit code (1-127): The commit is "bad".
This means any test runner that properly exits with a non-zero code on failure (like pytest, npm test, or a simple Bash script) can be used to drive the bisect process automatically.
Let's continue with the video from before to see this concept applied.
How To Find ANY Bug with Git Bisect
The second half of the 'How To Find ANY Bug with Git Bisect' video demonstrates how to automate the process using npm test.
Watch from 03:07 to the end. Notice how git bisect run npm test takes over the manual good/bad cycle.
A Real-World DevOps Scenario: Bisecting a Complex Project
The previous example was simple. But what if your "test" involves more than a single command? In a DevOps environment, you might need to compile code, start services, and then run a test. This is where your scripting skills come in handy.
Let's look at a case study of a developer debugging a complex bug within the Node.js source code itself. This is a perfect analogue for many DevOps tasks where you're troubleshooting issues in large, unfamiliar codebases or complex infrastructure setups.
The key takeaway is to create a wrapper script that performs all the necessary steps to test a single commit.
using git bisect to find a bug in nodejs (intermediate) anthony explains #569
In this video from anthonywritescode, he uses git bisect to find a bug in Node.js. We'll focus on how he constructs his test script to handle a multi-step process.
Watch the segment from 09:48 to 11:18. Pay close attention to how his Repro-bisect.sh script first builds Node.js and then runs the actual test. This is the pattern you would follow for any complex test scenario.
Handling Untestable Commits
In the video, Anthony mentions exit 125. This is a special exit code that tells git bisect to skip the current commit. This is incredibly useful for commits that can't be tested—for example, a commit that fails to compile or has a broken dependency.
If you are running git bisect run ./my-test.sh and the script encounters a build failure, it can exit with 125, and Git will automatically ignore that commit and try another one nearby.
The following article provides a great written reference for these concepts.
Master Git Bisect to Find the Exact Commit That Broke Your Code
The article 'Master Git Bisect' provides excellent text-based explanations of the automation process and advanced techniques.
Read the sections 'Automation with git bisect run' and 'Advanced Techniques'. The latter officially documents the git bisect skip command and the exit 125 convention.
Advanced Use in CI/CD
As a DevOps Engineer, you can take this a step further and integrate git bisect directly into your CI/CD pipelines. Imagine a performance regression is detected in your main branch. You could trigger a GitHub Actions workflow that automatically runs git bisect to find the culprit and report the result.
The "Master Git Bisect" article we just looked at contains a great example of a GitHub Actions workflow for this exact purpose in the "CI/CD Integration Patterns" section. This is a powerful pattern that combines your knowledge of Git, scripting, and CI/CD to build a highly automated debugging system.
Behavioral Interview Tip
The ability to systematically debug a complex issue is a highly valued skill. git bisect is a perfect story for a behavioral interview question.
Question: "Tell me about a time you had to track down a difficult bug. What was your process?"
You can use the STAR method to frame your answer:
- Situation: "A subtle performance regression was reported in our staging environment after a series of features were merged into the
mainbranch. The API response time for a key endpoint had increased by 30%, but it wasn't clear which of the ~50 new commits was responsible." - Task: "My goal was to efficiently identify the exact commit that introduced the latency without disrupting development."
- Action: "First, I wrote a small Bash script that used
curlto hit the endpoint and measure the response time. The script would exit with1if the time exceeded our performance threshold and0otherwise. I identified a known 'good' commit from before the release cycle and marked our currentHEADas 'bad'. I then started an automated bisect session withgit bisect run ./check-perf.sh. The script also handled commits that failed our build process by exiting with125, telling Git to skip them." - Result: "The automated process tested about 6 commits and pinpointed the exact one that caused the regression in under 15 minutes. It turned out to be an inefficient database query. This allowed the responsible developer to create a targeted fix immediately. This systematic approach saved us hours of manual
git logarchaeology and demonstrated the value of automated tooling in our incident response process."
Conclusion
You've now learned how to use git bisect, a powerful debugging tool that leverages a binary search algorithm to find regressions with logarithmic efficiency.
Key Takeaways:
git bisectis a binary search tool for your commit history, used to find the commit that introduced a change (usually a bug).- The manual process involves
git bisect start,git bisect bad, andgit bisect good. - Automation is achieved with
git bisect run <script>, which uses the script's exit code (0for good, non-zero for bad) to drive the process. - Use
exit 125in your script to tellgit bisecttoskipcommits that cannot be tested (e.g., due to build failures).
Preview of the Next Lesson:
We've now seen how to reactively find bugs with git bisect. In our next lesson, we'll shift to being proactive. We'll explore git hooks, which allow you to run scripts automatically at specific points in the Git lifecycle, such as before a commit or before a push. This will enable you to catch issues before they even enter the codebase.