Introduction
In our last lesson, we mastered git bisect, a powerful reactive tool for hunting down bugs after they've been introduced into the codebase. By using a binary search, we could efficiently pinpoint the exact commit that caused a problem.
Now, let's shift our focus from reaction to prevention. What if we could automatically stop bad code from ever entering our commit history in the first place? This is where Git hooks come in. They are scripts that run automatically at specific points in the Git workflow, acting as automated gatekeepers for code quality.
This lesson will teach you how to configure and use Git hooks for pre-commit linting and pre-push test automation. We'll start with the fundamentals of native Git hooks and then move to the industry-standard pre-commit framework, which you'll find indispensable in your DevOps role.
This diagram shows where different hooks fit into the Git workflow. We'll be focusing on the client-side pre-commit and pre-push hooks.
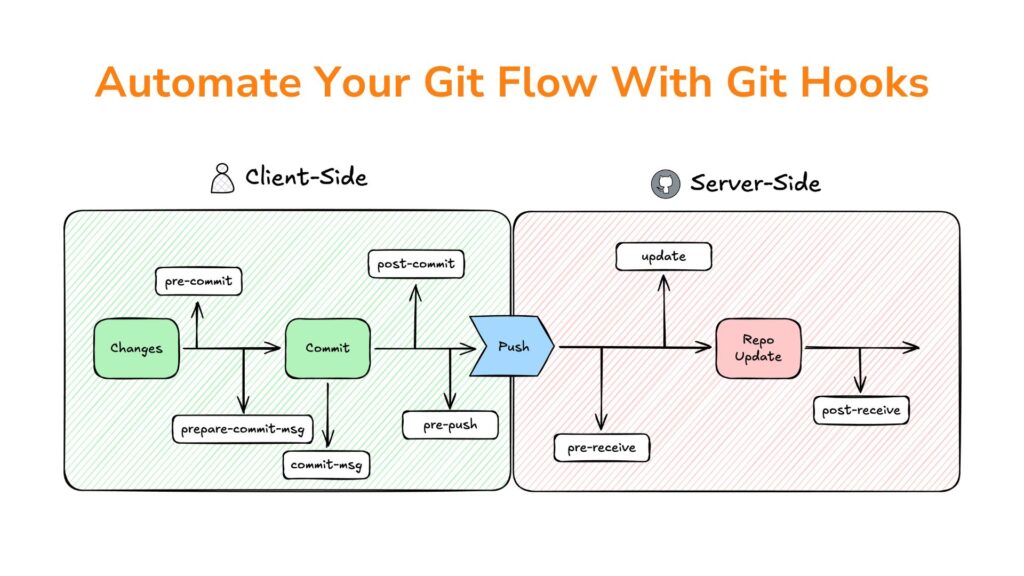
The Fundamentals: Native Git Hooks
At their core, Git hooks are simply executable scripts located in the .git/hooks directory of your repository. When you initialize a repository with git init, Git populates this directory with sample scripts (e.g., pre-commit.sample). To activate a hook, you just need to remove the .sample extension and ensure the script is executable.
These native hooks can be written in any scripting language, but since you're experienced with Bash and the command line, you'll find them quite natural to work with.
To get a solid grasp of how these native hooks work from the ground up, let's watch a video that covers the essentials.
Complete guide to GitHooks - Creating your own pre-commit hooks
The video 'Complete guide to GitHooks' by GitGuardian provides an excellent hands-on introduction. We'll break it down into a few key segments.
Please watch the following segments: What are Git Hooks? (00:00 - 02:18): This explains the concept and the difference between client-side and server-side hooks. Activating a Sample Hook (02:57 - 07:51): This part shows you where the hooks live and how to enable a default hook to see it in action. Creating a Custom Hook (07:51 - 11:00): This demonstrates creating a simple hook from scratch, including the crucial step of making it executable with chmod +x.
A Practical Example: Preventing Secret Commits
One of the most powerful use cases for a pre-commit hook is to prevent sensitive information, like API keys or passwords, from being committed. This aligns perfectly with your interest in cybersecurity.
Let's continue with the same video to see how you can build a hook to scan for hard-coded credentials.
Complete guide to GitHooks - Creating your own pre-commit hooks
This segment of the GitGuardian video demonstrates building a custom pre-commit hook using git grep to detect AWS credentials. It's a great practical example of a DevOps-centric quality check.
Watch from 12:37 to 16:37. Pay attention to how a simple script with a non-zero exit code (exit 1) can block the commit.
The Limitations of Native Hooks
While powerful, native hooks have two significant drawbacks in a team environment:
- They are not version controlled: The
.git/directory is not tracked by Git, so your hooks aren't cloned with the project. - They require manual setup: Every developer on the team must manually install and update the hooks on their local machine.
You could devise workarounds like storing hooks in the main project directory and using symlinks or even using Git's global core.hooksPath configuration, but these solutions add complexity. This is precisely the problem that dedicated frameworks were built to solve.
The Modern Approach: The pre-commit Framework
The pre-commit framework is a language-agnostic tool that manages hook configurations in a simple, version-controlled YAML file. It has become the de-facto standard for managing Git hooks in modern development.
Why use the framework?
- Version Controlled: Your hook configuration (
.pre-commit-config.yaml) lives in your repository. - Easy Setup: A developer just needs to run
pip install pre-commitonce and thenpre-commit installin the repository. - Massive Ecosystem: It supports hundreds of pre-built hooks for various languages and tools, so you don't have to write them from scratch.
Let's walk through setting it up.
How to Configure Pre-commit Hooks for Code Quality
The article 'How to Configure Pre-commit Hooks for Code Quality' from OneUptime provides a clear, text-based guide to getting started with the framework.
Read the sections 'Understanding Git Hooks' and 'Using the pre-commit Framework'. Focus on the installation steps and the structure of the .pre-commit-config.yaml file.
The process is straightforward:
- Install the framework:
pip install pre-commit - Create a
.pre-commit-config.yamlfile in your repository's root. - Install the hooks into your local
.git/hooksdirectory:pre-commit install
Now, every time you run git commit, the pre-commit script will run the hooks defined in your config file against the staged files.
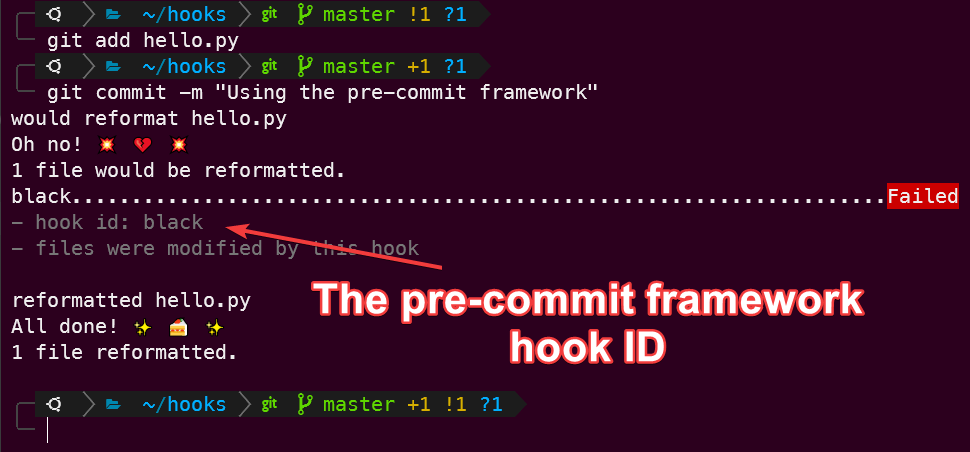
Example: A Polyglot DevOps Configuration
Given your role, you work with many technologies. The pre-commit framework shines here. You can easily create a single configuration file to lint and format Python code, Bash scripts, Terraform files, and more.
Here's an example of what a .pre-commit-config.yaml for a typical DevOps project might look like. This is adapted from the "Multi-Language Projects" section of the OneUptime article.
repos:


# Universal checks
-   repo: https://github.com/pre-commit/pre-commit-hooks
    rev: v4.5.0
    hooks:
    -   id: trailing-whitespace
    -   id: end-of-file-fixer
    -   id: check-yaml
    -   id: check-added-large-files
    -   id: detect-private-key


# Python linting and formatting
-   repo: https://github.com/astral-sh/ruff-pre-commit
    rev: v0.1.14
    hooks:
    -   id: ruff # Linter
        args: ['--fix']
    -   id: ruff-format # Formatter


# Terraform
-   repo: https://github.com/antonbabenko/pre-commit-terraform
    rev: v1.86.0
    hooks:
    -   id: terraform_fmt
    -   id: terraform_validate


# Shell scripts
-   repo: https://github.com/shellcheck-py/shellcheck-py
    rev: v0.9.0.6
    hooks:
    -   id: shellcheck
This single file ensures that no matter what part of the project you're working on, basic quality checks are automatically enforced.
Pre-push Hooks for Slower Tasks like Testing
Linting and formatting are fast, making them perfect for pre-commit. But what about running a test suite? A full test run could take several minutes, which would be frustrating to wait for on every single commit.
The solution is to use a pre-push hook. This hook runs before git push, making it the ideal place for slower, more comprehensive checks.
The pre-commit framework supports this via the stages keyword.
How to Configure Pre-commit Hooks for Code Quality
Let's return to the OneUptime article to see how to configure hooks for different stages.
Read the 'Hook Stages' section. Notice how you can assign a hook to stages: [commit] or stages: [push] and how to install hooks for different types with pre-commit install --hook-type pre-push.
To run your tests, you can define a local hook. This lets you run any command or script on your machine. The following video shows how to configure a local hook to run pytest.
Boost Your Python Code Quality: Pre-commit Tutorial (UV & Ruff)
In this 'Boost Your Python Code Quality' video from Timnology, you'll see a practical demonstration of creating a local hook to run tests.
Watch from 03:33 to 04:33. Pay close attention to the configuration of the local hook, especially the entry which points to the pytest command, and the stages: [push] that you would add to make it a pre-push hook.
Your final configuration for running tests on push would look something like this:
# In your .pre-commit-config.yaml
-   repo: local
    hooks:
    -   id: pytest
        name: Run unit tests
        entry: pytest
        language: system
        stages: [push]
        pass_filenames: false # We want to run all tests, not just changed files
        always_run: true      # Ensure it runs even if no Python files changed
After adding this, you would run pre-commit install --hook-type pre-push to install the push hook.
Behavioral Interview Tip
Automating quality gates is a classic DevOps responsibility and a great story to have ready for an interview.
Question: "Describe a time you improved your team's development process."
You can structure your answer using the STAR method:
- Situation: "My team was spending a significant amount of time in code reviews debating code formatting and style. Occasionally, developers would also accidentally commit large binary files or even secrets, which our CI pipeline would then flag, causing delays."
- Task: "My goal was to automate these quality and security checks on developers' local machines to catch issues before they even reached a pull request."
- Action: "I introduced the
pre-commitframework. I created a.pre-commit-config.yamlfile that included hooks for code formatting (black), linting (ruff), Terraform validation (terraform_fmt), and secret detection (detect-private-key). For slower, more comprehensive checks like our unit test suite, I configured a local hook to runpytestat thepre-pushstage. I documented the simple one-time setup (pre-commit install) in our project'sREADME.mdand held a short demo for the team." - Result: "The adoption of pre-commit hooks immediately reduced the noise in our pull requests, allowing code reviews to focus on business logic rather than style nits. It prevented several accidental secret commits within the first month. By moving fast checks locally, we also made our CI builds slightly faster and provided immediate feedback to developers, improving overall productivity."
Conclusion
You have now learned how to automate code quality checks using Git hooks, moving from the manual, native approach to the more robust and scalable pre-commit framework.
Key Takeaways:
- Git Hooks are scripts that run at key moments in the Git lifecycle.
- Native Hooks live in
.git/hooks/, are powerful but difficult to share and manage in a team. - The
pre-commitframework is the industry standard, using a version-controlled YAML file to manage a vast ecosystem of hooks. - Use
pre-commitfor fast checks like linting and formatting to provide immediate feedback. - Use
pre-pushfor slower checks like unit or integration tests to avoid disrupting the commit workflow.
Preview of the Next Lesson:
With this module on advanced Git workflows complete, we will now shift our focus from the code itself to the environment where it runs. In the next module, "Linux System Administration," our first lesson will be "Explain the Filesystem Hierarchy Standard (FHS) and use find and locate to search for files." This will be the first step in refreshing your practical Linux skills, a cornerstone of any DevOps role.