Introduction
Welcome back! In our last lesson, you mastered the powerful find and xargs combination, learning how to perform safe and efficient bulk operations on files. This gave you control over the static data residing on your system's disks. Now, we'll shift our focus from the static to the dynamic—the running programs and services that bring your system to life.
In your role as a DevOps Engineer, you constantly deal with running applications, background services, and automation scripts. Understanding how to monitor and control these is a critical operational skill. This lesson will equip you with the fundamental tools for that task.
Today, you will learn to manage system processes using ps, top, htop, kill, and nice, including job control. We'll cover how to see what's running, how to interact with processes in your terminal, how to terminate them safely (or forcefully), and how to influence their priority to manage system resources effectively.
What are Processes and Signals?
Before we jump into the commands, it's essential to understand the underlying mechanism the operating system uses for process communication: signals. A signal is a standardized, asynchronous message sent from the kernel or another process to a target process. Think of it as a notification that an event has occurred, prompting the process to take action.
You're already familiar with some signals, even if you don't realize it. When you press Ctrl+C, you're sending the SIGINT (Signal Interrupt) signal. The default action for a process receiving SIGINT is to terminate.
To build a solid mental model of what signals are and why they are fundamental to process management, the following video provides an excellent conceptual overview. Given your computer science background, you'll find its explanation of inter-process communication and signal handling particularly insightful.
Signals: Make Ctrl+C Do Anything You Want
Watch this segment from 'Signals: Make Ctrl+C Do Anything You Want' by Core Dumped. It explains what signals are, their role in communication, and how common keyboard shortcuts map to specific signals.
Watch from 00:20 to 02:19 to understand the concept of signals as a form of inter-process communication. Then, watch from 06:00 to 07:23 and 09:14 to 10:04 to see how the SIGINT signal relates to the Ctrl+C keyboard shortcut.
Viewing and Finding Processes
You can't manage what you can't see. Your first step is always to identify the processes running on your system. There are two primary approaches: static snapshots and real-time dashboards.
Static Snapshots with ps
The ps (process status) command gives you a snapshot of the current processes. Running it alone isn't very useful, but with the right flags, it's incredibly powerful, especially for scripting. The most common combination you'll see and use is ps aux:
a: Show processes for all users.u: Display user-oriented format (shows the user who owns the process).x: Show processes not attached to any terminal (like background daemons).
ps aux
The output gives you a lot of information, but the two most important columns are:
PID: The unique Process ID. This is the primary identifier you'll use to act on a process.COMMAND: The command that launched the process.
To find a specific process, you can pipe the output of ps aux to grep.
# Find all processes related to the SSH daemon
ps aux | grep sshd
A more direct, script-friendly way to get the PID of a process by name is to use pgrep.
pgrep sshd
Real-Time Monitoring with top and htop
While ps is great for a snapshot, top provides a real-time, dynamic view of your system's processes. It's like a task manager for your terminal.
top
top displays system summary information (CPU load, memory usage) and a list of processes sorted by CPU usage by default.
A more modern and user-friendly alternative is htop. It provides a color-coded interface, easier sorting, and a more intuitive layout. If it's not installed, you can typically install it with your system's package manager (e.g., sudo apt install htop or sudo yum install htop).
htop interface showing processes
The htop command provides a real-time, interactive, and color-coded view of system processes, CPU usage, and memory, making it a powerful tool for monitoring system health.
For a concise summary of these tools, the following reading is a great reference.
How To Use ps, kill, and nice to Manage Processes in Linux
Please read 'How To Use ps, kill, and nice to Manage Processes in Linux' from DigitalOcean. This will walk you through the practical use of top, htop, and ps.
Read 'Step 1 – How To View Running Processes in Linux' and 'Step 2 – How To Use ps to List Processes'. Focus on the difference between the dashboard-style output of top/htop and the static output of ps.
Job Control: Managing Processes in Your Shell
When you run a command in your terminal, it typically runs in the foreground, meaning it occupies your shell and you can't enter new commands until it finishes. Job control is a shell feature that lets you manage these interactive processes.
- Run in Background (
&): Add an ampersand (&) to the end of a command to start it as a background job. The shell will return your prompt immediately. - Suspend a Job (
Ctrl+Z): PressCtrl+Zto stop (suspend) the current foreground job. - List Jobs (
jobs): Use thejobscommand to see all jobs (running or stopped) in the current session. - Foreground (
fg): Usefg %<job_id>to bring a background or stopped job back to the foreground. - Background (
bg): Usebg %<job_id>to resume a stopped job in the background.
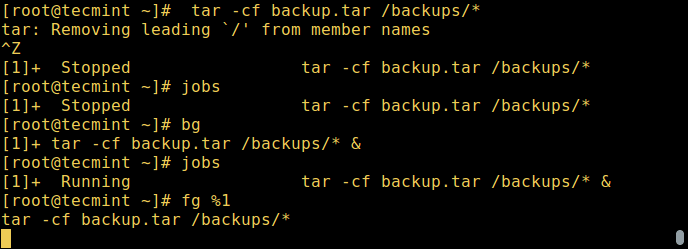
The following video provides an excellent, hands-on demonstration of all these concepts.
KILL Linux processes!! (also manage them) // Linux for Hackers // EP 7
The video 'KILL Linux processes!!' by NetworkChuck provides a very practical and engaging walkthrough of job control.
Watch the segment from 08:56 to 14:26. Follow along as he demonstrates running commands in the background, suspending them, and moving them between the foreground and background.
Sending Signals with kill
The kill command is used to send signals to processes, usually to terminate them. It's a bit of a misnomer, as it can send any signal, not just a termination one.
The basic syntax is kill <PID>.
By default, kill sends the SIGTERM (signal 15). This is a "polite" request, asking the process to shut down gracefully, save its state, and close open files. Most well-behaved applications will listen for SIGTERM and exit cleanly.
However, a stuck or unresponsive process might ignore SIGTERM. In this case, you need to escalate. The SIGKILL (signal 9) is a special, unblockable signal sent directly to the kernel, which immediately terminates the process. This is the "force quit" option. It's effective but should be used as a last resort, as the process gets no chance to clean up.
# First, try a graceful shutdown
kill 12345


# If that doesn't work, force quit
kill -9 12345


# or
kill -SIGKILL 12345
Besides SIGTERM and SIGKILL, other common signals include:
SIGHUP(1): "Hang up". Often used to tell a daemon to reload its configuration file without restarting.SIGSTOP(19): Stops (pauses) a process. UnlikeCtrl+Z'sSIGTSTP,SIGSTOPcannot be caught or ignored.SIGCONT(18): Continues a stopped process.
To make life easier, you can use pkill and killall to send signals using a process name instead of a PID.
pkill <process_name>: Kills a process matching the name (e.g.,pkill firefox).killall <process_name>: Kills all processes with that exact name.
This video segment provides a great walkthrough of the different kill signals and commands.
KILL Linux processes!! (also manage them) // Linux for Hackers // EP 7
Let's return to the NetworkChuck video to see a practical demonstration of terminating processes.
Watch from 04:41 to 06:29 for a basic kill demo. Then, jump to 15:02 and watch until 20:43. This section covers the different kill signals (SIGTERM, SIGKILL, SIGSTOP, etc.) and introduces the handy pkill command.
Adjusting Process Priority with nice and renice
Not all processes are created equal. You might have a critical application that needs CPU time, and a long-running batch job (like compressing logs) that can run whenever the CPU is free. Linux manages this through a concept called niceness.
- The "nice" value ranges from
-20(least nice, highest priority) to19(most nice, lowest priority). - By default, processes start with a nice value of
0. - Only the root user can set negative nice values (i.e., increase a process's priority above the default).
You can use two commands to control this:
-
nice: Start a new command with a specific nice value.# Start a backup script with low priority so it doesn't impact other services nice -n 10 ./backup_script.sh -
renice: Change the priority of a running process.# A log processing task is eating the CPU. Let's make it 'nicer'. # First, find the PID pgrep log-processor # Let's say the PID is 54321 renice 15 54321
You can also change priority interactively in top or htop (usually by pressing 'r'). This is a key skill for managing system load on the fly.
The DigitalOcean article you read earlier has a great section on this.
How To Use ps, kill, and nice to Manage Processes in Linux
Revisit the DigitalOcean article for a clear explanation of process priority.
Read 'Step 4 – How To Adjust Process Priorities'. This section concisely explains the concept of niceness and demonstrates the use of both nice and renice.
Conclusion
You've now covered the essential toolkit for Linux process management. From identifying processes to controlling their execution and priority, these commands give you direct control over the dynamic state of your system.
Key Takeaways:
- Viewing: Use
ps auxfor static snapshots and scripting, andtop/htopfor real-time interactive monitoring. Usepgrepto quickly find PIDs. - Job Control: Use
&,Ctrl+Z,jobs,fg, andbgto manage processes within an interactive shell session. - Termination: Always try to terminate gracefully with
kill <PID>(SIGTERM) before resorting to a forcefulkill -9 <PID>(SIGKILL). Usepkillandkillallfor convenience. - Priority: Understand the concept of "niceness". Use
niceto start a process with a given priority andreniceto change the priority of a running one.
Preview of the Next Lesson:
Managing processes ad-hoc with these tools is powerful, but for long-running applications and services, you need a more robust and systematic approach. In our next lesson, you will learn to configure and manage systemd services, units, and targets to control application lifecycle. This will move us from manual process management to the modern, standard way of running services on Linux.