Introduction
Welcome back! In our previous lesson, we built a solid foundation for navigating the Linux filesystem. You learned about the Filesystem Hierarchy Standard (FHS) and how to use find and locate to track down files based on name, type, and time. This gave you the "where" and "what" of file management.
Now, we'll answer the question, "What's next?" Finding files is powerful, but the real magic happens when you can perform actions on those files in bulk. This lesson bridges that gap.
Today, you will learn to combine find with xargs to perform bulk operations on files and directories safely and efficiently. This combination is a cornerstone of command-line automation and a skill you'll use constantly for tasks like log rotation, data cleanup, and code maintenance. It's a significant step up in your command-line proficiency.
The Missing Link: Why xargs is Essential
In the last lesson, you saw how find can produce a list of files. You might instinctively think you can pipe this list directly to another command, like rm to delete them. Let's see what happens.
# This command will NOT work as you might expect!
find . -name "*.tmp" | rm
This fails because the pipe (|) sends the output of find to the standard input (STDIN) of rm. However, rm, like cp, mv, and chmod, doesn't read file names from standard input; it expects them as command-line arguments.
This is the problem xargs solves. It reads items from standard input (one item per line by default) and converts them into arguments for another command.

For a conceptual overview of why xargs is necessary for commands that require arguments, the following video explains it well.
Part 9 - Unix/Linux for Testers | Piping and Usage of tee and xargs
The video 'Part 9 - Unix/Linux for Testers | Piping and Usage of tee and xargs' clearly explains the distinction between commands that read from standard input and those that need arguments. This will solidify your understanding of the problem xargs is designed to solve.
Watch the segment from 28:28 to 39:01. The key takeaway is understanding why a simple pipe to rm fails and how xargs bridges this gap by converting standard output into command arguments.
The Safe Way: The -print0 and -0 Golden Rule
Now that we know we need xargs, let's try a basic combination.
# Find all .log files and get a long listing
find . -type f -name "*.log" | xargs ls -l
This works great... until you encounter a filename with spaces, like "important log file.log". By default, xargs splits input by spaces and newlines. It would see that filename as four separate arguments: "important", "log", "file.log", causing your command to fail.
This is a critical failure point in scripts. The robust, professional solution is to make find and xargs agree on a "safe" separator: the null character (\0). This character is the only one that cannot appear in a Linux filename.
find ... -print0: This tellsfindto separate its output with null characters instead of newlines.xargs -0 ...: This tellsxargsto expect null-separated input.
This combination is the single most important technique for using find and xargs safely.
Always prefer find ... -print0 | xargs -0 ... for any bulk file operations.
The following video demonstrates this "gotcha" and its solution perfectly.
The video 'Xargs Explained' by TomNomNom is concise and professional. This specific clip is essential as it covers the most common pitfall when using xargs and its standard solution.
Watch the segment from 01:33 to 02:50. This demonstrates the problem with filenames containing spaces and introduces the -print0 and -0 flags as the definitive solution.
Performing Bulk Operations Efficiently
With the safety rule established, let's explore some powerful and efficient use cases relevant to your work as a DevOps engineer.
1. Bulk Deletion (Log & Temp File Cleanup)
A classic task is cleaning up old files. Let's find all files in /var/log ending in .gz (old, compressed logs) that haven't been modified in over 90 days and delete them.
# The -f flag on rm forces deletion without prompting, which is common in scripts.
# Use with caution!
find /var/log -type f -name "*.gz" -mtime +90 -print0 | xargs -0 rm -f
2. Bulk Permission Changes
Imagine you've just pulled a Git repository containing a scripts directory, and you need to make all shell scripts executable.
find ./scripts -type f -name "*.sh" -print0 | xargs -0 chmod +x
3. Controlling Argument Placement with -I
What if you need to copy or move files? The destination path needs to be in the right place. Consider this:
# This will fail! The destination is in the wrong place.
find . -name "*.jpg" -print0 | xargs -0 cp /mnt/backups
xargs places the arguments at the end of the command by default. To control placement, we use the -I option to define a placeholder (often {}). xargs will then run the command once for each input item, replacing {} with the item.
# This works! {} is replaced by each filename.
find . -name "*.jpg" -print0 | xargs -0 -I {} cp {} /mnt/backups/
Note: Using -I implies -n 1, meaning one file is processed per command. This is less efficient than letting xargs batch arguments but is necessary for commands like cp that have a specific argument order.
4. Parallel Processing with -P
Here's where xargs truly shines for efficiency. If you have a task that can be run on multiple files independently (like compressing or converting them) and a multi-core CPU, you can parallelize the work with the -P flag.
Let's say you have a large number of uncompressed log files you want to gzip.
# Get the number of CPU cores on the system
nproc


# Use that number to run gzip jobs in parallel
# Let's say nproc returned 8
find . -type f -name "*.log" -print0 | xargs -0 -P 8 gzip
This will run up to 8 gzip processes simultaneously, dramatically speeding up the total time. You can even use command substitution to make it dynamic:... | xargs -0 -P $(nproc) gzip
The video from TomNomNom also covers these powerful options for control and efficiency.
Let's return to the 'Xargs Explained' video to learn about controlling command structure and unlocking parallel execution.
Watch from 03:47 to 06:06. This part covers: The -I flag for creating a placeholder to control where the input goes. The -P flag for running commands in parallel to maximize efficiency.
Interactive Safety with -p
Sometimes, even in scripts, you might want a final confirmation before a destructive action. The -p flag tells xargs to print the command it's about to run and prompt you for confirmation (y/n).
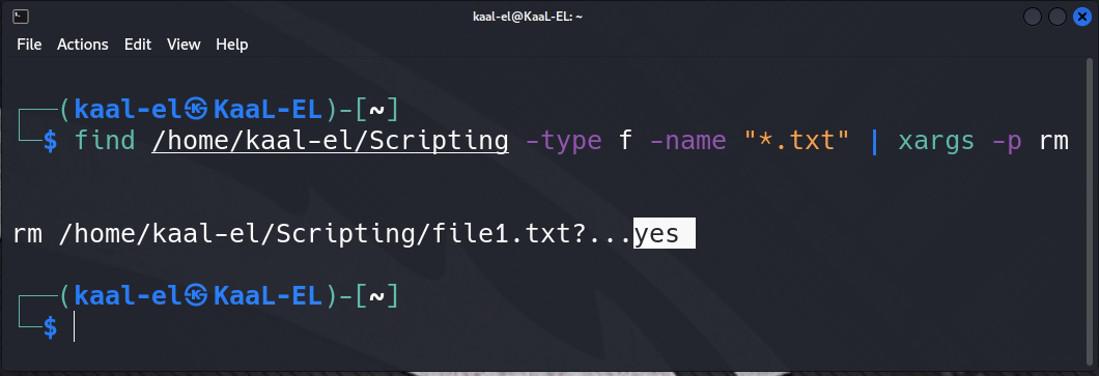
This is an excellent tool for semi-automated tasks where you want a human in the loop.
# Find all .bak files and prompt before deleting each one.
find . -name "*.bak" -print0 | xargs -0 -p rm
Advanced Technique: Running Complex Commands with sh -c
Your scripting background makes this next technique particularly relevant. What if you need to run a command pipeline for each file found? For example, renaming a file and then logging the action.
Pipes are interpreted by the shell, but xargs just constructs a simple command. To run more complex logic, you can have xargs invoke a new shell (sh -c) for each item.
Scenario: Rename all .jpeg files to .jpg.
find . -name "*.jpeg" -print0 | xargs -0 -I {} sh -c 'mv "$1" "${1%.jpeg}.jpg"' -- {}
Let's break this down:
sh -c '...': Tellsxargsto run the command string inside the quotes in a new shell.'mv "$1" "${1%.jpeg}.jpg"': This is the command string.$1refers to the first argument passed to the shell."${1%.jpeg}.jpg"is a Bash parameter expansion that removes the.jpegsuffix and adds.jpg. We'll cover this in more detail in the Advanced Bash module, but it's a powerful string manipulation trick.
-- {}: This is the clever part. The--signals the end of options forsh. The{}(from-I {}) is then passed as an argument to the shell script, becoming accessible as$1inside the command string.
This pattern is incredibly versatile for running complex, multi-step operations on each file found by find.
Conclusion
You've now connected the ability to find files with the power to act on them in a safe, efficient, and scalable way. The find | xargs combination is a fundamental pattern in DevOps automation.
Key Takeaways:
xargsis the bridge between commands that produce lists (likefind) and commands that expect arguments (rm,cp,chmod).- Always use
find -print0 | xargs -0to safely handle filenames with spaces or special characters. - Use
-I {}to control where the filename is placed in the command, which is essential forcpandmv. - Use
-Pto dramatically speed up operations by running them in parallel across multiple CPU cores. - Use
-pfor an interactive confirmation step before executing a command. - For complex per-file logic, use the
xargs ... sh -c '...' -- {}pattern.
Preview of the Next Lesson:
We've focused on managing files on the disk. Next, we'll shift our attention to what's running in memory. You will learn to manage system processes using ps, top, htop, kill, and nice, giving you control over the applications and services running on your Linux system.