Hello! In our last lesson, we covered special permissions like setuid and setgid. These are part of a model called Discretionary Access Control (DAC), where the owner of a file or directory has the discretion to grant or deny access to others.
Today, we're diving into a fundamentally different and more powerful security paradigm. The learning outcome for this lesson is to explain the concept of Mandatory Access Control (MAC) and perform basic troubleshooting of SELinux permission errors.
Unlike DAC, where owners rule, MAC enforces a single, system-wide policy defined by the administrator. This policy is mandatory for everyone and everything, including the root user. SELinux (Security-Enhanced Linux) is the most prominent implementation of MAC in the Linux world. It's notorious for its complexity, but mastering its basics is a crucial skill for a DevOps engineer, as it prevents entire classes of attacks, especially those stemming from application compromises.
In this lesson, we will cover:
- The core differences between DAC and MAC.
- The fundamental concepts of SELinux: modes, contexts, and booleans.
- A repeatable workflow for diagnosing and fixing common SELinux permission denials.
1. From Discretionary to Mandatory Access Control
Before diving into SELinux, it's essential to understand the philosophy behind Mandatory Access Control. Where DAC is about ownership, MAC is about classification and policy. Every process (subject) and every resource (object, like a file or network port) is assigned a security label. The system then consults a central policy to decide if a subject's label allows it to perform a requested action on an object's label.
The owner's wishes are irrelevant. If the policy says "no," the answer is "no."
Access Control Models Explained | DAC MAC RBAC ABAC | Cybersecurity Fundamentals - Infosec Guardians
To solidify this concept, the video 'Access Control Models Explained' provides a clear distinction between the different models. We will focus on what makes MAC unique.
Watch the following sections: Mandatory Access Control (06:19 - 08:37): This section explains the core principle of MAC, using the analogy of security clearances and classified documents. Pay close attention to how access is determined by a central authority, not the file owner. Comparison (13:24 - 15:19): This part compares the strengths and weaknesses of DAC and MAC side-by-side, which will help you understand why MAC is used in high-security environments.
This rigid, policy-driven approach is what makes SELinux so effective at containment. If a web server process is compromised, SELinux policy can prevent it from accessing user home directories or running unexpected commands, even if the process is running as a privileged user.
2. What is SELinux?
SELinux is a Linux Security Module (LSM) that implements MAC. It's enabled by default on Red Hat-based distributions (like RHEL, CentOS, Fedora) and Android, making it a technology you will frequently encounter.
The architecture involves a few key components:
- Subjects: Processes that request access.
- Objects: Resources like files, directories, ports, or devices.
- Policy: A set of rules defining what subjects can do to what objects.
- Security Server: The kernel component that caches and makes access decisions based on the policy.
For a more detailed breakdown of the SELinux architecture and its components, the "Introduction to SELinux" article on the GitHub blog provides a good overview. We will focus on the practical aspects you need to know.
SELinux Modes
SELinux operates in one of three modes. You can check the current mode with sestatus or getenforce.
- Enforcing: The default mode. SELinux is active and will block any actions that violate the policy. Denials are logged.
- Permissive: SELinux is active but does not block actions. It only logs what it would have denied. This is an invaluable mode for troubleshooting.
- Disabled: SELinux is completely turned off. This requires a system reboot to change.
You can switch between enforcing and permissive modes on-the-fly, which is essential for diagnostics.
# Check the detailed status of SELinux
sestatus


# Get just the current mode
getenforce


# Temporarily switch to permissive mode
sudo setenforce 0


# Switch back to enforcing mode
sudo setenforce 1
To change the mode permanently, you must edit the /etc/selinux/config file and reboot.
I Hate SELinux. You Can Too. (Linux+ Objective 2.5.1)
The video 'I Hate SELinux. You Can Too.' offers a very practical, hands-on introduction to these core concepts. The title is tongue-in-cheek, but the content is excellent for getting started.
Watch the following segments to get comfortable with SELinux modes: Introduction (00:00 - 01:06): This sets the stage, explaining what SELinux does and why it's often perceived as frustrating. SELinux Modes (02:08 - 04:10): This covers the three modes and demonstrates the sestatus, getenforce, and setenforce commands. Permanent Configuration (04:10 - 07:10): This shows how to edit /etc/selinux/config to make mode changes persist across reboots.
3. The Language of SELinux: Security Contexts
The "labels" we mentioned earlier are called security contexts in SELinux. Every file, process, and port has one. A context is a string with four parts: user:role:type:range.
user:role:type:range
For day-to-day troubleshooting, the type is the most important component. The SELinux policy is overwhelmingly based on rules that define which types can access other types.
For example:
- A web server process might run with the
httpd_ttype. - Files in
/var/www/htmlhave thehttpd_sys_content_ttype. - A policy rule
allow httpd_t httpd_sys_content_t:file { read getattr open };would permit the web server process to read those files.
You can view file contexts using ls -Z.
ls -Z /var/www/html/index.html


# Output might look like:
# system_u:object_r:httpd_sys_content_t:s0 /var/www/html/index.html
I Hate SELinux. You Can Too. (Linux+ Objective 2.5.1)
Let's return to the 'I Hate SELinux' video to see contexts in action.
Watch the section on SELinux Contexts (08:03 - 11:14). The instructor does a great job of breaking down the user:role:type fields and demonstrating how to view them with ls -LZ.
4. A Practical Guide to Troubleshooting SELinux
When an application fails with a "Permission Denied" error and standard file permissions look correct, SELinux is the prime suspect. Here is a reliable workflow to diagnose and fix the issue.
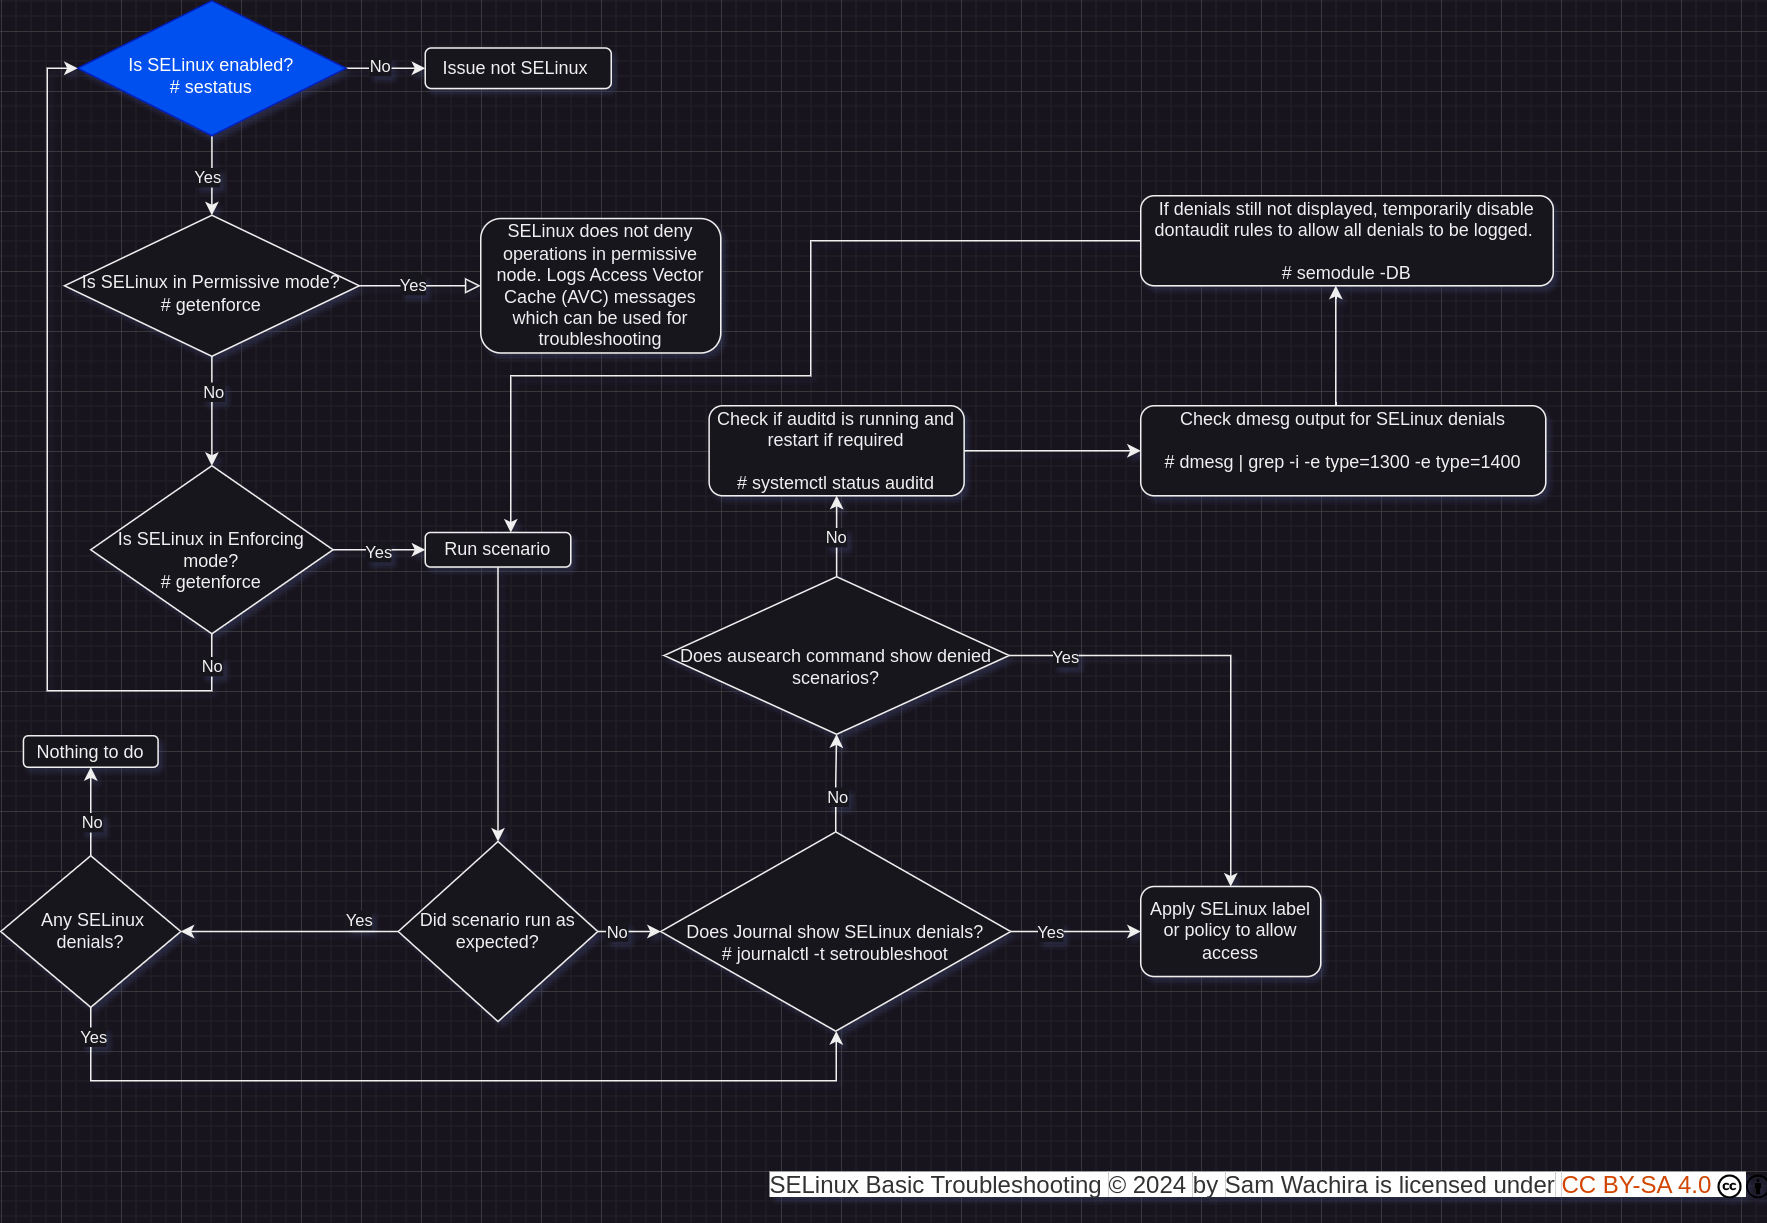
Step 1: Confirm SELinux is the Cause
The first step is always to temporarily put SELinux into permissive mode.
sudo setenforce 0
Now, retry the action that failed.
- If it succeeds, you've confirmed SELinux is the cause.
- If it still fails, the problem lies elsewhere (e.g., file permissions, application config, firewall).
Crucially, switch back to enforcing mode immediately after your test. Never leave a system in permissive mode.
sudo setenforce 1
Step 2: Find and Interpret the Denial Log
SELinux logs all denials as AVC (Access Vector Cache) messages to /var/log/audit/audit.log. This log can be cryptic, but tools exist to help.

The best tool for translating these logs is sealert, which is part of the setroubleshoot-server package.
How to Troubleshoot SELinux Permission Denials
The article 'How to Troubleshoot SELinux Permission Denials' provides an excellent, structured guide to this workflow. We'll use it to understand the diagnostic tools.
Read the following sections to learn how to analyze denial logs: 'Step 1: Confirm SELinux Is the Problem': This reinforces the setenforce diagnostic step. 'Step 2: Read the Audit Log': This introduces the ausearch command to find raw AVC messages. 'Step 3: Use sealert for Human-Readable Analysis': This is the most important part. It explains how to use sealert to get clear explanations and suggested fixes. You may need to install it with sudo yum install setroubleshoot-server or sudo dnf install setroubleshoot-server.
To run sealert, you point it at your audit log:
sudo sealert -a /var/log/audit/audit.log
The output will give you a confidence score, a human-readable reason for the denial, and one or more suggested solutions.
5. Common Problems, Common Solutions
The sealert tool will often point you to one of two common problems.
Problem 1: Incorrect File Contexts
This is the most frequent cause of SELinux issues. It often happens when you mv a file instead of cp-ing it. A moved file retains its original security context, while a copied file inherits the context of the destination directory.
If you mv a file from your home directory (user_home_t) to /var/www/html/ (httpd_sys_content_t), the file will keep its user_home_t context, and SELinux will deny the web server access.
The Fix: restorecon
The restorecon command reads the default file context policies and "restores" the correct contexts to files and directories.
# Restore context for a single file
sudo restorecon -v /var/www/html/badfile.html


# Restore contexts for an entire directory, recursively
sudo restorecon -Rv /var/www/html/
For non-standard directories: If your app uses a custom directory (e.g., /srv/myapp), you must first tell SELinux what the context should be for that path using semanage fcontext, then apply it with restorecon.
I Hate SELinux. You Can Too. (Linux+ Objective 2.5.1)
The 'I Hate SELinux' video has a fantastic demonstration of this exact problem and its solution.
Watch the following practical demonstrations: The mv vs. cp Problem (12:39 - 15:54): This segment clearly shows how moving a file breaks access in enforcing mode, while copying works, and uses ls -LZ to reveal the context difference. Fixing Contexts with chcon and restorecon (16:21 - 20:20): See how to fix the broken context, first manually with chcon (temporary) and then correctly with restorecon (permanent based on policy). Defining Custom Contexts with semanage (22:03 - 24:38): This shows the proper way to handle applications using non-standard directory locations.
Problem 2: The Policy Needs a Minor Tweak (Booleans)
SELinux policies include booleans, which are on/off switches for specific behaviors. For example, by default, SELinux prevents HTTPD from making outbound network connections. If your web app needs to contact a database or an API, you must enable the corresponding boolean.
The Fix: getsebool and setsebool
You can list all booleans and their current state, and then toggle the one you need.
# List all booleans related to httpd
getsebool -a | grep httpd


# Example: Allow httpd to connect to the network
sudo setsebool -P httpd_can_network_connect on
The -P flag is critical—it makes the change persistent across reboots. Without it, the setting will revert.
I Hate SELinux. You Can Too. (Linux+ Objective 2.5.1)
Finally, let's see how to manage these policy switches.
Watch the final segment on SELinux Booleans (24:38 - 30:40). It explains what booleans are and demonstrates how to list, modify, and make them permanent using getsebool, setsebool, and semanage boolean.
Conclusion
You've now taken a significant step from Discretionary Access Control to the more robust world of Mandatory Access Control with SELinux. While it has a steep learning curve, understanding its principles and knowing a basic troubleshooting workflow transforms it from a mysterious obstacle into a powerful security tool.
Key Takeaways:
- MAC vs. DAC: MAC uses a central, system-wide policy that overrides owner permissions, providing stronger security guarantees.
- SELinux Modes:
Enforcingblocks violations,Permissivelogs them, andDisabledturns it off. Use permissive mode for diagnostics. - Context is King: Most SELinux issues boil down to a mismatch between a process's type context and a resource's type context.
- Troubleshooting Workflow:
- Confirm with
setenforce 0. - Check logs with
sealert -a /var/log/audit/audit.log. - If it's a file context issue, fix with
restorecon. - If it's a policy setting, toggle the appropriate boolean with
setsebool -P.
- Confirm with
- Don't Disable It: Learning to work with SELinux is a hallmark of a proficient Linux administrator and DevOps engineer.
Preview of the Next Lesson:
We've now hardened our system at the file and process level. Next, we will turn our attention back to the network. The next lesson's outcome is to capture and analyze network traffic at the packet level using tcpdump for troubleshooting, giving you a deeper view into how services communicate.