Hello! Welcome back to the module on the Kubernetes Ecosystem and Operations.
In our last lesson, you mastered Helm's dynamic templating capabilities, learning to use functions and control structures like if/else and range. This gave you the power to create sophisticated, reusable application packages. Now, it's time to automate the deployment of these packages in a modern, declarative way.
This lesson directly addresses the learning outcome: Explain GitOps principles and deploy an application from a Git repository using ArgoCD. We will explore how GitOps transforms your deployment workflow, moving from imperative "push" commands to a declarative "pull" model where your Git repository becomes the single source of truth for your cluster's state.
By the end of this lesson, you'll understand the "why" behind GitOps and have the practical skills to implement a continuous delivery pipeline using ArgoCD.
Introduction: The Shift from Push to Pull
In your current CI/CD workflows with Jenkins and GitHub Actions, a pipeline typically pushes changes to Kubernetes. The CI server holds credentials and runs kubectl apply or helm upgrade commands to update the cluster.
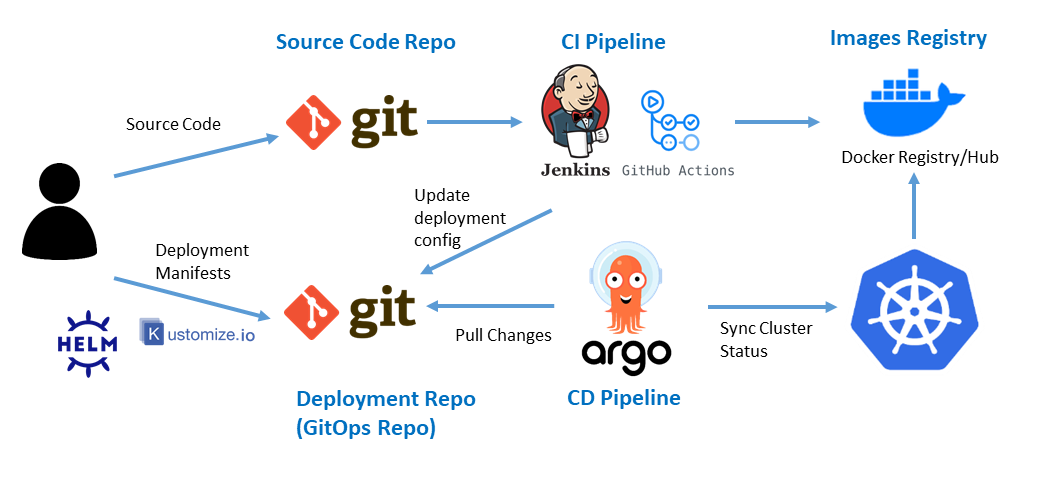
GitOps inverts this model. As the diagram shows, the deployment tool (ArgoCD) lives inside the cluster and constantly watches a Git repository. When it sees a change, it pulls that change and applies it. This seemingly small architectural shift has profound implications for security, visibility, and reliability.
1. Understanding GitOps Principles
Before diving into the tooling, it's essential to grasp the core philosophy of GitOps. It's an operational framework built on four key principles.
GitOps with Argo CD: Step-by-Step Tutorial
The article "GitOps with Argo CD: Step-by-Step Tutorial" by SquareOps provides a crystal-clear definition of GitOps and its principles. This is a great starting point for the theory.
Please read the first two sections, "What is GitOps?" and "The Four Principles of GitOps". Pay close attention to the definition of each of the four principles.
As you read, you'll see GitOps is defined by:
- Declarative Configuration: The entire desired state of your system is described in a declarative format (e.g., Kubernetes YAML).
- Version Controlled: This declarative state is stored and versioned in a Git repository, making Git the single source of truth.
- Automatically Applied: An agent automatically applies changes from the repository to the environment.
- Continuously Reconciled: The agent continuously compares the live state with the desired state in Git and corrects any drift. This is also known as self-healing.
For a dynamic explanation of these concepts and how they contrast with traditional CI/CD, the following video is excellent.
ArgoCD Tutorial for Beginners | GitOps CD for Kubernetes
The video "ArgoCD Tutorial for Beginners" from the TechWorld with Nana channel provides a fantastic visual explanation of the challenges with traditional push-based CD and how the GitOps pull model addresses them.
Watch the first two parts of the video: Introduction and Push vs. Pull (00:00 - 05:44): This section highlights the security and visibility challenges of having external tools like Jenkins push changes to Kubernetes. How ArgoCD Works (05:44 - 11:54): This part explains the GitOps workflow in detail, covering the roles of the application and configuration repositories, and how ArgoCD ensures the Git repo remains the source of truth, even correcting manual changes.
2. Deploying an Application with ArgoCD
Now that you understand the principles, let's put them into practice by deploying an application using ArgoCD. We'll do this declaratively, which is the recommended approach for a production-like environment.
Step 2.1: Install ArgoCD
First, you'll need a Kubernetes cluster. You can use any local cluster like Minikube, Kind, or k3s. The following commands will install ArgoCD into its own namespace.
GitOps with Argo CD: Step-by-Step Tutorial
Let's return to the SquareOps tutorial for the installation commands. They are clear and concise.
Follow the commands in Step 1: Installing Argo CD (using the Non-HA Installation) and Step 2: Accessing the Argo CD Web Interface (using Option A: Port Forwarding). Also, follow the instructions under Getting the Initial Admin Password to log in.
After completing these steps, you should have ArgoCD running in your cluster and be logged into the web UI.
Step 2.2: Define an ArgoCD Application
The core of ArgoCD is the Application Custom Resource Definition (CRD). This resource tells ArgoCD what to deploy (the source Git repository) and where to deploy it (the destination cluster and namespace).
Here is an example of an Application manifest. This is the declarative heart of the GitOps process.
apiVersion: argoproj.io/v1alpha1
kind: Application
metadata:
  name: guestbook
  namespace: argocd
spec:
  project: default
  source:
    repoURL: https://github.com/argoproj/argocd-example-apps.git
    targetRevision: HEAD
    path: guestbook
  destination:
    server: https://kubernetes.default.svc
    namespace: guestbook
  syncPolicy:
    automated:
      prune: true
      selfHeal: true
    syncOptions:
    - CreateNamespace=true
Let's break down the spec:
source: Defines the Git repository (repoURL), the branch/tag to track (targetRevision), and the specific folder within that repo containing the manifests (path).destination: Specifies the target Kubernetes cluster (server) and the namespace to deploy into (namespace).https://kubernetes.default.svcis a special address that refers to the local cluster where ArgoCD is running.syncPolicy: This is critical.automated: Tells ArgoCD to automatically sync changes from Git.prune: true: If a resource is deleted from the manifests in Git, ArgoCD will also delete it from the cluster.selfHeal: true: If ArgoCD detects that the live state has drifted from the Git state (e.g., someone manually scaled a deployment), it will automatically revert the change.CreateNamespace=true: A convenience option to create the destination namespace if it doesn't exist.
Step 2.3: Deploy and Observe
- Save the YAML above as
guestbook-app.yaml. - Apply it to your cluster:
kubectl apply -f guestbook-app.yaml
Now, go to the ArgoCD UI. You will see a new "guestbook" application card appear. Click on it. ArgoCD will automatically:
- Clone the repository.
- Render the Kubernetes manifests from the
guestbookpath. - Apply them to your cluster in the
guestbooknamespace. - Display the health and status of all created resources.
To see the self-healing in action, try this:
- Find the guestbook deployment:
kubectl get deployment -n guestbook - Manually edit it to change the number of replicas:
kubectl scale deployment guestbook-ui --replicas=3 -n guestbook - Watch the ArgoCD UI. Within a few minutes, you'll see the application status become
OutOfSync, and then ArgoCD will automatically scale the deployment back down to the number defined in Git.
The following video demonstrates this entire process, from creating the Application manifest to watching it sync and self-heal.
ArgoCD Tutorial for Beginners | GitOps CD for Kubernetes
Let's watch Nana's demonstration of deploying an application. This will visually reinforce what you've just done and show you what to look for in the UI.
Watch these two segments to see the practical application of the concepts: Creating the Application YAML (31:41 - 40:44): This covers creating the manifest we discussed above, with a detailed explanation of the syncPolicy options. Applying and Testing (40:44 - 47:44): This demonstrates applying the manifest and then tests the automated sync, pruning, and self-healing features live. It's a perfect showcase of GitOps principles in action.
3. Integrating CI with GitOps
You've now seen how ArgoCD handles the Continuous Delivery (CD) part. But where do the manifest changes come from? This is where your CI pipeline fits in.
In a complete GitOps workflow, the CI pipeline's responsibility changes slightly:
- Build and test the application code.
- Build a container image and push it to a registry.
- Update the configuration in the GitOps repository. This is the key step. Instead of running
kubectl, the CI pipeline commits a change to the manifest file (e.g., updating the image tag).
ArgoCD then picks up this commit and handles the deployment. This decouples your build process from your deployment process.
ArgoCD Tutorial for Beginners | DevOps Project 2025 | GitHub Actions, GitOps, Kubernetes
The video "ArgoCD Tutorial for Beginners | DevOps Project 2025" by Inderjeet Singh provides an excellent end-to-end example of this full loop, focusing on the GitHub Actions CI part.
You don't need to build this from scratch, but study the workflow to understand the integration: GitHub Actions CI Pipeline (39:58 - 01:06:25): Scan through this section to see how the GitHub Actions workflow is constructed. Pay special attention to the steps where it builds the image, pushes it, and most importantly, uses a sed command to update the image tag in the deployment.yaml and commits it back to the repository. Demonstrating the Full Loop (01:16:20 - 01:18:49): Watch this final segment. The presenter makes a small code change, pushes it, which triggers the GitHub Actions pipeline. The pipeline updates the manifest in Git, and then you see ArgoCD automatically detect the change and roll out the new version to the cluster. This is the complete CI/CD GitOps flow.
Conclusion
In this lesson, you've bridged the gap between packaging applications with Helm and deploying them automatically and reliably. You've learned the core principles of GitOps and seen how tools like ArgoCD implement them to create a secure, auditable, and self-healing deployment system.
Key Takeaways:
- GitOps uses Git as the single source of truth for your cluster's desired state.
- It employs a pull model, where an in-cluster agent (ArgoCD) reconciles the state, rather than a push model where an external tool runs commands.
- This model provides self-healing, automatically correcting any drift between the live state and the state defined in Git.
- The ArgoCD
ApplicationCRD is the declarative link between your Git repository and your Kubernetes cluster. - CI and CD are decoupled: CI builds artifacts and updates the GitOps repo; CD (ArgoCD) syncs the state from the repo to the cluster.
What's Next?
Now that you have a powerful, automated way to manage Kubernetes applications, the next step is to deploy a crucial piece of the operational stack: monitoring. In the next lesson, "Deploy and configure a Prometheus and Grafana stack for Kubernetes monitoring," you will apply your new GitOps skills to deploy and manage your observability platform, ensuring it's as reliable and version-controlled as the applications it monitors.