Hello! Welcome back to our module on Kubernetes Ecosystem and Operations.
In the last lesson, we took a significant step forward by packaging an application into a Helm chart. You learned to templatize manifests by substituting static values with references to values.yaml, and how to use environment-specific values files to customize deployments. This is the foundation of managing Kubernetes applications at scale.
However, simple value substitution has its limits. What if you need to create a resource only in a specific environment? Or iterate over a list of configuration items? This is where Helm's more advanced templating capabilities come into play.
This lesson directly addresses that need by focusing on the learning outcome: Use Helm template functions and control structures (if/else, range) to dynamically generate manifests. We'll move beyond basic placeholders and unlock the full power of the Go templating engine that Helm uses.
By the end of this lesson, you will be able to:
- Use functions and pipelines to transform values.
- Implement conditional logic with
if/elseblocks. - Iterate over lists and maps using
range. - Create reusable template snippets with
_helpers.tpl.
1. Helm Functions and Pipelines
At the heart of Helm's templating engine is the concept of functions and pipelines. You've already used simple value access like {{ .Values.replicaCount }}. A pipeline allows you to take that value and pass it through a series of functions, where the output of one becomes the input of the next. The pipe character | is used for this.
For example:{{ .Values.appName | upper | quote }}
This pipeline does three things:
- It retrieves the value of
appNamefromvalues.yaml. - It passes this value to the
upperfunction, which converts it to uppercase. - The result of
upperis then passed to thequotefunction, which wraps it in double quotes, ensuring it's a valid YAML string.
Helm includes all of the functions from Go's Sprig library, giving you a vast toolkit for string manipulation, math, type conversions, and more.
Mastering Helm Template Functions and Pipelines
The article "Mastering Helm Template Functions and Pipelines" from OneUptime is an excellent reference for the functions available. You don't need to memorize them all, but it's good to be aware of what's possible.
Please review the sections on Pipelines and String Functions. This will give you a solid idea of how functions are chained together and the common operations you can perform on strings.
2. Conditional Logic with if/else
One of the most common requirements in advanced charting is conditional logic. For example, you might want to create an Ingress resource only if a specific value is set to true in your values.yaml. This is handled with if/else blocks.
The basic syntax is:
{{- if .Values.ingress.enabled }}
apiVersion: networking.k8s.io/v1
kind: Ingress
metadata:
  name: {{ .Release.Name }}-ingress
spec:


  # ... ingress spec
{{- end }}
{{- if PIPELINE }}: The block is rendered only if the pipeline evaluates totrue. In Helm,false,0,nil, and empty strings/lists/dicts are considered false. Everything else is true.{{- end }}: This closes theifblock.{{-and-}}: Notice the hyphens. These are for whitespace control.{{-removes whitespace to its left, and-}}removes it to its right. Using them is crucial for generating clean, valid YAML.
You can also build more complex logic with else if and else, using comparison functions like eq (equal), ne (not equal), gt (greater than), etc.
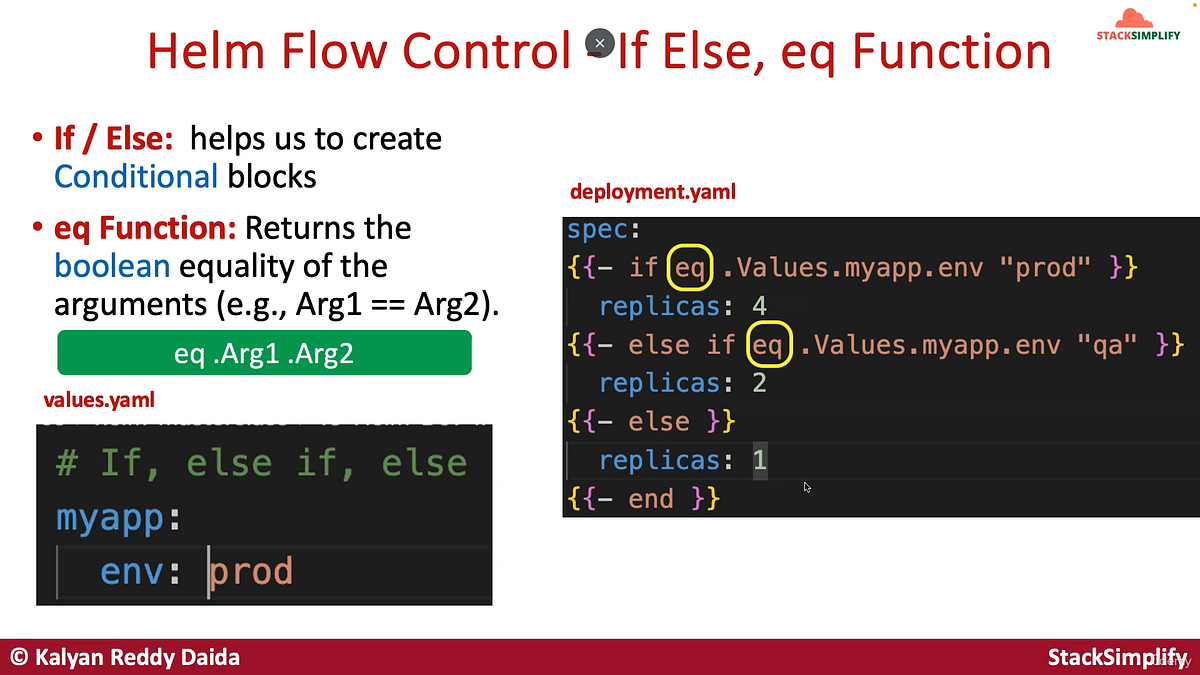
To dive deeper into the syntax and rules, the official Helm documentation is the best source.
The official Helm documentation provides a clear explanation of flow control structures.
Please read the sections If/Else and Controlling Whitespace. Pay close attention to how values are evaluated as true or false and the use of {{- to manage YAML indentation.
3. Iterating with range
The range action allows you to loop through collections like lists (slices) and dictionaries (maps). This is incredibly useful for dynamically generating repeated blocks of YAML.
Ranging over a List
Imagine you want to define multiple container ports from a list in values.yaml:
values.yaml:
ports:
  - name: http
    containerPort: 80
  - name: metrics
    containerPort: 9100
deployment.yaml template:
ports:
{{- range .Values.ports }}
- name: {{ .name }}
  containerPort: {{ .containerPort }}
{{- end }}
Inside the range block, the dot (.) is scoped to the current item in the iteration. In the first loop, . refers to the first port object ({name: http, containerPort: 80}), and so on.
Ranging over a Dictionary
You can also iterate over key-value pairs in a map, which is perfect for generating labels or annotations:
values.yaml:
podAnnotations:
  prometheus.io/scrape: "true"
  prometheus.io/port: "9100"
deployment.yaml template:
spec:
  template:
    metadata:
      annotations:
      {{- range $key, $value := .Values.podAnnotations }}
        {{ $key }}: {{ $value | quote }}
      {{- end }}
Here, range assigns the key to $key and the value to $value for each item in the map.
Let's return to the official Helm documentation to understand the range action.
Read the section Looping with the range action. Focus on how the scope of . changes within the loop and the different ways range can be used for lists and maps.
4. Reusable Logic with Named Templates
As your charts grow, you'll often find yourself repeating the same snippets of code. A common example is the block of labels applied to every resource. Instead of copying and pasting, you can define this logic once in a named template and include it wherever needed.
These reusable templates are traditionally defined in the _helpers.tpl file. The define action creates the template, and include renders it.
This short video from Infrasity provides a concise explanation of what _helpers.tpl is for and how to use it.
Watch the segments explaining what helpers.tpl is (00:39 - 02:23), the syntax for defining a template (02:36 - 04:20), and how to call it using template or include (04:20 - 05:01).
5. Putting It All Together: A Comprehensive Example
Now that you understand the individual components, let's see how they work together in a realistic scenario. The following video demonstrates how to build a single, flexible Helm chart that can be deployed across multiple environments with significantly different configurations.
This walkthrough is dense but extremely practical for your role as a DevOps Engineer. It covers:
- Using
if/endto conditionally enable/disable the HPA. - Using named templates (
include) andnindentfor reusable labels. - Rendering entire YAML blocks from
values.yamlusingtoYaml. - Dynamically selecting and rendering entire configuration files using variables,
printf, and the.Files.Getfunction.
Single Helm Chart, Multiple environments
The video "Single Helm Chart, Multiple environments" by Deekshith SN is a masterclass in dynamic templating. It shows how to solve real-world configuration challenges.
Watch the following key segments. Pay close attention to the templating syntax being used to solve each problem: Rendering YAML Blocks (toYaml) (10:24 - 13:00): See how an entire resources block is defined in values.yaml and rendered into the template using the toYaml and nindent functions. This is a powerful pattern for complex, nested configurations. Using Named Templates (include) (13:00 - 17:12): Observe how a common set of labels is defined once in _helpers.tpl and then reused across different manifests using include. Conditional Resource Creation (if) (17:12 - 18:34): This shows how a boolean in values.yaml is used with an if block to control whether the HPA manifest is generated at all. Managing External Config Files (26:01 - End): This is an advanced but very common use case. Watch how the chart is designed to handle both YAML and non-YAML (XML) configuration files that vary per environment. Notice the use of toYaml for embedded YAML and the combination of printf and .Files.Get for external files. This demonstrates true dynamic manifest generation.
6. Debugging Your Dynamic Templates
As templates become more complex, debugging becomes essential. You need to be able to see the final rendered YAML before applying it to a cluster.
The helm template and helm install --dry-run commands are your best friends here.

A common debugging technique is to temporarily use the fail function to print out a value and stop the rendering process: {{ .Values | toPrettyJson | fail "Dumping values" }}. This will print the entire .Values object in a readable format.
Conclusion
You have now moved from basic value substitution to advanced dynamic manifest generation. By mastering functions, pipelines, and control structures, you can create professional, reusable, and highly flexible Helm charts that can adapt to any environment or configuration requirement.
Key Takeaways:
- Pipelines (
|) chain functions together to transform data. if/elseblocks provide conditional logic to include or exclude parts of a template based on values.rangeiterates over lists and maps, allowing you to generate repetitive YAML structures dynamically.- Named templates (
define/include) in_helpers.tplpromote code reuse and maintainability. - Functions like
toYamland.Files.Getenable you to manage complex configuration blocks and entire files within your chart.
What's Next?
You've now mastered how to package and configure your applications with Helm. The next logical step is to automate the deployment of these packages. In the next lesson, we will explore the principles of GitOps and use ArgoCD to automatically deploy an application from a Git repository whenever changes are made. This will connect your packaging skills to a modern, declarative deployment workflow.