Hello! Welcome to the "Kubernetes Ecosystem and Operations" module.
In our previous module, you mastered several advanced AWS topics, culminating in a deep dive into cost optimization. This skill is crucial for any senior DevOps role. Now, we shift our focus to the Kubernetes ecosystem, building upon the solid foundation you've established with your CKA studies. While the CKA focuses on building and managing the cluster itself, this module is about running applications on it securely, efficiently, and reliably.
Our first lesson directly addresses the learning outcome: Secure a Kubernetes cluster using a combination of RBAC, Network Policies, and Pod Security Standards.
We will explore three fundamental pillars of Kubernetes security, each answering a critical question:
- Role-Based Access Control (RBAC): Who can do what? This controls access to the Kubernetes API itself.
- Network Policies: How can pods communicate? This isolates workloads at the network level.
- Pod Security Standards (PSS): What can a pod do? This hardens your workloads by restricting their capabilities at the host level.
By the end of this lesson, you'll understand how these three mechanisms provide a powerful defense-in-depth strategy for your cluster.
1. Network Policies: Isolating Workloads at the Network Layer
By default, Kubernetes has a "flat" network where any pod can communicate with any other pod in the cluster. This is convenient for development but represents a significant security risk in production. If one pod is compromised, it can potentially attack any other service in the cluster.
Network Policies allow you to segment this network, acting as a firewall for your pods. You define rules that specify which pods are allowed to communicate with each other. This enforces the principle of least privilege at the network level.
A critical point to remember is that Network Policies are not enforced by Kubernetes itself but by the Container Network Interface (CNI) plugin. Your CKA experience likely introduced you to this, but it's worth restating: if your CNI (like the default kindnet in Kind or Flannel) doesn't support them, your policies will be created but will have no effect. CNIs like Calico and Cilium are popular choices specifically because they offer robust policy enforcement.
Let's watch a few segments from a detailed video that walks through a realistic scenario.
Day 47: Kubernetes Network Policies Explained with Real-World Demo | CKA Course 2025
The video "Kubernetes Network Policies Explained with Real-World Demo" by Cloud With VarJosh provides an excellent breakdown. We'll focus on the conceptual parts and a key troubleshooting step you're likely to encounter.
Please watch the following segments: The 'Why' (00:00 - 05:05): This section introduces a classic three-tier application and explains the problem with the default 'allow-all' network model. The 'What' (05:05 - 11:06): This is a great refresher on what Network Policies are, the concepts of ingress (incoming) and egress (outgoing) traffic, and the crucial role of the CNI. Designing the Rules (15:38 - 21:41): Pay close attention here. Before writing any YAML, the video logically breaks down the required ingress and egress rules for each tier (frontend, backend, database). This thought process is exactly what you'd do in a real-world design. Troubleshooting DNS (52:50 - 01:06:08): This is the most important part. After applying an egress policy, DNS resolution for service names (backend-svc) suddenly fails. The video demonstrates why this happens (the egress policy is now blocking traffic to CoreDNS) and how to fix it by adding a specific rule to allow DNS traffic. This is a common and valuable real-world problem to understand.
As the video demonstrates, a common and powerful strategy is to start with a "default deny" policy for a namespace, which blocks all ingress and egress traffic. Then, you can add specific policies to allow only the required communication paths.
A Practical Guide to Kubernetes Security: Hardening Your Cluster in ...
The article "A Practical Guide to Kubernetes Security" provides a quick, practical example of this "deny by default" approach.
Read the section titled "Network Segmentation: Deny by Default". It shows two YAML manifests: the first is a simple policy that denies all traffic in a namespace, and the second is a specific rule to allow traffic from a 'web' pod to a 'db' pod. This reinforces the pattern we saw in the video.
By mastering Network Policies, you prevent lateral movement by attackers, a foundational step in securing your cluster.
2. Role-Based Access Control (RBAC): Securing the API Server
While Network Policies control pod-to-pod traffic, RBAC controls who can interact with the Kubernetes API server. It answers questions like:
- Can this user list pods in the
prodnamespace? - Can this application running in a pod update a ConfigMap?
Kubernetes RBAC is built on four main objects:
- Role: A set of permissions (verbs like
get,list,createon resources likepods,services) within a single namespace. - ClusterRole: The same as a Role, but the permissions are cluster-wide.
- RoleBinding: Binds a Role to a subject (a User, Group, or ServiceAccount), granting those permissions within that Role's namespace.
- ClusterRoleBinding: Binds a ClusterRole to a subject, granting those permissions across the entire cluster.
As a DevOps Engineer, you are most often concerned with granting permissions to applications, not human users. This is done via ServiceAccounts. Every pod runs with a ServiceAccount, which provides its identity to the API server. By binding a Role or ClusterRole to a pod's ServiceAccount, you grant it the precise permissions it needs to function.
This video, "RBAC in Kubernetes" from Pavan Elthepu, provides a clear walkthrough of the core RBAC components. We'll focus on the part most relevant to your work: service accounts.
Watch the following two segments: Service Accounts (16:02 - 18:55): This section explains what ServiceAccounts are and demonstrates a common scenario: a pod needing to list other pods. It shows how, by default, the pod is forbidden, and how creating a ServiceAccount and binding a role to it grants the necessary permission. Checking Permissions (18:55 - 20:04): The kubectl auth can-i command is an indispensable tool for debugging RBAC issues. This short segment shows you how to use it to check permissions for yourself or to impersonate a ServiceAccount.
The guiding principle for RBAC is least privilege. Always start with the minimum required permissions. Prefer namespaced Roles and RoleBindings over cluster-wide ones whenever possible. Avoid granting permissions to the default ServiceAccount; instead, create dedicated ServiceAccounts for your applications.
A Practical Guide to Kubernetes Security: Hardening Your Cluster in ...
Let's reinforce these best practices with another look at the "Practical Guide to Kubernetes Security."
Read the section "Authentication and Authorization (RBAC) Done Right". It provides a concise YAML example of a least-privilege setup: creating a dedicated ServiceAccount, a Role with read-only permissions, and a RoleBinding to connect them. It also highlights the important practice of disabling auto-mounting of the service account token if the pod doesn't need to talk to the API server.
3. Pod Security Standards (PSS): Hardening the Workload
We've secured the network and the API. The final layer is securing the pod itself. What privileges does the pod have on the underlying host node? This is where Pod Security Standards (PSS) come in.
PSS define three distinct security profiles for pods:
- Privileged: Unrestricted. Essentially grants the pod root-level access to the host. This should be avoided except for specific system-level components.
- Baseline: A minimally restrictive policy that prevents known privilege escalations. It's a good default for many applications.
- Restricted: A highly restrictive policy that follows current pod hardening best practices. This is the ideal target for security-critical applications.

Instead of applying these policies pod by pod, you enforce them at the namespace level using Pod Security Admission (PSA). By adding labels to a namespace, you instruct the API server to enforce a certain policy level, audit violations against another, or simply warn about them.
How To Get Started With Kubernetes: A Practical Guide
The article "How To Get Started With Kubernetes: A Practical Guide" has an excellent, easy-to-follow demonstration of PSA in action.
Read the sections "Pod Security Standard (PSS)" and "Pod Security Admission (PSA)". The PSA section shows a clear example: A namespace is created with labels that enforce the baseline profile. An attempt to create a pod that violates the baseline policy (by setting hostNetwork: true) is immediately rejected by the API server. Another attempt to create a pod that violates the more stringent restricted profile (by not running as non-root) is allowed but triggers a warning, because the namespace was configured to only warn on restricted violations.
To make a pod compliant with the restricted standard, you must configure its securityContext. This YAML block defines privilege and access control settings for a Pod or Container.
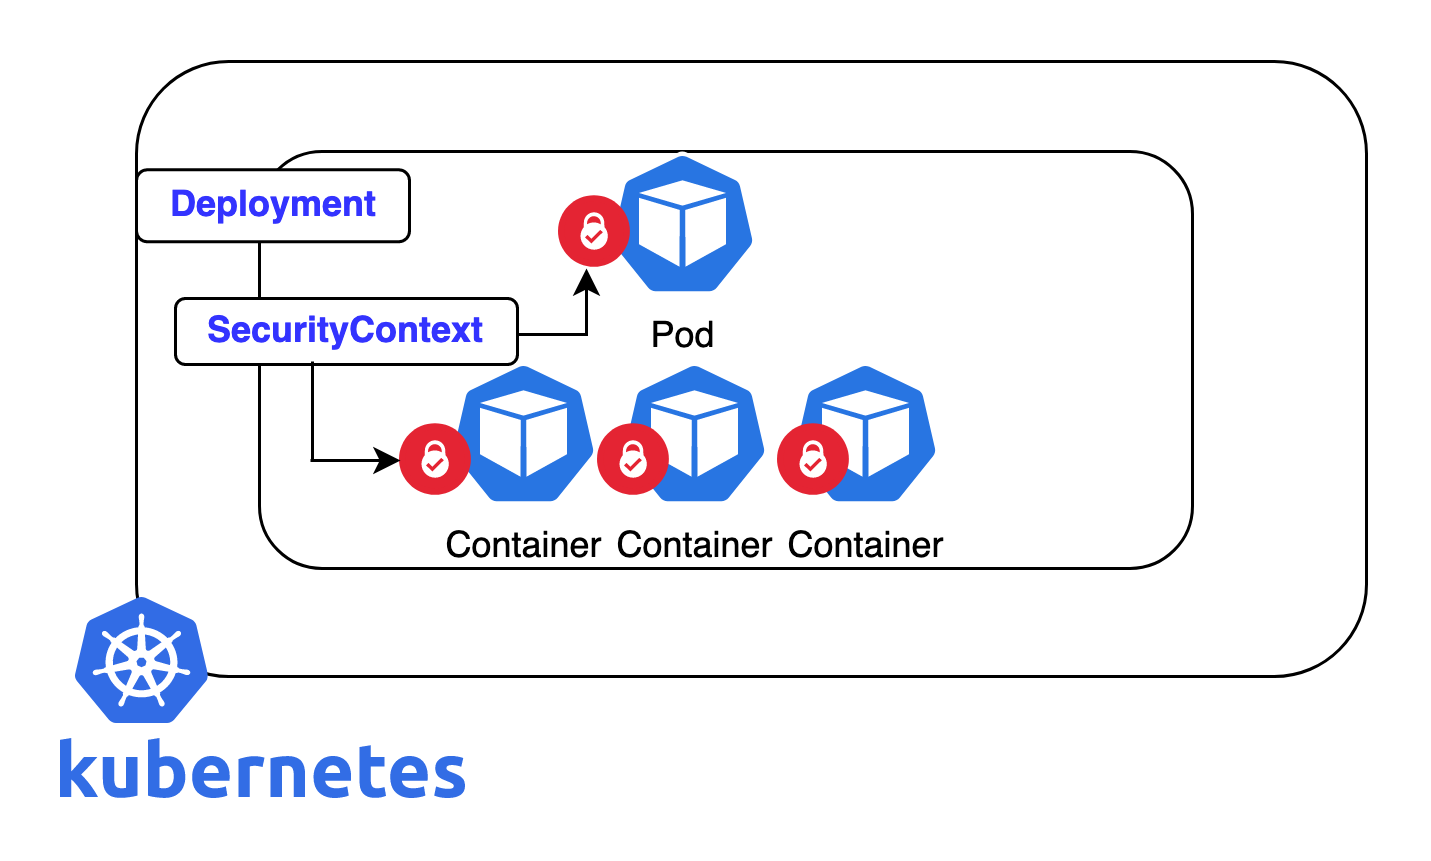
The following checklist and example show what a hardened securityContext looks like.
A Practical Guide to Kubernetes Security: Hardening Your Cluster in ...
Finally, let's look at a concrete example of a secure Pod spec from the "Practical Guide to Kubernetes Security."
Read the section "Workload Hardening: Pod and Container Security". Review the checklist for a secure Pod spec and study the example secure-app Pod YAML. Pay close attention to the fields within both the pod-level and container-level securityContext, such as: runAsNonRoot: true allowPrivilegeEscalation: false readOnlyRootFilesystem: true capabilities: { drop: ["ALL"] } seccompProfile: { type: 'RuntimeDefault' }
By enforcing Pod Security Standards, you drastically reduce the "blast radius" if a container within a pod is compromised, as it will be unable to escalate privileges or interfere with the host node.
Conclusion
You have now covered the three core pillars of modern Kubernetes security. By combining them, you create a robust, layered defense:
- Pod Security Standards harden your individual workloads, limiting what a compromised container can do on its host.
- Network Policies isolate your workloads from each other at the network level, preventing lateral movement.
- RBAC controls access to the Kubernetes control plane, ensuring users and applications only have the permissions they absolutely need.
Key Takeaways:
- Defense-in-Depth is Key: No single security measure is enough. These three mechanisms work together to protect your cluster at the host, network, and API layers.
- Start with Least Privilege: Whether it's network access, API permissions, or container capabilities, always start with a "deny-all" posture and explicitly allow only what is necessary.
- Automate and Enforce: Security shouldn't be optional. Use namespace labels for PSA, mandatory CNI plugins for Network Policies, and dedicated ServiceAccounts for RBAC to make security the default, not an afterthought.
What's Next?
Now that we've covered how to secure an application, the next logical step is to manage its resources and ensure it can scale to meet demand. In our next lesson, we will focus on "Manage application resource utilization and autoscaling using requests, limits, and the Horizontal Pod Autoscaler (HPA)." This will bridge the gap between security and performance, another critical aspect of running applications in production.