Hello! Welcome back to our module on the Kubernetes Ecosystem and Operations.
In our last lesson, we established a strong security posture for our applications by layering RBAC, Network Policies, and Pod Security Standards. We answered the questions of who can access the API, how pods can communicate, and what pods are allowed to do.
Now that our application is secure, we need to ensure it's also resilient and efficient. This lesson focuses on the next critical aspect of production operations: managing resources and handling variable load. We'll be addressing the learning outcome: Manage application resource utilization and autoscaling using requests, limits, and the Horizontal Pod Autoscaler (HPA).
We will break this down into three parts:
- Understanding Requests and Limits: The fundamental building blocks for defining a pod's resource needs.
- The Art of Right-Sizing: A practical methodology for determining the correct resource values, moving from guesswork to a data-driven approach.
- Horizontal Pod Autoscaler (HPA): Automating scaling to respond dynamically to application load.
By the end of this lesson, you'll be able to configure your Kubernetes workloads to be both cost-effective and highly available.
1. The Foundation: Resource Requests and Limits
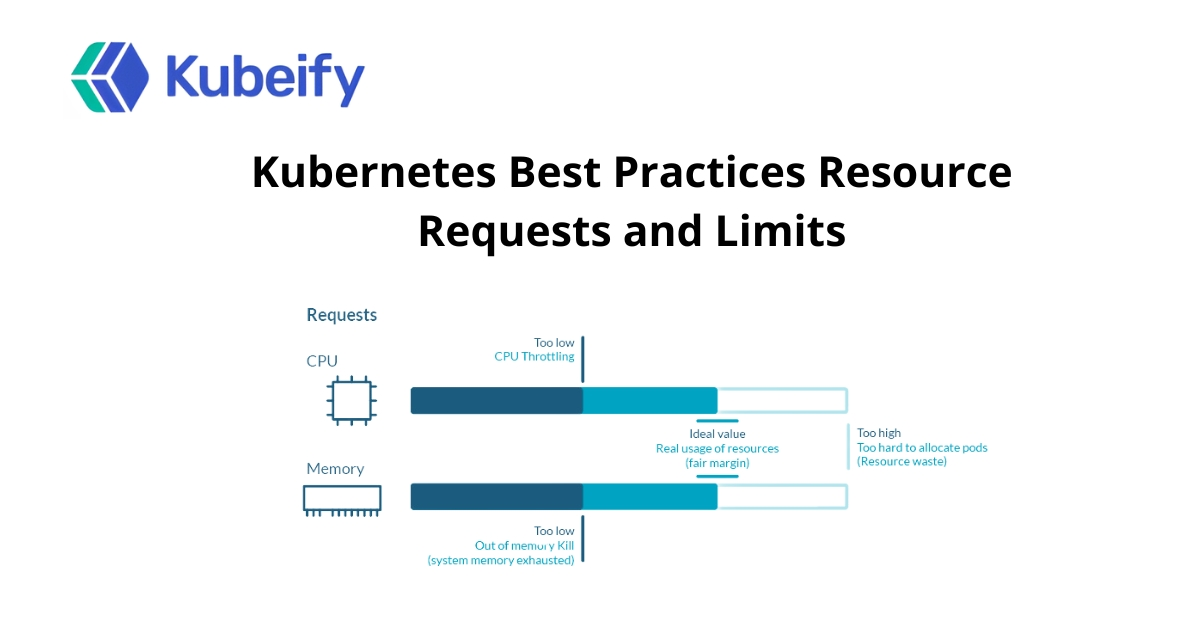
In Kubernetes, you declare how much CPU and memory (RAM) each of your containers needs. This is done through two primary fields: requests and limits. It is critical to understand that they serve two very different purposes.
requests: This is the amount of resource that is guaranteed for the container. The Kubernetes scheduler uses this value to make placement decisions. A pod will only be scheduled on a node that has enough unallocated resources to satisfy the sum of all its containers' requests. This is a scheduling-time construct.limits: This is the maximum amount of a resource a container is allowed to use. This is enforced at runtime by the container runtime on the node.- If a container exceeds its CPU limit, it will be throttled (its CPU usage will be artificially capped), leading to performance degradation.
- If a container exceeds its memory limit, it will be terminated with an Out of Memory error (
OOMKilled).
Let's watch a video that demonstrates these concepts practically.
Day 16/40 - Kubernetes Requests and Limits - CKA Full Course 2025
The video "Kubernetes Requests and Limits" from Tech Tutorials with Piyush clearly illustrates why these settings are crucial and what happens when they are misconfigured. It builds on concepts you'll know from your CKA studies but focuses on the practical implications.
Please watch the following segments: Why Requests and Limits Matter (00:04 - 05:05): This section explains the core problem: how requests prevent scheduling conflicts and how limits prevent 'noisy neighbors' from consuming all of a node's resources. A Well-Behaved Pod (07:45 - 12:23): Here, a pod is deployed with memory requests and limits. Pay attention to how its actual usage stays within the defined boundaries. Exceeding the Memory Limit (12:23 - 14:22): This demonstrates the direct consequence of a container trying to use more memory than its limit. You will see the pod status change to OOMKilled. Requesting More Than a Node Has (14:22 - 17:27): This shows what happens when you request more resources than are available on any node in the cluster. The pod gets stuck in a Pending state with an Insufficient memory event.
As you saw, getting these values wrong leads to either instability (OOMKilled) or scheduling failures (Pending). Getting them right is a balancing act.
Quality of Service (QoS) Classes
The way you set requests and limits directly determines a pod's Quality of Service (QoS) class, which Kubernetes uses to decide which pods to kill first during node-level resource shortages.
- Guaranteed: Set when
requestsandlimitsare identical for all resources (CPU and memory). These are the last pods to be killed. Ideal for critical stateful workloads like databases. - Burstable: Set when
requestsandlimitsare specified, but are not equal. These pods can "burst" to use more resources up to their limit if available. This is the most common class. - BestEffort: Set when no
requestsorlimitsare defined. These are the first pods to be killed. Only suitable for non-critical, interruptible tasks.
2. The Art of Right-Sizing Resources
Knowing what requests and limits are is one thing; knowing what values to set is the real challenge. Setting them arbitrarily (e.g., copy-pasting from another service) is a common anti-pattern that leads to waste and instability. The professional approach is to profile your application and make data-driven decisions.
The following guide provides an excellent methodology for this process.
How to Right-Size Kubernetes Resource Requests and Limits
The article "How to Right-Size Kubernetes Resource Requests and Limits" from OneUptime provides a fantastic, practical guide for this exact task. We'll focus on its core methodology.
Please read the following sections: "Step 1: Profile Your Application": This section details how to gather real usage data using tools like Metrics Server (kubectl top), Prometheus queries, and even the Vertical Pod Autoscaler (VPA) in recommendation-only mode. Focus on the concept of using historical data to inform your decision. "Step 3: Set Appropriate Values": This is the core takeaway. Study the "Golden Rules" for setting CPU and Memory values based on percentile data (e.g., P95, P99). Also, review the different patterns for different workload types (Web API, Background Worker, Batch Job). "Step 6: Quality of Service (QoS) Classes": This provides a concise summary of the QoS classes we just discussed, showing the exact YAML structure that leads to each one.
Key Heuristics from the Guide:
- CPU Request: Set to the 95th percentile (P95) of observed usage. This covers typical peaks without over-provisioning for rare spikes.
- CPU Limit: For latency-sensitive apps (like web servers), set this to 2-5x the request to allow bursting during traffic spikes. For throughput-focused apps (like background jobs), consider omitting the limit entirely to let them use all available idle CPU.
- Memory Request: Memory cannot be compressed like CPU, so be more conservative. Set to the 99th percentile (P99) of usage, plus a 10-20% buffer.
- Memory Limit: Set this equal to or slightly higher than the memory request. A large gap between memory request and limit is dangerous, as a pod consuming its full limit could cause memory pressure on the node.
3. Horizontal Pod Autoscaler (HPA)
Setting appropriate requests and limits ensures your application is stable and uses resources efficiently under a known load. But what happens when that load changes dramatically? The Horizontal Pod Autoscaler (HPA) is the Kubernetes-native solution.
Instead of changing the resources of a single pod (vertical scaling), HPA changes the number of pod replicas (horizontal scaling).

The HPA controller periodically checks metrics exposed via the Kubernetes metrics API and adjusts the replicas field on a workload (like a Deployment) to try and match a target value. A prerequisite for HPA is the Metrics Server, which collects resource metrics from nodes and makes them available.
Let's watch a demo of the HPA in action.
Day 17/40 - Kubernetes Autoscaling Explained| HPA Vs VPA
The video "Kubernetes Autoscaling Explained" by Tech Tutorials with Piyush provides both a great conceptual overview and a hands-on demonstration.
Please watch these segments: Autoscaling Types Overview (08:00 - 13:16): This provides excellent context by explaining the difference between HPA, VPA (Vertical Pod Autoscaler), and Cluster Autoscaler. Understanding this landscape is important for a holistic view of scaling. Setting up the Demo (14:05 - 17:07): The video prepares for the HPA demo by deploying a sample application. Notice that the deployment manifest includes resource requests—this is crucial! The HPA calculates utilization as (current usage / requested value). HPA in Action (17:18 - 23:53): This is the main part. You will see how to create an HPA with kubectl autoscale, apply load to the application, and watch the HPA automatically increase the replica count. It then shows the replicas scaling back down once the load is removed.
Beyond CPU and Memory
The demo focused on scaling by CPU utilization, but HPA is more powerful than that. Using the autoscaling/v2 API version, you can configure scaling based on a wide variety of metrics. This is particularly relevant given your experience with AWS and complex systems.
HorizontalPodAutoscaler Walkthrough - Kubernetes
The official Kubernetes documentation provides the details for these advanced scaling configurations. This is a great reference for real-world use cases.
Read the section "Autoscaling on multiple metrics and custom metrics". You don't need to memorize the YAML, but understand the different types of metrics you can use: Resource metrics: Standard CPU and Memory. Pods metrics: Custom metrics associated with a pod (e.g., transactions per second). Object metrics: Metrics associated with another Kubernetes object (e.g., requests per second on an Ingress). External metrics: Metrics from outside the cluster. A classic example is scaling a worker pool based on the length of an AWS SQS queue.
When multiple metrics are configured, the HPA calculates the required replica count for each metric and picks the highest one. This ensures it can respond to bottlenecks from any source.
Conclusion
In this lesson, you've moved from static resource definition to dynamic, automated resource management—a core competency for operating applications on Kubernetes.
Key Takeaways:
- Requests are for Scheduling, Limits are for Safety:
requestsguarantee resources and guide the scheduler, whilelimitsprevent resource abuse at runtime. - Right-Sizing is a Data-Driven Process: Don't guess. Profile your application under realistic load, analyze the data (especially P95/P99 percentiles), and set requests and limits accordingly.
- HPA Automates Scaling: The Horizontal Pod Autoscaler automatically adjusts the number of replicas to match demand, using metrics like CPU, memory, or even custom application-specific metrics.
- Requests are the Foundation for HPA: Effective HPA relies on well-defined resource requests, as target utilization is calculated as a percentage of the requested amount.
What's Next?
We have now configured a single application to be secure, resilient, and scalable. In a real-world DevOps workflow, you rarely deploy just one application, and you need a way to manage its configuration across different environments (dev, staging, prod).
In our next lesson, we will tackle this challenge by learning how to create a Helm chart for an application and customize its configuration using a values.yaml file. This will introduce you to the de facto package manager for Kubernetes and a critical tool in your DevOps arsenal.