Hello! Welcome back to our "CI/CD Pipeline Mastery" module.
In the last lesson, we built a Jenkins Declarative Pipeline from the ground up, turning a manual process into automated, version-controlled code. We saw how Jenkins uses a Jenkinsfile to define stages like 'Build', 'Test', and 'Deploy'. Today, we'll explore these same concepts in your other primary tool: GitHub Actions.
You've mentioned that you use GitHub Actions daily but want to build the confidence to write workflows "by heart." This lesson is designed to solidify your understanding of how to orchestrate more complex workflows. We'll be focusing on this learning outcome: Write a multi-job GitHub Actions workflow with dependencies and artifacts.
By the end of this lesson, you'll understand how to move beyond single-job workflows and create pipelines where jobs run in a specific order and share data with each other.
1. From Jenkins Stages to GitHub Actions Jobs
In our previous lesson, we used stage blocks in Jenkins to create a sequence: Checkout -> Setup -> Lint -> Build. In GitHub Actions, the equivalent concept is a job.
A key difference is that by default, all jobs in a GitHub Actions workflow run in parallel. This is great for speed if the jobs are independent, but for a typical CI/CD process, you need to enforce a specific order. You can't test code that hasn't been built yet!
Let's quickly refresh our memory on the basic syntax of a GitHub Actions workflow.
GitHub Actions Tutorial - Basic Concepts and CI/CD Pipeline with Docker
The video 'GitHub Actions Tutorial' by TechWorld with Nana offers a great walkthrough of the fundamental components of a workflow file. This will help formalize the concepts you already use daily.
Please watch from 12:56 to 15:10. Focus on the explanation of the YAML structure: name, on, jobs, runs-on, steps, uses, and run. This will serve as a solid foundation for the multi-job concepts we're about to cover.
2. Creating Dependencies with needs
To control the execution order and make jobs run sequentially, you use the needs keyword. A job with needs will wait for the specified job (or jobs) to complete successfully before it starts. This allows you to build a dependency graph.
For a simple build -> deploy sequence, the workflow would look like this:
jobs:
  build:
    runs-on: ubuntu-latest
    steps:
      - run: echo "Building the application..."

  deploy:
    runs-on: ubuntu-latest
    needs: build # This line is the key!
    steps:
      - run: echo "Deploying the application..."
In this example, the deploy job will not start until the build job has finished successfully. If build fails, deploy will be skipped entirely.
You can also make a job dependent on several other jobs. This is common when you have parallel test suites and a final deployment job that should only run if all tests pass.
jobs:


  # ... build job ...

  unit-tests:
    runs-on: ubuntu-latest
    needs: build
    steps:
      - run: echo "Running unit tests..."

  integration-tests:
    runs-on: ubuntu-latest
    needs: build
    steps:
      - run: echo "Running integration tests..."

  deploy:
    runs-on: ubuntu-latest


    # `deploy` waits for both test jobs to succeed
    needs: [unit-tests, integration-tests]
    steps:
      - run: echo "Deploying..."
The GitHub UI provides a great visualization of this dependency graph.
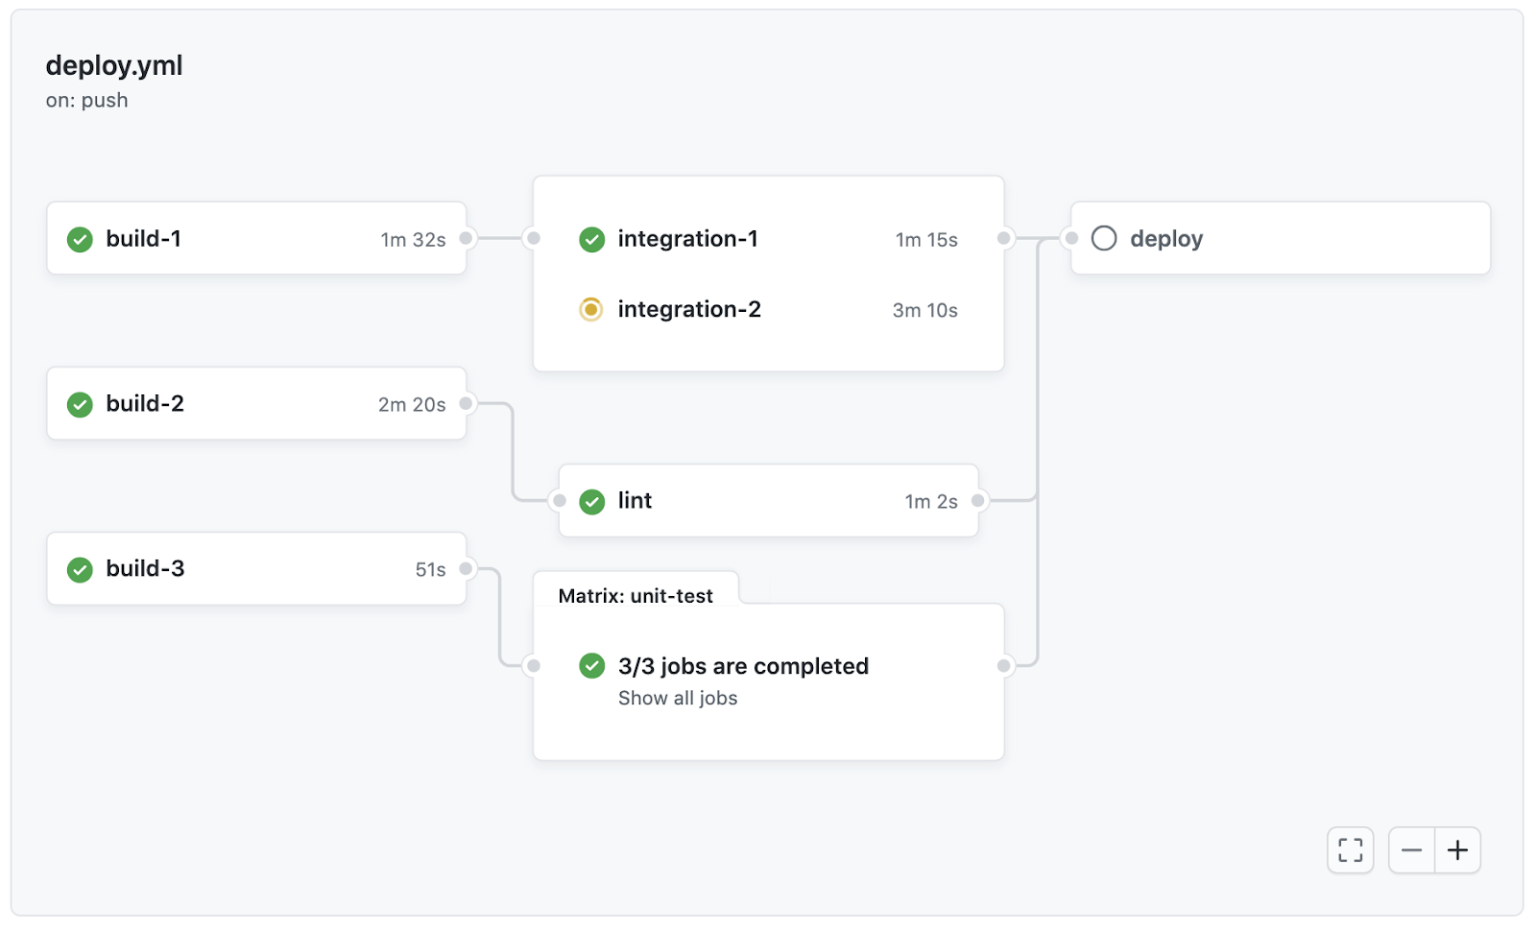
To get a more detailed look at the needs keyword and see how to structure these dependencies, the following article is an excellent resource.
How to Handle Job Dependencies in GitHub Actions
The article 'How to Handle Job Dependencies in GitHub Actions' provides clear examples of creating both single and multiple dependencies.
Read the sections 'The needs Keyword' and 'Multiple Dependencies'. These sections provide concise YAML examples that directly illustrate the concepts we just discussed.
3. Sharing Data Between Jobs with Artifacts
Now we have jobs running in the correct order. But there's a problem: each job runs on a fresh, isolated virtual machine (runner). The files generated in the build job are not available in the test or deploy job's filesystem.
This is where artifacts come in. Artifacts allow you to persist data after a job has completed and share it with other jobs in the same workflow. The process is simple:
- Job A (
build): Runs the build process and then uses theactions/upload-artifactaction to package and upload the resulting files (e.g., binaries, adistfolder, test reports). - Job B (
test): Uses theactions/download-artifactaction to download and unpack the files from Job A, making them available for the next set of steps.
Let's see this in action.
Tip 7: Downloading artifacts in a GitHub Actions workflow
This short video from Microsoft DevRadio provides a very clear, visual demonstration of one job creating an artifact and a dependent job downloading it.
Watch the video from 00:25 to 03:36. Pay attention to three things: The use of the needs keyword to create the dependency. The actions/download-artifact step in the second job. The visual graph in the 'Actions' tab, showing one job waiting for the other.
The following example shows a complete build and test workflow that passes a build artifact from the first job to the second.
name: CI Pipeline with Artifacts

on: [push]

jobs:
  build:
    runs-on: ubuntu-latest
    steps:
      - uses: actions/checkout@v4
      - name: Build application
        run: |
          mkdir -p dist
          echo "My App v1.0" > dist/version.txt

      - name: Upload artifact
        uses: actions/upload-artifact@v4
        with:
          name: app-build # The name of the artifact
          path: dist/      # The path to the files to upload

  test:
    runs-on: ubuntu-latest
    needs: build # Depends on the 'build' job
    steps:
      - name: Download artifact
        uses: actions/download-artifact@v4
        with:
          name: app-build # Must match the upload name
          path: test-dist  # Directory to download into

      - name: Run tests on the build
        run: |
          echo "Testing the downloaded artifact..."
          cat test-dist/version.txt
This pattern is fundamental to almost every non-trivial CI/CD pipeline in GitHub Actions. For a deeper dive, the same OneUptime article has an excellent section on this.
How to Handle Job Dependencies in GitHub Actions
Let's return to the article on job dependencies to see a detailed explanation of sharing data.
Read the section titled 'Sharing Data Between Dependent Jobs'. Focus specifically on 'Method 2: Artifacts', as it provides another clear code example and explanation.
4. Your Turn: Create a Multi-Job Workflow
Now it's time to put these concepts into practice.
Task:
Create a GitHub Actions workflow file (.github/workflows/release.yml) that performs a mock release process.
Requirements:
- The workflow should have two jobs:
prepare-release-notesandpublish-release. - The
publish-releasejob must depend on theprepare-release-notesjob. - Job 1:
prepare-release-notes- It should check out your repository's code.
- It must create a file named
release.txt. - It should write the commit SHA into this file using the command:
echo ${{ github.sha }} > release.txt. - It must upload
release.txtas an artifact namedrelease-notes.
- Job 2:
publish-release- It should download the
release-notesartifact. - It must print the contents of the downloaded
release.txtfile to the console with the command:cat release.txt.
- It should download the
Think about how you'll structure the jobs, where to place the needs keyword, and what parameters to use for the upload-artifact and download-artifact actions.
Click here to see the solution
name: Mock Release Workflow

on: [push]

jobs:
  prepare-release-notes:
    runs-on: ubuntu-latest
    steps:
      - name: Check out code
        uses: actions/checkout@v4

      - name: Create release notes file
        run: echo ${{ github.sha }} > release.txt

      - name: Upload release notes artifact
        uses: actions/upload-artifact@v4
        with:
          name: release-notes
          path: release.txt

  publish-release:
    runs-on: ubuntu-latest
    needs: prepare-release-notes
    steps:
      - name: Download release notes artifact
        uses: actions/download-artifact@v4
        with:
          name: release-notes

      - name: Display release notes
        run: |
          echo "Publishing release with notes:"
          cat release.txt
Conclusion
Excellent work! You've successfully built a multi-job workflow that demonstrates two of the most critical concepts for creating sophisticated pipelines in GitHub Actions: dependencies and artifacts.
Key Takeaways:
- By default, jobs in a workflow run in parallel.
- The
needskeyword is used to create dependencies between jobs, forcing them to run in a specific order. - Since each job runs on a fresh runner,
actions/upload-artifactandactions/download-artifactare essential for passing files and data between them. - The combination of
needsandartifactsallows you to create complex, multi-stage CI/CD pipelines.
In our next lesson, we will explore another powerful feature for managing complex workflows: implementing matrix builds in GitHub Actions. This will allow you to run the same job multiple times across different environments, such as various operating systems or software versions, all with just a few lines of configuration.