Hello! Welcome to the final lesson of our "Python for DevOps Automation" module.
In our last lesson, you transformed a simple script into a robust automation tool by implementing professional-grade error handling and logging. That kubectl wrapper is now resilient and observable. But how do you share it with your team? Asking them to clone a Git repo, manually create a virtual environment, and pip install dependencies from a requirements.txt file is cumbersome and error-prone. There's a much better way.
Today, we'll bridge the gap between a script that works on your machine and a tool that is easily distributable and usable by anyone.
This lesson directly addresses the learning outcome: Package a Python CLI tool for distribution and manage dependencies using virtual environments. We will take your script and turn it into a legitimate, installable Python package.
1. The Problem: "Dependency Hell" and Isolation
Imagine you give your script to a colleague. It requires the requests library, version 2.25. They have version 2.28 installed globally for another project. Installing your required version could break their other tools. This is a classic problem known as "dependency hell."
The solution is two-fold:
- Isolation: Each project should have its own isolated environment with its own set of dependencies. This is what virtual environments are for.
- Definition: Your project needs a standard way to define its name, version, dependencies, and entry points. This is what packaging is for.
Let's start by understanding why virtual environments are so critical.
Python Dependency Hell Explained (And How to Escape It)
The video 'Python Dependency Hell Explained (And How to Escape It)' by ArjanCodes provides an excellent overview of the problem and the solution provided by virtual environments.
Please watch these two segments: The Problem (00:00 - 02:39): Pay close attention to the definition of a virtual environment and why it's necessary for creating isolated, reproducible setups. Important Considerations (11:58 - 14:23): This part highlights practical aspects like dependency management, activation, and potential compatibility issues.
While the video mentions a tool called Poetry, we are going to focus on the tools that are part of the standard Python ecosystem: venv for virtual environments and pip for installation. This foundation will help you understand how all other tools, including Poetry, work under the hood.
2. Creating Your Isolated Workspace with venv
Python's built-in venv module is the standard way to create virtual environments. Let's create one for our kubectl wrapper project.
In your project's root directory, run:
# Create a virtual environment named 'venv'
python3 -m venv venv
This creates a venv folder containing a private copy of the Python interpreter and its own site-packages directory. Now, you need to activate it.
- On macOS and Linux:
source venv/bin/activate - On Windows (PowerShell):
.\venv\Scripts\Activate.ps1
You'll know it's active because your shell prompt will be prefixed with (venv). Now, any packages you install with pip will be placed inside this environment, leaving your global Python installation untouched. To exit, simply type deactivate.
3. Packaging Your Tool with pyproject.toml
With our isolated environment ready, it's time to define our project so it can be packaged. The modern standard for this is a single file: pyproject.toml. This file serves as the central configuration for your project's metadata, dependencies, and build instructions.
We'll walk through the process of converting a script into a package structure and creating the pyproject.toml file from scratch.
Packaging Your Python Code With pyproject.toml | Complete Code Conversation
The video 'Packaging Your Python Code With pyproject.toml' from Real Python is a fantastic step-by-step guide. It shows the entire process of structuring, configuring, and installing a simple CLI tool.
Please watch from the beginning to 15:40. This covers the core concepts of structuring your project. Introduction (00:00 - 01:40): Understand the pain points this process solves. Project Structure & __main__.py (03:05 - 08:25): This is key. See how to organize files into a package directory and use __main__.py as a runnable entry point. Absolute Imports & The -m flag (08:25 - 15:40): This explains why a simple file structure can lead to import errors and how moving to a proper package structure with absolute imports solves this.
Now that you understand the importance of project structure and proper imports, let's create our pyproject.toml file and make our tool installable.
4. Defining and Installing the Package
The pyproject.toml file uses the TOML format, which is designed to be human-readable. Let's explore the key sections needed for our CLI tool.
How to Manage Python Projects With pyproject.toml
The article 'How to Manage Python Projects With pyproject.toml' from Real Python serves as an excellent textual reference for what we're about to do. We'll focus on the sections that define our project and make it executable.
Please read the section 'Setting Up a Python Project With pyproject.toml'. It provides a clear example of the file structure and the initial content of pyproject.toml, explaining the [build-system] and [project] tables.
A minimal pyproject.toml for a CLI tool looks like this:
[build-system]
requires = ["setuptools>=61.0"]
build-backend = "setuptools.build_meta"

[project]
name = "k8s-pod-checker"
version = "0.1.0"
dependencies = [


  # Add any dependencies here, e.g., "requests"
]

[project.scripts]
pod-checker = "k8s_pod_checker.cli:main"
Let's break down the most important parts:
[build-system]: Tellspipwhich tools are needed to build your package. You can usually just copy this as-is.[project]: Contains metadata like thename,version, anddependencies.[project.scripts]: This is the magic for CLI tools. It creates an executable script.pod-checker: This is the command you'll type in your terminal.k8s_pod_checker.cli:main: This points to themainfunction inside thecli.pyfile within yourk8s_pod_checkerpackage.
The Editable Install
For development, you want your changes to be reflected immediately without reinstalling. This is done with an editable install.
Packaging Your Python Code With pyproject.toml | Complete Code Conversation
Let's continue with the Real Python video to see how to perform an editable install and what benefits it provides.
Watch the segment from 33:59 to 38:46. Focus on the pip install -e . command and how it allows you to run your code from anywhere, resolving the import issues we saw earlier.
After running pip install -e . from your project's root directory (where pyproject.toml lives), your pod-checker command will be available in your activated virtual environment. Any edits you make to your Python source files will be live immediately!
5. Creating the Command-Line Entry Point
The [project.scripts] table points to a function. This means we need to refactor our script so its logic is contained within a function, usually called main.
Packaging Your Python Code With pyproject.toml | Complete Code Conversation
The final segment from the Real Python video shows how to define the script entry point in pyproject.toml and refactor the code to support it.
Watch from 38:46 to 44:28. Pay close attention to: Adding the [project.scripts] table. Wrapping the core logic in a main() function. Using the if __name__ == '__main__': idiom to make the script runnable both directly and as an installed package.
The if __name__ == '__main__': block is a standard Python convention. It ensures that the main() function is called only when the file is executed directly, not when it's imported by another module.
6. Building for Distribution
An editable install is great for development, but to share your tool, you need to build distributable artifacts. The two main formats are:
- Source Distribution (
sdist): A.tar.gzfile containing your source code and build instructions. - Wheel (
.whl): A pre-built distribution that is faster to install.
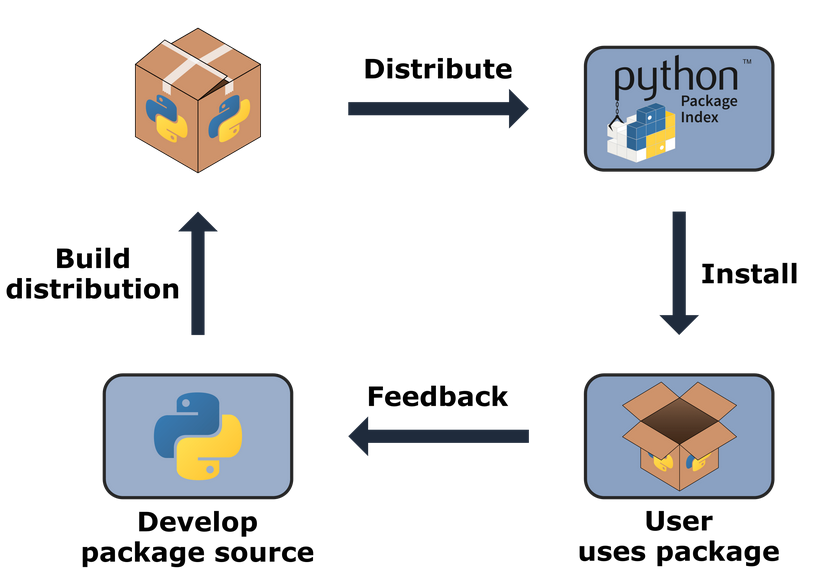
The standard tool for building these is build.
- Install
build:pip install build - Run the build:
python -m build
This command will create a dist directory containing your .tar.gz and .whl files. These are the files you would upload to an artifact repository like PyPI, Nexus, or Artifactory. Another developer could then just run pip install k8s-pod-checker to install your tool.
Creating and packaging command-line tools
The official Python Packaging User Guide provides a concise tutorial that reinforces these steps.
Please review the sections on 'pyproject.toml' and 'Installing the package with pipx'. This guide uses typer instead of argparse, but the principle for defining [project.scripts] is identical. It also introduces pipx, a great tool for running CLI applications in isolated environments.
7. Your Turn: Package the kubectl Wrapper
Now it's time to put it all together and package the robust check_pods.py script from our last lesson.
Task:
-
Set up the project structure:
- Create a root directory, e.g.,
k8s-pod-checker-project. - Inside it, create your package directory:
k8s_pod_checker. - Inside
k8s_pod_checker, create an empty__init__.pyfile. - Move your script's logic into
k8s_pod_checker/cli.py.
Your structure should look like this:
k8s-pod-checker-project/ ├── k8s_pod_checker/ │ ├── __init__.py │ └── cli.py └── pyproject.toml (You'll create this next) - Create a root directory, e.g.,
-
Refactor
cli.py:- Wrap all the logic from your
check_pods.pyscript (logger setup, argparse, subprocess calls, etc.) inside amain()function. - Add the
if __name__ == '__main__':block at the end to callmain().
- Wrap all the logic from your
-
Create
pyproject.toml:- In the root directory (
k8s-pod-checker-project), create thepyproject.tomlfile with the following content. If your script had dependencies, you would add them to thedependencieslist.
[build-system] requires = ["setuptools>=61.0"] build-backend = "setuptools.build_meta" [project] name = "k8s-pod-checker" version = "0.1.0" authors = [ { name="Your Name", email="your@email.com" }, ] description = "A simple CLI tool to check pod statuses in Kubernetes." requires-python = ">=3.8" dependencies = [ # List any dependencies here if you used external libraries ] [project.scripts] pod-checker = "k8s_pod_checker.cli:main" - In the root directory (
-
Install and Test:
- Navigate to your project's root directory.
- Create and activate a virtual environment:
python3 -m venv venvandsource venv/bin/activate. - Perform an editable install:
pip install -e .. - Test your command from anywhere:
pod-checker -n kube-system. It should work exactly like your script did before.
-
Build for Distribution:
- Install the build tool:
pip install build. - Run the build process:
python -m build. - Inspect the
dist/directory to see yoursdistandwheelfiles. These are your sharable artifacts!
- Install the build tool:
Conclusion
Congratulations! You've completed the "Python for DevOps Automation" module. You've gone from writing basic scripts to creating robust, logged, error-handled, and now professionally packaged command-line tools. This skill is invaluable for a DevOps engineer, as it allows you to create and share custom automation that empowers your entire team.
Key Takeaways:
- Virtual Environments (
venv) are essential for isolating project dependencies and preventing conflicts. pyproject.tomlis the modern, unified standard for configuring Python projects.- The
[project.scripts]table is how you create command-line entry points for your tools. - An editable install (
pip install -e .) is crucial for an efficient development workflow. python -m buildcreates standard, distributablesdistandwheelpackages that can be shared and installed anywhere.
In our next module, CI/CD Pipeline Mastery, we will take the artifacts you've just learned to build and automate their testing and deployment, closing the loop on the full software development lifecycle.