Hello! Welcome to the next lesson in our "CI/CD Pipeline Mastery" module.
In our last lesson, we focused on making pipelines more efficient and maintainable by creating reusable components in both Jenkins and GitHub Actions. Today, we'll put that principle into practice by tackling one of the most critical responsibilities in modern DevOps: integrating security directly into the pipeline.
This lesson addresses the learning outcome: Integrate static analysis (linting) and security scanning (e.g., Trivy) into a CI pipeline. We will explore the "Shift Left" philosophy, where security checks are moved earlier in the development lifecycle, enabling teams to find and fix issues faster and more cheaply.
1. Introduction to DevSecOps and "Shifting Left"
DevSecOps is a cultural and technical shift that integrates security practices within the DevOps process. Instead of treating security as a final gate before release, it becomes a shared responsibility throughout the entire application lifecycle. A core tenet of DevSecOps is "shifting left"—performing security checks as early as possible.
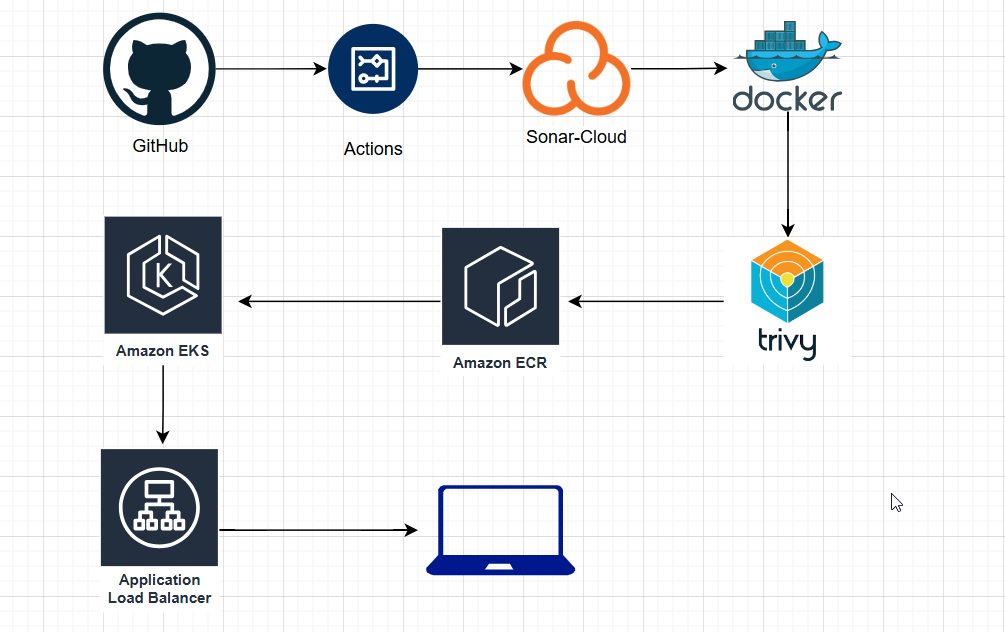
Integrating these checks into your CI pipeline is the primary way to implement this philosophy. Let's start by getting a high-level overview of what this looks like in practice.
DevSecOps CI/CD Pipeline Implementation | Beginner to Advanced | Tiktactoe Game
The video 'DevSecOps CI/CD Pipeline Implementation' by Abhishek Veeramalla provides an excellent introduction to what DevSecOps means in a practical context and why it's so important. It also outlines the end-to-end pipeline we'll be analyzing today.
Watch the first 9 minutes of the video (00:00 - 09:05). Focus on understanding the definition of DevSecOps beyond just CI/CD, and the two primary reasons given for its growing importance.
As the video explains, a DevSecOps pipeline isn't just one tool; it's a series of automated checks. We'll focus on two fundamental types: static analysis and vulnerability scanning.
2. Static Analysis: The First Line of Defense
Static analysis involves analyzing code without executing it. This is our first and fastest feedback loop. It includes:
- Linting: Enforcing code style, catching syntax errors, and identifying potential bugs.
- Static Application Security Testing (SAST): Scanning source code for common security flaws, like SQL injection or hardcoded credentials.
In many modern projects, a linting step is configured to run via a package manager. Let's see how this is integrated as a job in a GitHub Actions workflow.
DevSecOps CI/CD Pipeline Implementation | Beginner to Advanced | Tiktactoe Game
Let's continue with Abhishek Veeramalla's video. We'll look at the initial jobs in the workflow that handle testing and static analysis.
Watch the segment from 35:02 to 49:46. While it covers the entire workflow structure, pay close attention to the 'unit test' job (which runs npm test) and the 'lint' job (which runs npm run lint). Notice how these are set up as separate, independent jobs that must pass before the build can proceed.
As you saw, adding a linting stage is straightforward. In both GitHub Actions and Jenkins, it's typically a step that executes a command defined in the project's configuration (like package.json).
GitHub Actions Example (lint job):
jobs:
  lint:
    name: Static Code Analysis
    runs-on: ubuntu-latest
    steps:
      - name: Check out code
        uses: actions/checkout@v4
      - name: Install NodeJS
        uses: actions/setup-node@v4
        with:
          node-version: '20'
      - name: Install dependencies
        run: npm ci
      - name: Run linting
        run: npm run lint
This pattern is applicable to any language or framework: pylint for Python, shellcheck for Bash scripts, or hadolint for Dockerfiles.
3. Vulnerability Scanning with Trivy
While linting checks your source code, vulnerability scanning inspects your application's dependencies and final artifacts for known security issues (CVEs - Common Vulnerabilities and Exposures). Trivy, by Aqua Security, is a popular open-source scanner for this purpose.

Trivy can scan:
- Container Images: For vulnerabilities in OS packages and language-specific dependencies.
- Filesystems: To find vulnerabilities in dependencies (
package-lock.json,Gemfile.lock) and misconfigurations in IaC files (Terraform, Dockerfile, Kubernetes manifests). - Git Repositories: Scanning a remote repository directly.
Integrating Trivy into GitHub Actions
The easiest way to use Trivy in GitHub Actions is with the official aquasecurity/trivy-action. This action handles the setup and execution of the scan.
The video you watched demonstrates this perfectly within the "Docker" job. Let's revisit that specific part.
DevSecOps CI/CD Pipeline Implementation | Beginner to Advanced | Tiktactoe Game
We'll now focus on the security scanning part of the pipeline from the same video.
Watch the section from 52:48 to 01:03:44. Pay special attention to the 'Run Trivy vulnerability scanner' step. Note the parameters used, especially the image name being scanned and the final output showing zero critical vulnerabilities found.
The video shows a practical implementation. For a more detailed look at the workflow configuration, let's turn to a focused article.
Setting up Trivy in your GitHub Actions - Thomas Thornton Blog
The blog post 'Setting up Trivy in your GitHub Actions' by Thomas Thornton provides excellent, concise examples and explains how to integrate the results into GitHub's UI.
Read the sections 'Why Use Trivy for Security Scanning?', 'Setting Up Trivy in GitHub Actions', 'Scanning Docker Images for Vulnerabilities', and 'Understanding the results'. Focus on the YAML example and the explanation of key parameters like image-ref, format: 'sarif', and exit-code.
From the article and video, here's a key example of a Trivy step for container scanning:
- name: Run Trivy vulnerability scan
  uses: aquasecurity/trivy-action@master
  with:
    image-ref: 'my-app:${{ github.sha }}'
    format: 'sarif'
    output: 'trivy-results.sarif'
    severity: 'CRITICAL,HIGH'
    exit-code: '1' # Fail the build if CRITICAL or HIGH vulnerabilities are found

- name: Upload Trivy scan results to GitHub Security tab
  uses: github/codeql-action/upload-sarif@v3
  with:
    sarif_file: 'trivy-results.sarif'
Key Concepts:
exit-code: '1': This is the security gate. If Trivy finds vulnerabilities matching the specifiedseverity, it will exit with a non-zero code, failing the pipeline and preventing the vulnerable image from being pushed. Setting it to'0'will report issues but not fail the build.format: 'sarif': This outputs the results in the Static Analysis Results Interchange Format.upload-sarifstep: This step uploads the SARIF file to GitHub, which populates the Security > Code scanning alerts tab in your repository. This provides a clean UI for developers to review and triage vulnerabilities.
Integrating Trivy into Jenkins
Since you also use Jenkins, let's see how to accomplish the same task there. In Jenkins, you typically install Trivy on the agent (or use a Docker image that contains it) and run it as a shell command.
Demo Vulnerability Scan using Trivy - KodeKloud
The KodeKloud note 'Demo Vulnerability Scan using Trivy' provides a clear, step-by-step guide for Jenkins.
First, skim the 'Installing Trivy' section to see the different installation options. Then, read the 'Integrating Trivy into a Jenkins Pipeline' section carefully. Finally, look at 'Reviewing Scan Results' to see how the reports are displayed in Jenkins.
Here is a declarative Jenkins stage based on the KodeKloud example:
stage('Trivy Vulnerability Scanner') {
    steps {
        sh '''


            # Scan for CRITICAL vulnerabilities and fail the build if any are found
            trivy image --exit-code 1 --severity CRITICAL my-app:${GIT_COMMIT}


            # Scan for other severities but don't fail the build, just generate a report
            trivy image --exit-code 0 --severity HIGH,MEDIUM,LOW \
                --format template --template "@contrib/html.tpl" -o trivy-report.html
        '''
    }
    post {
        always {
            // Publish the HTML report for easy viewing
            publishHTML(target: [
                allowMissing: true,
                alwaysLinkToLastBuild: true,
                keepAll: true,
                reportDir: '.',
                reportFiles: 'trivy-report.html',
                reportName: 'Trivy Scan Report'
            ])
        }
    }
}
This Jenkins example demonstrates a powerful pattern:
- Run a strict scan (
--exit-code 1 --severity CRITICAL) to act as a hard gate. - Run a second, more comprehensive scan (
--exit-code 0) to generate an HTML report for all vulnerabilities, which can be reviewed in the Jenkins UI via thepublishHTMLplugin.
Conclusion
In this lesson, you've learned how to shift security left by embedding automated checks directly into your CI pipelines. This is a foundational practice for any high-performing DevOps team.
Key Takeaways:
- Static Analysis (Linting) is your first line of defense, catching code quality and style issues early using tools integrated into your build process (e.g.,
npm run lint). - Vulnerability Scanning with tools like Trivy inspects your artifacts and dependencies for known security issues (CVEs).
- In GitHub Actions, the
aquasecurity/trivy-actionsimplifies scanning and can upload results inSARIFformat to the repository's Security tab for easy review. - In Jenkins, Trivy is typically run as a shell command (
sh 'trivy image ...'), and its results can be published as reports (e.g., HTML, JUnit) using plugins. - A Security Gate is implemented by configuring the scanner to return a non-zero exit code (e.g.,
exit-code: 1), which fails the pipeline if critical vulnerabilities are found.
In our next lesson, we will focus on the next logical step in the pipeline: Build, tag, and publish a container image to a registry (e.g., Docker Hub, ECR) from a CI/CD pipeline. This will complete the "CI" part of our workflow, taking our code from a commit to a secure, published artifact ready for deployment.