Hello! Welcome back to our "CI/CD Pipeline Mastery" module.
In our last lesson, we successfully built, tagged, and published a container image to AWS ECR. That versioned, immutable artifact is the cornerstone of a reliable deployment process. Now, we'll take that artifact and move it through a realistic deployment workflow.
This lesson addresses the learning outcome: Implement staging environments and manual approval gates in a deployment workflow. This is where Continuous Integration (CI) transitions to Continuous Delivery/Deployment (CD). By creating a buffer zone (staging) and adding a human checkpoint (approval gate), we can significantly reduce the risk of introducing bugs into production and ensure that deployments are intentional and authorized.
We will cover implementations for both GitHub Actions and Jenkins, allowing you to apply these patterns in your daily work.
1. The Deployment Workflow: Staging and Promotion
Before we dive into code, let's establish the conceptual model. A typical modern deployment workflow doesn't go straight from a developer's commit to production. It follows a path of increasing scrutiny.
- Staging Environment: A pre-production environment designed to be as identical to production as possible. It runs the same infrastructure, configuration, and data (or a sanitized subset). This is where you conduct final, high-confidence tests like end-to-end (E2E) tests, performance tests, and user acceptance testing (UAT).
- Manual Approval Gate: An intentional pause in the CI/CD pipeline that requires human intervention to proceed. This is most commonly used right before a deployment to a sensitive environment like production. It serves as a final "go/no-go" decision point for a team lead, product manager, or SRE.
The following diagram illustrates this common pattern. Code is first deployed to a development or QA environment. After validation, a formal process (like a Pull Request and an approval) promotes it to the production environment.

2. Implementation in GitHub Actions: Environments
GitHub Actions provides a first-class feature for managing deployment targets called Environments. An environment is more than just a name; it's a collection of protection rules, secrets, and a full deployment history for a specific target like staging or production.
Configuring a Protected Environment
The key to creating a manual approval gate is to configure a protection rule on your environment.
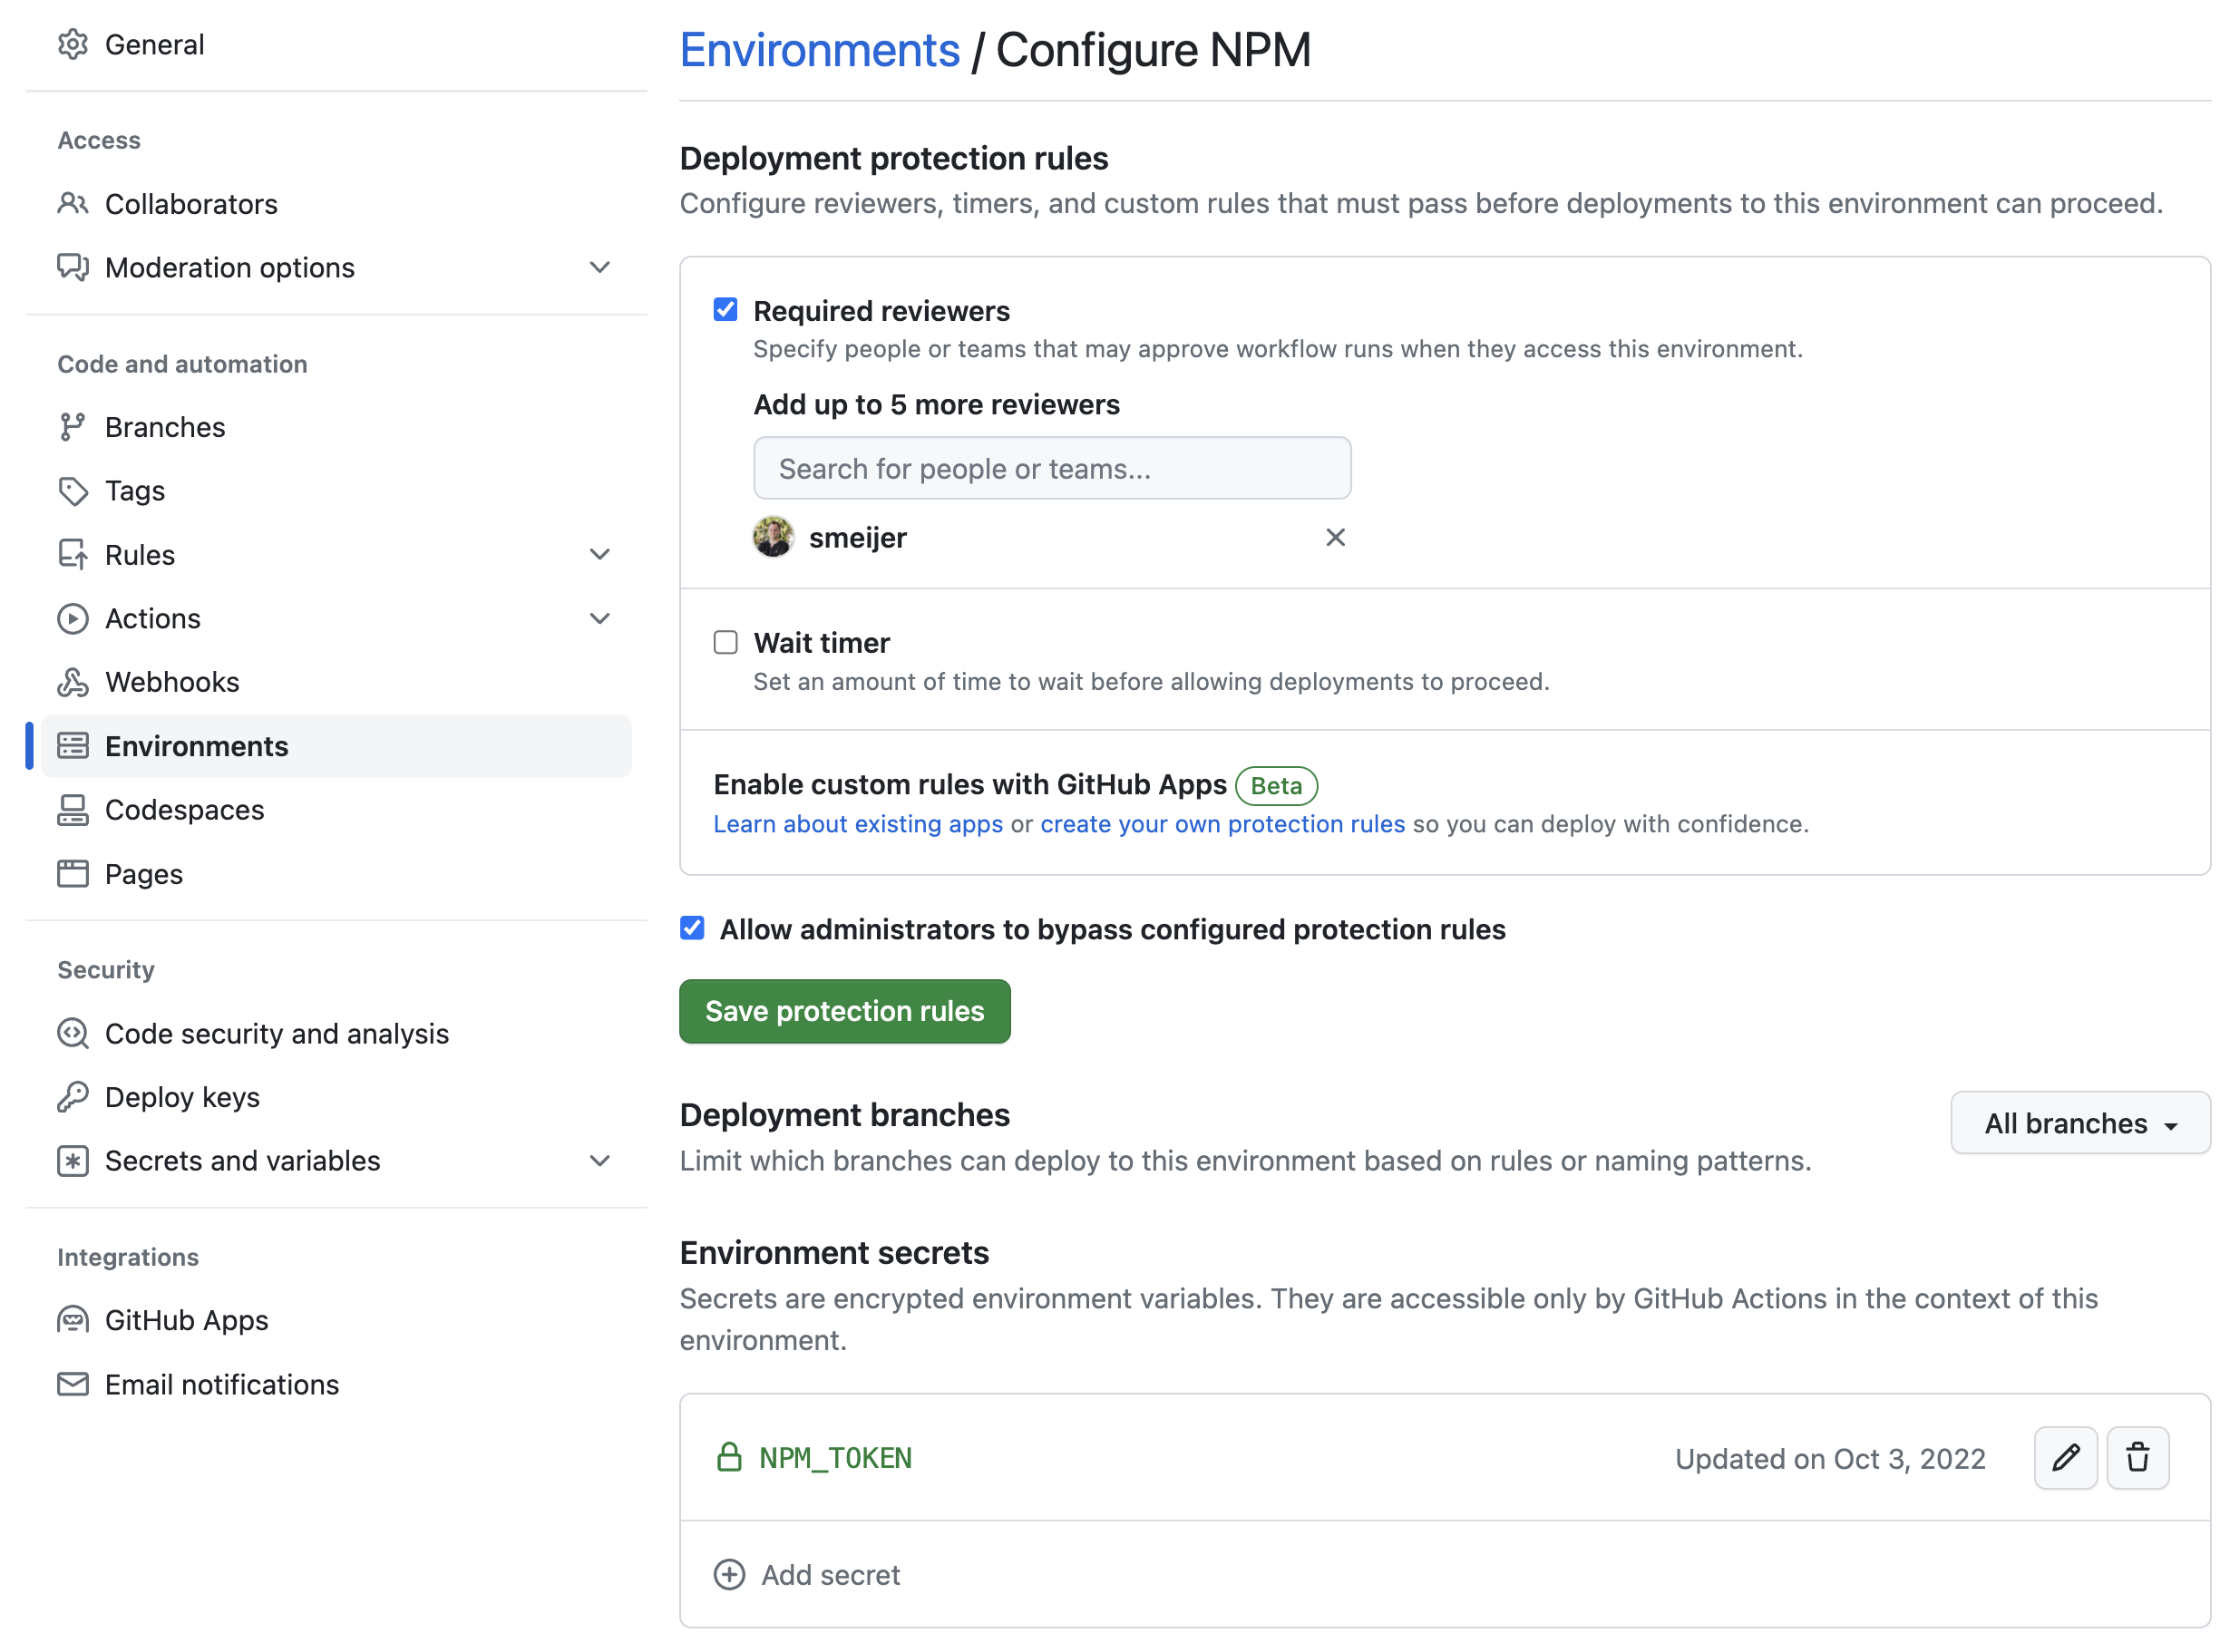
To create a manual approval gate, you navigate to your repository's Settings > Environments, create a new environment (e.g., production), and enable the Required reviewers protection rule. You can then add specific teams or users who are authorized to approve deployments.
A Complete Video Walkthrough
The following video provides an excellent deep dive into creating, configuring, and using environments for manual approvals.
GitHub Actions: Approvals, Environments and Visualization DEEP DIVE
The video 'GitHub Actions: Approvals, Environments and Visualization DEEP DIVE' by CoderDave provides a comprehensive walkthrough. It covers everything from the UI setup to the workflow YAML and a live demonstration.
Please watch the following segments: (01:42 - 05:30): This section shows how to navigate the GitHub UI to create environments, configure protection rules like 'Required reviewers' and 'Wait timer', and manage environment-specific secrets. (06:07 - 08:38): Here, you'll see how to modify the workflow YAML file to target these environments using the environment key and how to make deployments conditional (e.g., PRs go to dev, main branch goes to staging/prod). (08:38 - 11:35): This is a live demo where a change is merged, triggering a deployment to staging, which then pauses while waiting for a manual approval before deploying to production. Pay attention to the notification and the approval UI.
Workflow YAML Example
As shown in the video, you link a job to an environment using the environment key. When a workflow targets a protected environment, it automatically pauses and notifies the designated reviewers.
Here is a consolidated example of a workflow that deploys to staging automatically on a push to main, but requires approval for production.
name: Deploy to Staging and Production

on:
  push:
    branches:
      - main

jobs:
  build:
    runs-on: ubuntu-latest
    steps:
      - run: echo "Building the application and container image..."


      # This job would contain the steps from our previous lesson
      # to build and push a container image to ECR.
      # It would output the image tag (e.g., the git SHA) for downstream jobs.

  deploy_staging:
    runs-on: ubuntu-latest
    needs: build
    environment:
      name: staging
      url: https://staging.example.com # Optional: URL shows up in UI
    steps:
      - run: echo "Deploying image to Staging..."


      # Steps to deploy the container image to the staging cluster

  deploy_production:
    runs-on: ubuntu-latest
    needs: deploy_staging
    environment:
      name: production # This environment has a 'Required reviewers' rule
      url: https://app.example.com
    steps:
      - run: echo "Deploying image to Production after approval..."


      # Steps to deploy the container image to the production cluster
For a detailed textual summary and a comparison of why Environments are superior to other methods like workflow_dispatch or branch protection rules for this purpose, the following article is a great read.
Unlock Safer Deployments: Job-Level Approvals in GitHub Actions with Environments
The article 'Unlock Safer Deployments: Job-Level Approvals in GitHub Actions with Environments' reinforces the concepts from the video and clearly explains the benefits of using Environments.
Read the sections 'The Native Solution: GitHub Environments and Protection Rules', 'How to Configure Environment Protection Rules for Manual Approval', and 'Why Environments Excel as Software Development Productivity Tools'. This will solidify your understanding of the feature's power and proper use.
3. Implementation in Jenkins: The input Step
In Jenkins, you can achieve the same outcome using built-in declarative pipeline syntax. The key components are:
stageblocks to define the deployment steps for each environment.- The
inputstep to pause the pipeline and prompt for human approval. whendirectives to conditionally execute stages based on the branch or other parameters.
A Complete Video Walkthrough
This video demonstrates a complete multi-environment deployment pipeline in Jenkins, including the crucial manual approval step before deploying to production.
Multi-Environment Deployment with Jenkins (Best Practices 2024)
The video 'Multi-Environment Deployment with Jenkins' from Emergency TechOps shows how to structure a Jenkinsfile to deploy different branches to different environments and how to insert a manual approval gate.
Please watch the following segments: (25:18 - 33:41): This part breaks down the structure of a declarative Jenkinsfile. Focus on the use of parameters, the when { expression { ... } } block for conditional deployments, and the introduction of the input step before the production deployment. (33:41 - 34:10): This short but critical section explains how the input step creates a manager approval gate and can be combined with notifications (like Slack). (52:52 - 53:43): This is the live demo of the approval gate. Watch how the pipeline runs, deploys to other environments, and then pauses at the 'Deploy to Prod' stage, waiting for someone to click 'Proceed'.
Jenkinsfile Example
The input step is simple yet powerful. You place it in its own stage right before the critical stage you want to protect. If a user rejects the input, the pipeline fails. If they approve it, the pipeline continues to the next stage.
The following Jenkinsfile provides a clear, real-world example of this pattern.
How to Build a Real-World CI/CD Pipeline for Microservices with ...
For a concise code example, let's look at the 'How to Build a Real-World CI/CD Pipeline...' article, which provides a clean Jenkinsfile.
Review the sections 'CI pipeline stages' and the full Jenkinsfile example. Focus specifically on the stage('Manual approval to Prod') and how it uses the input step. Notice it is placed right before the stage('Deploy to Prod').
Here's the core logic extracted into a simplified Jenkinsfile:
pipeline {
    agent any

    stages {
        stage('Build') {
            steps {
                echo 'Building and publishing container image...'
                // Steps from previous lesson go here
            }
        }

        stage('Deploy to Staging') {
            steps {
                echo 'Deploying to the staging environment...'
                // kubectl apply or helm upgrade for staging
            }
        }

        // This is the manual approval gate
        stage('Approve for Production') {
            // Only run this gate for the main branch
            when { branch 'main' }
            steps {
                script {
                    // This will pause the pipeline and require a user
                    // to click "Proceed" in the Jenkins UI.
                    input message: "Deploy to production?", ok: "Yes, Deploy to Production"
                }
            }
        }

        stage('Deploy to Production') {
            // This stage only runs if the 'Approve for Production' stage succeeds
            when { branch 'main' }
            steps {
                echo 'Deploying to the production environment...'
                // kubectl apply or helm upgrade for production
            }
        }
    }
}
This structure ensures that deployments to production are deliberate and only happen after both automated checks (in staging) and manual human review have been completed.
Conclusion
You have now learned how to build a safe and controlled deployment workflow that bridges the gap between continuous integration and production. By implementing staging environments and manual approval gates, you introduce critical checkpoints that protect your production systems and give your team confidence in the release process.
Key Takeaways:
- Staging environments are essential for final validation of a release candidate in a production-like setting.
- Manual approval gates provide necessary human oversight for critical deployments, creating an auditable "go/no-go" decision point.
- GitHub Actions implements this natively using Environments and protection rules, which offer granular control, environment-specific secrets, and a full audit trail.
- Jenkins uses the declarative
inputstep within astageto pause the pipeline and wait for manual confirmation before proceeding.
In our next lesson, we will address a crucial follow-up question: what happens when a deployment goes wrong? We will compare common rollback strategies and design a process to revert a failed deployment, completing your understanding of the deployment lifecycle.