Hello! Welcome back to the Embedded Interview Preparation Bootcamp.
In our last lesson, we established a crucial pattern for responsive device drivers: splitting interrupt handling into a fast top half and a deferrable bottom half (workqueue). This allows your driver to handle hardware events without blocking the system. Now, we'll focus on one of the most common sources of those interrupts: General-Purpose Input/Output (GPIO) pins.
Your work in automotive embedded systems has undoubtedly involved configuring and reading digital I/O. In Linux, the kernel provides a robust and standardized framework for this. This lesson moves beyond simple register writes to the modern, descriptor-based GPIO API that is standard practice in kernel development.
Your learning outcome for this lesson is to: Use the modern GPIO framework (gpiod_* API) to control GPIO lines from a kernel driver.
1. The Linux GPIO Architecture
At a high level, the GPIO subsystem in Linux acts as an abstraction layer between hardware-agnostic consumer drivers (like your keyboard, touchscreen, or custom device driver) and the hardware-specific GPIO controller drivers.
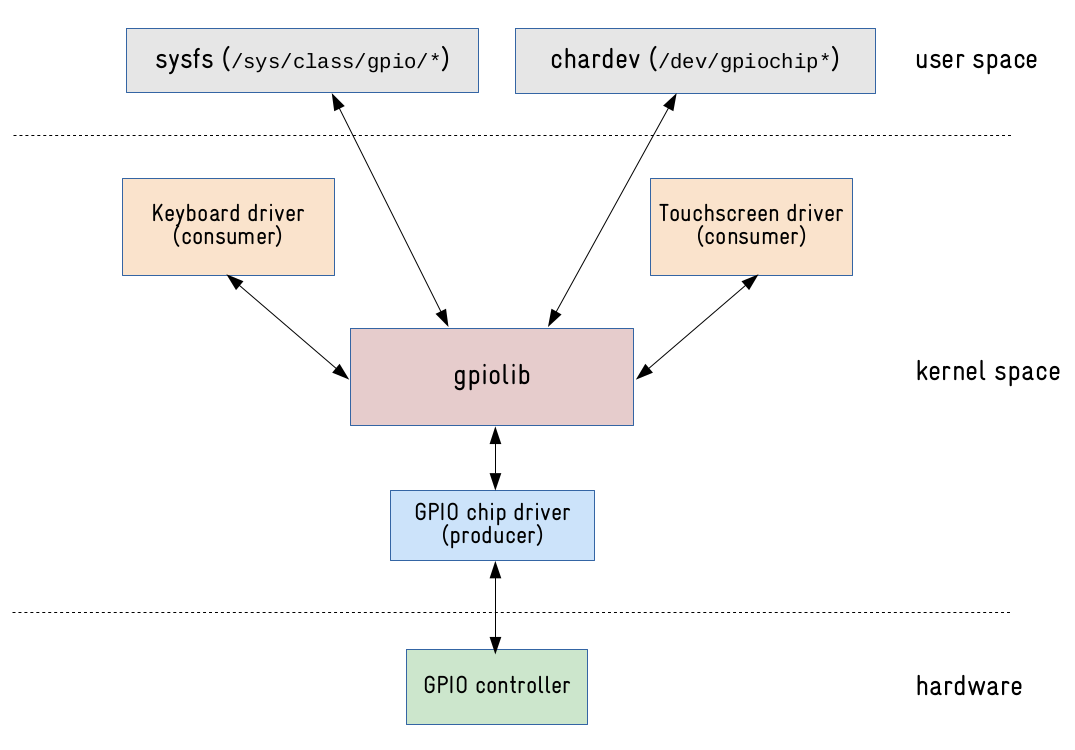
Historically, drivers referenced GPIOs using a global integer number space (gpio_request(21, ...)). This approach proved fragile and unscalable for modern Systems-on-Chip (SoCs) with hundreds of GPIOs across multiple controllers. The modern standard, which is the focus of this lesson and what interviewers expect you to know, is the descriptor-based (gpiod_*) API.
2. From Unstable Numbers to Stable Descriptors
To understand why the gpiod_* API is so important, it's essential to grasp the problems it solves. A kernel subsystem maintainer provides the best context on this shift.
In this talk from The Linux Foundation, kernel maintainer Linus Walleij explains the historical context and motivation for moving away from the legacy number-based GPIO interface.
Watch the segment from 00:08:45 to 00:12:05. Focus on the reasons why the global number space is considered unstable and problematic, especially concerning probe order and system complexity.
As you just saw, the core issues with the legacy integer-based API are:
- Unstable Namespace: GPIO numbers could change depending on module probe order, making hardcoded numbers in drivers unreliable.
- No Ownership or Typing: The global numbers didn't inherently belong to a device, leading to potential conflicts and a lack of clarity.
- Poor Scalability: On complex SoCs with multiple GPIO controllers and expanders, managing a flat number space becomes a nightmare.
The descriptor-based API solves this by using an opaque struct gpio_desc *. This descriptor is not a simple number; it's a stable, non-forgeable handle that the kernel provides to your driver, representing a specific GPIO line for a specific device.
3. The Modern GPIO Workflow
The standard workflow for using a GPIO in a modern platform driver involves three main steps: defining the resource in the device tree, acquiring it in your driver's probe function, and then controlling it.
Step 1: Describing the GPIO in the Device Tree
The device tree is the standard way to describe non-discoverable hardware to the Linux kernel. A GPIO is a resource that a device uses, so you declare it within that device's node.
The syntax for a GPIO specifier is typically: &<phandle_to_gpio_controller> <pin_number> <flags>.
Linux Drivers – Using the device tree to define your GPIO
This article provides a concise, up-to-date example of defining a GPIO in a device tree overlay for a Raspberry Pi 5. It clearly demonstrates the modern syntax and properties.
Read the section 'Using the device tree to define your GPIO'. Pay close attention to the led-gpios = <&rp1_gpio 13 GPIO_ACTIVE_LOW>; line. Note the use of a phandle (&rp1_gpio), a pin number, and a flag (GPIO_ACTIVE_LOW). Also, understand how the property name led-gpios is deliberately chosen.
The key is that the hardware connection is defined in the device tree, not hardcoded in the driver. The property name (e.g., led-gpios, reset-gpios) gives the GPIO a functional name. The trailing -gpios is a convention that the framework recognizes.
Step 2: Acquiring the GPIO Descriptor in probe()
When your driver's probe function is called for a device, you can now request the GPIO described in the device tree. The primary function for this is gpiod_get().
The device-managed variant, devm_gpiod_get(), is strongly preferred as it automatically handles releasing the GPIO when the driver is unbound from the device.
#include <linux/gpio/consumer.h> // The essential header

static int my_driver_probe(struct platform_device *pdev)
{
    struct device *dev = &pdev->dev;
    struct gpio_desc *led_gpio;

    /*
     * Acquire the GPIO descriptor.
     * - dev: The device requesting the GPIO.
     * - "led": The connection ID, matching the "led-gpios" property in the DT.
     * - GPIOD_OUT_HIGH: An optional flag to set initial direction and value.
     */
    led_gpio = devm_gpiod_get(dev, "led", GPIOD_OUT_HIGH);
    if (IS_ERR(led_gpio)) {
        // -ENOENT means the DT property wasn't found.
        // Other error codes indicate a problem acquiring the GPIO.
        return PTR_ERR(led_gpio);
    }

    // ... save led_gpio in private data and continue probing ...

    return 0;
}
The con_id ("led" in this case) directly corresponds to the led-gpios property name from the device tree. This mapping by name is what makes the new API so robust.
For the definitive guide on GPIO acquisition functions, you should know where to find the official kernel documentation.
GPIO Descriptor Consumer Interface
This is the official kernel documentation for the consumer GPIO interface. It's the primary source of truth for all API functions.
Skim the section 'Obtaining and Disposing GPIOs'. Notice the different functions available, such as gpiod_get, gpiod_get_optional (for GPIOs that may not be present), and the device-managed devm_* variants.
Step 3: Controlling the GPIO
Once you have a valid descriptor, you can control the pin.
1. Setting Direction:
If you didn't set the direction during acquisition, you must do so before using the GPIO.
// Set as an output, with an initial value of 0 (inactive).
int ret = gpiod_direction_output(led_gpio, 0);

// Set as an input.
ret = gpiod_direction_input(led_gpio);
2. Setting and Getting Values:
The most common functions are gpiod_set_value() and gpiod_get_value(). These are spinlock-safe and can be called from atomic contexts like an ISR (top half).
A critical concept here is logical vs. physical value. The gpiod_set_value() function operates on logical values (1 for active, 0 for inactive). It automatically accounts for the GPIO_ACTIVE_LOW flag from the device tree.
Linux Drivers – Using the device tree node in the driver
The emlogic.no article provides an excellent explanation and code example of the difference between logical and raw value access.
Read the section 'Using the device tree node in the driver'. Focus on the code comments explaining gpiod_set_value() vs. gpiod_set_raw_value() and how they behave with the GPIO_ACTIVE_LOW property.
To summarize this crucial point:
gpiod_set_value(led_gpio, 1);// Sets the line to its "active" state. If active-low, the physical pin goes to 0V.gpiod_set_raw_value(led_gpio, 1);// Sets the physical pin to a high state (e.g., 3.3V), ignoring active-low configuration.
As a driver author, you should almost always use the logical gpiod_set_value(), as your driver shouldn't need to know about the board-level wiring details.
4. A Practical Walkthrough
Let's tie this all together by watching a developer implement a simple GPIO driver from scratch. This video covers the entire process, reinforcing the steps we've just discussed.
Let's code a Linux Driver - 21: Device Tree GPIO Driver
This video provides a complete end-to-end demonstration of creating a GPIO driver using the modern framework.
Watch the video from 02:03 to 12:06. As you watch, identify the key steps: Device Tree (02:03): See how the green-led-gpio property is added. Driver Probe (03:42): Observe the use of gpiod_get to acquire the descriptor and gpiod_set_value to control it. Compilation & Testing (10:43): Watch how the device tree overlay and kernel module are loaded and tested.
5. Using GPIOs for Interrupts
Connecting back to our previous lesson, GPIOs are frequently configured as interrupt sources. The gpiod framework provides a clean way to get the corresponding IRQ number for a GPIO descriptor.
The function is gpiod_to_irq():
#include <linux/interrupt.h>

// In your probe function, after getting the descriptor...
struct gpio_desc *button_gpio;
int irq;

button_gpio = devm_gpiod_get(dev, "button", GPIOD_IN);
if (IS_ERR(button_gpio))
    return PTR_ERR(button_gpio);

// Now, convert the descriptor to an IRQ number
irq = gpiod_to_irq(button_gpio);
if (irq < 0) {
    // Error converting to IRQ (e.g., pin doesn't support interrupts)
    return irq;
}

// You now have an IRQ number to use with request_irq!
ret = devm_request_irq(dev, irq, my_driver_isr, IRQF_TRIGGER_FALLING, "my-button", dev);
if (ret) {
    // Error requesting IRQ
    return ret;
}
This seamlessly bridges the GPIO and generic IRQ frameworks. You describe the GPIO in the DT, get a descriptor, convert it to an IRQ, and then register your top-half handler just as you learned in the last lesson.
6. Interview Perspective
Control over low-level I/O is fundamental in semiconductor companies. You can expect to be tested on your knowledge of the modern GPIO framework.
-
Question: "Why did the Linux kernel move from an integer-based GPIO API to the modern descriptor-based (
gpiod_*) API? What problems does the new API solve?"- Your Answer: You should talk about the instability of the global number space due to probe order dependency. Mention that the descriptor model provides a stable, opaque handle that is explicitly tied to a consumer device, preventing conflicts and making drivers more portable across different board layouts.
-
Question: "I need to control an LED from my platform driver. Walk me through the entire process, starting from the device tree."
- Your Answer:
- Define the LED in the device tree with a property like
led-gpios = <&gpio1 5 GPIO_ACTIVE_LOW>;. - In the driver's
probefunction, usedevm_gpiod_get(dev, "led", GPIOD_OUT_LOW)to acquire the descriptor. - The
con_id"led" matches theled-gpiosproperty. - To turn the LED on, call
gpiod_set_value(led_gpio, 1). The framework handles the active-low inversion. - Explain that using
devm_*simplifies error handling and cleanup.
- Define the LED in the device tree with a property like
- Your Answer:
-
Question: "My device has a 'data ready' signal connected to a GPIO, which should trigger an interrupt. How do I set this up in my driver?"
- Your Answer: Describe the process we just covered: acquire the GPIO descriptor using
devm_gpiod_get()with theGPIOD_INflag. Then, callgpiod_to_irq()on that descriptor to get the virtual IRQ number. Finally, pass that IRQ number todevm_request_irq()to register your top-half ISR.
- Your Answer: Describe the process we just covered: acquire the GPIO descriptor using
Conclusion
You have now learned the modern, standard-compliant way to manage GPIOs within a Linux kernel driver. This approach emphasizes hardware description in the device tree and robust, portable driver code.
Key Takeaways:
- The modern
gpiod_*descriptor-based API is the standard for all new kernel code. - The workflow is Describe -> Acquire -> Control. GPIOs are described in the Device Tree, acquired with
gpiod_get()inprobe(), and controlled with functions likegpiod_direction_output()andgpiod_set_value(). - The
gpiod_*functions abstract away physical line characteristics.gpiod_set_value(desc, 1)always means "activate," regardless of whether the line is active-high or active-low. - The bridge to the interrupt subsystem is
gpiod_to_irq(), which converts a GPIO descriptor into an IRQ number forrequest_irq().
Preview of the Next Lesson:
A single physical pin on an SoC can often serve multiple functions (e.g., it could be a GPIO, a UART TX pin, or an I2C SCL pin). The GPIO framework lets you control a pin when it's configured as a GPIO. In the next lesson, we will explore the subsystems that control this configuration: Use the pinctrl and clock frameworks to configure pin multiplexing and manage peripheral clock rates.