Welcome back! In our previous lesson, we transformed our static ProductCard into a reusable, dynamic component using props. You learned the powerful analogy between Figma's component properties and React's props, allowing you to configure components by passing data from a parent. This is the foundation of building a scalable component library.
However, props only solve half of the puzzle. They handle data coming from the outside. What happens when a component needs to remember something about itself that changes over time? For instance, whether a dropdown menu is open, which tab is currently active, or the text a user has typed into a search bar. This internal memory is called state.
This lesson will introduce you to the useState hook, React's primary tool for managing local component state. By the end of this lesson, you will be able to give your components their own memory, making them fully interactive. This is the key to bringing your static designs to life.
Props vs. State: The Two Types of Component Data
To build interactive UIs, it's crucial to understand the difference between props and state.
- Props (Properties): Are passed into a component from its parent. They are read-only from the child component's perspective. Think of them as configuration settings. You use props to tell a
Buttoncomponent what its label and color should be. - State: Is data that is managed inside a component. It is private and can be changed by the component itself over time, usually in response to user interaction. You use state to track whether a
Modalcomponent is currently visible or not.
When either a component's props or its state changes, React automatically re-renders the component to reflect the new data.

The distinction is about data ownership. Does the parent component own the data and pass it down? It's props. Does the component itself own and manage the data? It's state.
The Magic of Re-rendering: Why Regular Variables Fail
A common question for beginners is, "Why can't I just use a simple JavaScript variable to track changes?"
Let's imagine trying to build a counter with a standard variable:
// This will NOT work as expected in React!
function Counter() {
  let count = 0;

  const handleClick = () => {
    count = count + 1;
    console.log(count); // The console will show 1, 2, 3...
  };

  return (
    <div>
      <p>You clicked {count} times</p> {/* This will always show 0! */}
      <button onClick={handleClick}>Click me</button>
    </div>
  );
}
If you run this code, you'll notice that while the console.log shows the count increasing, the text on the screen never updates. It always says "You clicked 0 times."
This happens because React components are just functions that execute to produce UI. When the count variable changes, React has no way of knowing it needs to run the Counter function again to produce an updated UI. To React, changing a local variable is an invisible side effect.
This is the problem that state solves. By using a special function provided by React, we can tell React, "This piece of data is important. When it changes, please re-render this component." That special function is the useState hook.
React useState Hook Explained: Managing State and Re- ...
This article by Ali Aslam provides a fantastic explanation of the foundational concepts of state.
Read from the beginning, starting with "What is State in React?" to solidify the definition. Then, pay close attention to the section "Why not just use variables?", which explains exactly why the code example above fails. Finally, the article introduces useState with a working counter, explaining the core idea of one-way data flow.
Introducing the useState Hook
A "hook" in React is a special function that lets you "hook into" React features from your functional components. The useState hook lets you hook into the state feature.
Here’s how you use it:
- Import it from React:
import { useState } from 'react'; - Call it inside your component to create a piece of state.
The syntax looks like this:
const [stateVariable, setStateFunction] = useState(initialValue);
Let's break this down with a practical example:
import { useState } from 'react';

function Counter() {
  // 1. Call useState with an initial value of 0.
  // 2. It returns an array with two things:
  //    - `count`: The current value of our state (initially 0).
  //    - `setCount`: A function to update that value.
  const [count, setCount] = useState(0);

  const handleIncrement = () => {
    // 3. To update the state, we call the setter function.
    //    This tells React to re-render the component.
    setCount(count + 1);
  };

  return (
    <div>
      <p>You clicked {count} times</p>
      <button onClick={handleIncrement}>Click me</button>
    </div>
  );
}
This line const [count, setCount] = useState(0); is using a JavaScript feature called "array destructuring." It's a concise way to pull the two items out of the array that useState returns and assign them to variables.
The video below provides an excellent walkthrough, first demonstrating why a regular variable fails, and then showing how useState fixes it.
Learn to use State in React in 19 minutes (for beginners)
In this video, Sonny Sangha clearly explains the concept of state and walks through building a counter, which is the classic "Hello, World!" for useState.
Watch the introduction from "think of state" to understand the core purpose of state. Observe the demonstration from building the counter where using a let variable fails to update the UI. This is a crucial point. Finally, watch how the code is fixed using the useState hook from implementing useState. Pay attention to the syntax: the initial value, the state variable (count), and the setter function (setCount).
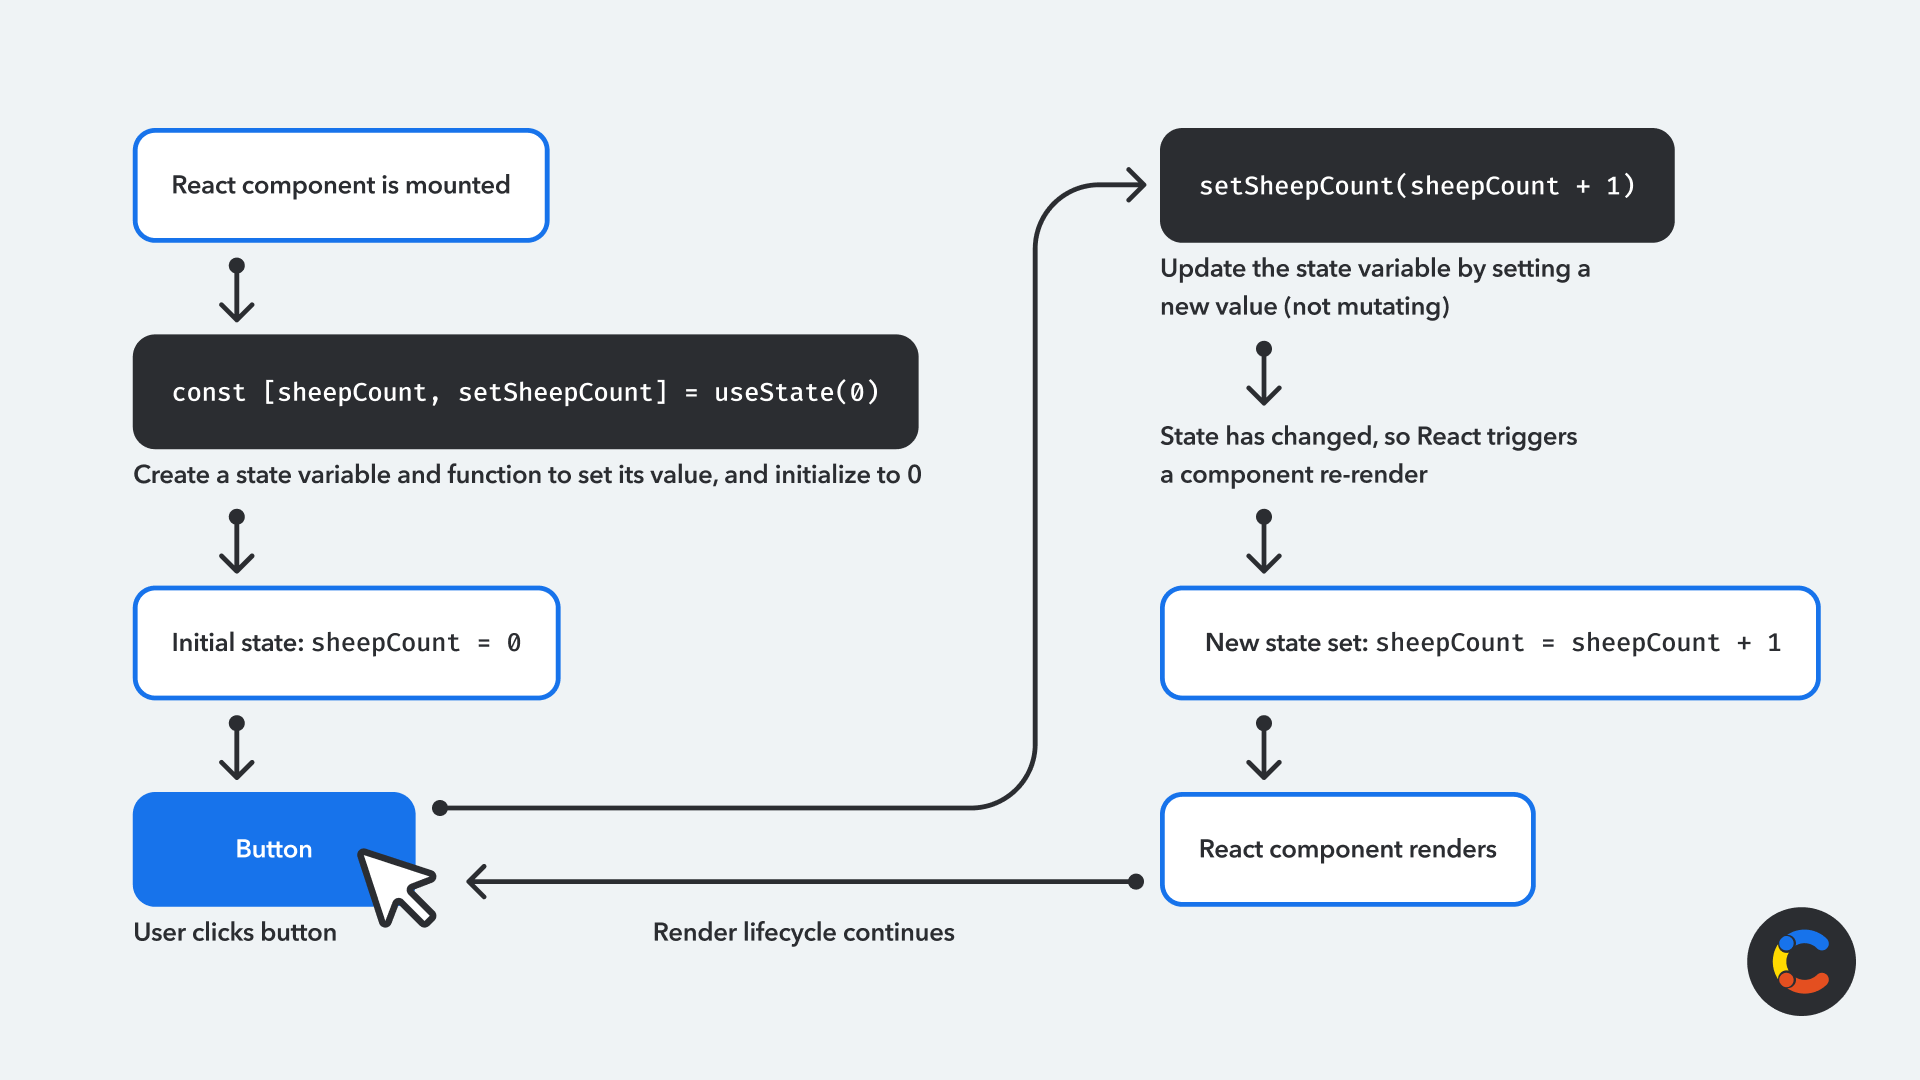
The useState Lifecycle
The useState hook follows a clear lifecycle every time an update occurs. This is how interactivity is born in React.
Common Patterns with useState
While a number counter is a great learning tool, you'll most often use useState to manage other data types like booleans, strings, and objects to control your UI.
Toggling a Boolean State
A very common use case is managing an open/closed state, like for a dropdown menu or an "expand details" button. This is typically handled with a boolean (true/false) state.
import { useState } from 'react';

function Accordion() {
  const [isOpen, setIsOpen] = useState(false);

  const toggleAccordion = () => {
    // We set the state to the opposite of its current value.
    setIsOpen(!isOpen);
  };

  return (
    <div>
      <button onClick={toggleAccordion}>
        {isOpen ? 'Collapse' : 'Expand'}
      </button>
      {/* Conditionally render the content based on the isOpen state */}
      {isOpen && (
        <div>
          <p>Here is some hidden content that is now visible!</p>
        </div>
      )}
    </div>
  );
}
This pattern is fundamental to your work as a Design Engineer. You'll use it for modals, tooltips, navigation menus, and more.
React useState() hook introduction 🎣
This video from Bro Code provides another clear, step-by-step introduction to useState and demonstrates its use with different data types.
First, review the syntax explanation from "import it at the top". Notice the common naming convention: [myVariable, setMyVariable]. Then, watch the example of a boolean variable being toggled. This directly maps to the learning outcome of managing an "open/closed state."
State and User Experience: Loading States
Your background in UX makes you acutely aware of the importance of feedback during loading. Skeletons and spinners are not just decorative; they manage user expectations. useState is the tool you'll use to implement this.
A common pattern is to have an isLoading state variable that you toggle as you fetch data.
Handling React loading states with React Loading Skeleton
This LogRocket article demonstrates using skeleton loaders, a key UX pattern. While it introduces data fetching concepts we'll cover later, it has a perfect, simple example of using useState for a UI-specific need.
Find the section "Using skeletons for partial data loading." In the code block that follows, notice this line: const [isImageLoaded, setIsImageLoaded] = useState(false);. This is a real-world example of using a boolean state to track if an image has loaded, showing a skeleton placeholder until it has. This is a perfect blend of code and user experience thinking.
Rules of State
To use state effectively and avoid bugs, there are a few important rules to follow:
-
Never Modify State Directly. Always use the setter function.
- Wrong:
count = count + 1; - Right:
setCount(count + 1);
Directly modifying the state variable will not trigger a re-render.
- Wrong:
-
State Updates May Be Asynchronous. React can batch multiple state updates together for performance. This means you can't rely on the state variable having its new value immediately after calling the setter function.
-
Use a "Functional Update" When New State Depends on the Old. If you need to update state based on its previous value (like in a counter), it's safer to pass a function to your setter. This function will receive the previous state as an argument, ensuring you're working with the most up-to-date value.
- Good:
setCount(count + 1); - Better/Safer:
setCount(prevCount => prevCount + 1);
- Good:
React useState Hook Explained: Managing State and Re- ...
Let's revisit the article by Ali Aslam to review the rules and best practices.
Read the section on common mistakes to reinforce Rule #1. Then, study the section on Functional Updates to understand Rule #3. Finally, review the Best Practices and Summary for a concise recap.
Supervising AI: Prompting for Stateful Behavior
When using Cursor for Vibe Coding, describing the state a component needs is a critical part of your prompt. You are moving beyond describing what something looks like to describing how it behaves.
- Weak Prompt: "Make an accordion component."
- Strong, State-Aware Prompt: "Create a React component named
FaqAccordion. It should use theuseStatehook to manage a boolean state calledisOpen, initialized tofalse. The component should display a question and a button. When the button is clicked, it should toggle theisOpenstate. An answer section should only be visible whenisOpenistrue."
Your role as the supervisor is to:
- Verify the
useStatecall: Does it have the correct initial value? - Check the event handler: Does the click handler correctly call the setter function (e.g.,
setIsOpen)? - Inspect the conditional rendering: Is the UI element correctly shown or hidden based on the state variable (e.g.,
isOpen)?
Conclusion
You've now learned about the second major data-handling concept in React: state. While props allow you to configure components from the outside, state gives them an internal memory, making them interactive.
Key Takeaways:
- State is local, private data that a component manages internally.
- The
useStatehook is used to add state to functional components. It returns a state variable and a setter function. - Calling the setter function is the only correct way to update state, as it tells React to re-render the component.
- Common state patterns include managing booleans for toggles (open/closed, visible/hidden), strings for input fields, and numbers for counters.
- Always use the setter function (never mutate state directly), and prefer functional updates when the new state depends on the previous one.
We've now seen how to create state and how to create a function that updates it. In the next lesson, we will dive deeper into handling user events, formally connecting actions like clicks and input changes to the state-updating functions you learned about today.