Introduction
In our last lesson, you mastered conditional rendering, learning how to show and hide UI elements based on state. This is the exact skill you need to create user experiences that feel responsive and informative, especially when dealing with data that isn't instantly available. You know from your UX work that showing a loading indicator or a clear error message is crucial for a good user journey.
This lesson connects that concept to a core React capability: fetching data from an API. We'll introduce the useEffect hook, which allows your components to perform "side effects"—actions that interact with the world outside of React, like making an API request. You will learn the standard, robust pattern for fetching data when a component first mounts, managing loading and error states along the way. Most importantly, you will learn to recognize what correct, professional-grade data fetching code looks like, empowering you to effectively supervise and fix the code generated by AI tools like Cursor.
Side Effects and the useEffect Hook
In React, a component's main job is to transform props and state into JSX. A "side effect" is anything your component does that affects something outside of its own scope. Common examples include:
- Fetching data from a server (an API call).
- Setting up a subscription to a WebSocket.
- Manually changing the DOM (e.g., to focus an input field).
React provides a special hook to manage these side effects: useEffect. The key thing to remember is that useEffect runs after your component has rendered to the screen.
The basic syntax is:
useEffect(() => {
  // Your side effect code goes here.
}, [dependencies]);
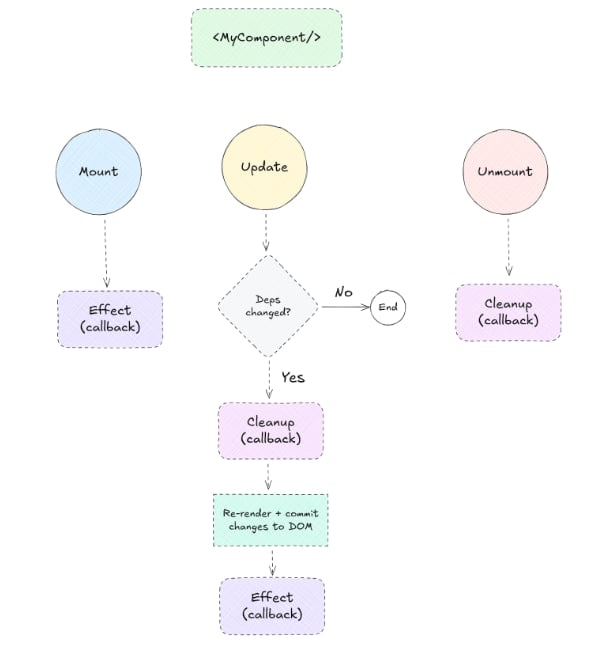
The second argument, the dependency array, is crucial. It tells React when to re-run the effect:
[](an empty array): The effect runs only once, after the component's initial render. This is perfect for fetching initial data when a component first appears or "mounts".[propA, stateB]: The effect runs after the initial render, and then again any timepropAorstateBchanges.- No array: The effect runs after every single render. This almost always leads to bugs (like infinite loops) and should be avoided.
The Anatomy of a Data Fetching Effect
Let's build the complete, robust pattern for fetching data on component mount. This pattern directly implements the state transitions (Loading → Success/Error) you would design in Figma.
The process involves combining three hooks: useState (for managing data, loading, and error states), useEffect (to perform the fetch), and the conditional rendering logic you learned in the last lesson.
Here is a breakdown of the standard pattern:
-
Three States, Three
useStateHooks: You need to track the data itself, whether the request is in progress, and if an error occurred.const [data, setData] = useState(null); const [loading, setLoading] = useState(true); const [error, setError] = useState(null);We initialize
loadingtotruebecause the fetch will begin immediately on mount. -
The
useEffectStructure: We define anasyncfunction inside theuseEffectcallback. You cannot make the callback itselfasync.useEffect(() => { const fetchData = async () => { // Fetching logic will go here }; fetchData(); }, []); // Empty array means run once on mount -
The
try/catchBlock: To handle both success and failure gracefully, we wrap our fetching logic in atry/catchblock.try { const response = await fetch('api/url'); if (!response.ok) { throw new Error('Network response was not ok'); } const jsonData = await response.json(); setData(jsonData); } catch (error) { setError(error); } finally { setLoading(false); }- The
tryblock attempts the fetch. If it succeeds, it updates thedatastate. - The
catchblock executes if any error occurs (e.g., network down, server error), updating theerrorstate. - The
finallyblock always runs, whether the fetch succeeded or failed. It's the perfect place to setloadingtofalse.
- The
-
Conditional Rendering: Finally, you use the state variables to render the correct UI.
if (loading) {
  return <div>Loading...</div>;
}
if (error) {
  return <div>Error: {error.message}</div>;
}
return (
  // Your success UI that uses the `data`
);
The following article provides a clear, complete example of this entire pattern.
How to Handle API Calls with useEffect
This article from OneUptime demonstrates the complete, modern pattern for fetching data in a React component, including state management for loading and errors.
Read the section from the beginning down to the end of the first code example. Pay close attention to how the UserProfile component uses useState for user, loading, and error, and how the useEffect hook orchestrates the API call and state updates. Notice how the final return statements use conditional rendering to handle each state.
Supervising AI: Recognizing and Fixing Common useEffect Mistakes
As a Design Engineer using Vibe Coding, your most important job is not to write this code from scratch, but to supervise it. AI tools can generate data-fetching components quickly, but they often produce code that is buggy, inefficient, or fragile. Here are the critical mistakes to watch for.
Mistake 1: The Infinite Loop (Missing Dependency Array)
If the AI forgets the [] dependency array, the useEffect will run after every render. Since setting state with setData causes a re-render, this creates an infinite loop of fetching and re-rendering.
- What to look for: A
useEffectthat fetches data but has no second argument. - How to fix: Add an empty array
[]as the second argument touseEffect.
The following article explains this classic mistake and its simple solution very clearly.
How to fetch data with React Hooks
This guide by Robin Wieruch is a classic resource on data fetching in React. This particular section masterfully explains the most common useEffect pitfall.
Read the text starting from the paragraph that discusses the loop. The author clearly explains why leaving out the dependency array causes an infinite loop and how adding [] solves it.
Mistake 2: Unhandled Race Conditions and Missing Cleanup
This is a more subtle but critical bug. Imagine a search component that refetches data as the user types.
- User types "react". A fetch request begins.
- Before that request finishes, the user quickly types "nextjs". A second fetch request begins.
- The "nextjs" request is fast and returns first. The UI updates correctly.
- Then, the original "react" request finally finishes. It overwrites the UI with the now-stale "react" data.
The UI is now showing the wrong results. This is a race condition. The solution is to cancel the previous request before starting a new one. This is done using useEffect's cleanup function and a tool called AbortController.
The cleanup function is a function that you can return from your useEffect callback. React will run this function just before it runs the effect again, or when the component is unmounted.
Fetching Data in React - Complete Tutorial
This tutorial from Cosden Solutions provides an exceptionally clear, step-by-step explanation of race conditions and how to solve them using AbortController.
Watch the section from "one thing that you really have to think about". The presenter does an excellent job of: Explaining what a race condition is with a practical example (00:15:31 - 00:21:07). Demonstrating the AbortController pattern to cancel the previous request (00:21:07 - 00:25:02). Showing how to handle the specific AbortError so it doesn't trigger your error UI (00:25:02 - 00:27:01).
When supervising AI code, always check if it includes this cleanup logic, especially for effects that can run multiple times. If it's missing, you now know how to add it.
Mistake 3: "Cannot read properties of null"
This error happens when your component tries to render data.name before the data has been fetched, when data is still null or undefined.
- What to look for: Accessing properties on a state variable that is initialized to
nullwithout any protection. - How to fix: Ensure your conditional rendering is correct. The
if (loading)orif (!data)check must come before any code that tries to access properties ondata.
This short video explains the problem and the clean solution using a loading state.
All 12 useState & useEffect Mistakes Junior React Developers Still Make in 2025
This ByteGrad video highlights common React mistakes. This specific segment is perfect for understanding why you get errors when rendering fetched data.
Watch the segment on "initializing state with an object". It clearly shows the error that occurs and demonstrates how implementing a proper loading state is the clean, correct solution.
Your Vibe Coding Prompt
Now you can write a much more powerful and precise prompt for Cursor. Instead of just "fetch user data," you can specify the entire robust pattern.
Weak Prompt:
"Create a component to fetch and display a user's profile."
Strong, Supervisable Prompt:
"Create a React component named
UserProfilethat accepts auserIdprop.
- On component mount, it should fetch user data from the API endpoint
https://jsonplaceholder.typicode.com/users/${userId}.- Use
useStateto manage three states:user(for the data),loading(boolean), anderror(for any errors).- Implement conditional rendering:
- If
loadingis true, show adivwith the text "Loading profile...".- If an
erroroccurs, show adivwith the error message.- If successful, display the user's name, email, and company name.
- Use
useEffect's cleanup function and anAbortControllerto cancel the fetch request if the component unmounts before the request completes. Ensure you handle the 'AbortError' so it's not treated as a real error."
This detailed prompt forces the AI to generate professional-grade code that you can then confidently review and approve.
Conclusion
You've now learned one of the most fundamental patterns in React development: fetching data with useEffect. You understand not just the "happy path," but also how to handle loading states, errors, and complex issues like race conditions.
Key Takeaways:
useEffectis the hook for managing side effects, like API calls, which run after the component renders.- The dependency array (
[]) is key to ensuring a fetch effect runs only once on mount. - A robust data-fetching component manages three states:
data,loading, anderror. - A
useEffectcleanup function withAbortControlleris the standard way to prevent race conditions by canceling stale requests. - Supervising AI means looking for these specific patterns and pitfalls: missing dependency arrays, lack of cleanup, and improper handling of initial
nullstate.
In our next lesson, we'll shift gears slightly. Now that your components are becoming more complex, managing your codebase becomes more important. We'll dive into Git branching, a fundamental skill that allows you to work on new features and experiments in isolation, without risking the stability of your main project.