Introduction
In our last lesson, you learned one of the most powerful patterns in React: using the useEffect hook to fetch data. You now understand how to manage loading and error states, and even how to handle tricky situations like race conditions. This is a huge step toward building dynamic, professional applications that interact with real-world data.
As you start building more complex features, it becomes critical to have a safe way to experiment and develop without risking the stability of your main project. What if you want to try a completely new layout for a page, or integrate a feature that might take a few days to get right? You don't want to commit broken or incomplete code to your main codebase. This lesson introduces the solution: Git branching.
Today, you will learn how to create and switch between Git branches to manage new features and experiments in an isolated environment. This practice is fundamental to modern software development and directly supports your goal of "shipping with confidence." For you as a designer, this concept will feel very familiar—it's the coding equivalent of duplicating a Figma frame to try out new ideas without touching the original design.
Why We Use Branches: A Designer's Analogy
In your UI/UX work, you would never experiment with radical new button styles directly on the final, client-approved design screen. Instead, you'd duplicate the frame or artboard, create your variations in that safe copy, and only merge the changes back once they are approved.
Git branching works on the exact same principle. The main branch (often called main or master) is your "source of truth"—the stable, working version of your application. When you want to start a new feature, fix a bug, or just experiment, you create a branch.
A branch is essentially a lightweight, movable copy of your project at a specific point in time. It allows you to create an isolated "sandbox" where you can make changes, add new code, and create commits without affecting the main branch.
Git Branching for Designers - Builder.io
This article from Builder.io does an excellent job of explaining Git concepts using analogies from the world of design. It will help you build an intuitive understanding of why branching is so powerful.
Please read the article from the section "Branching is like duplicating a Figma frame" up to the end of the "Collaborating works best async" section. Pay close attention to how the author equates creating a branch with duplicating a design frame for experimentation and safety.
As the article explains, this workflow provides a "creative safety net." You can explore ideas freely on your branch, and if an experiment doesn't work out, you can simply delete the branch, just like you would delete a messy duplicate frame in Figma.
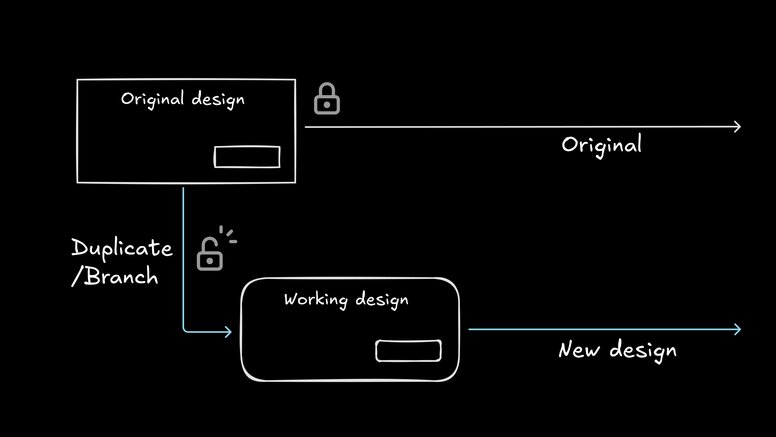
This diagram perfectly illustrates the branching concept. The "Original design" is like your main branch—stable and locked. You create a "Duplicate / Branch" to create a "Working design" where you can freely make changes for your "New design" without affecting the original.
In a professional team, this becomes even more important. Different developers work on different features, each on their own branch. This parallel workflow prevents them from interfering with each other's work. Once a feature is complete and tested, its branch is merged back into the main codebase.
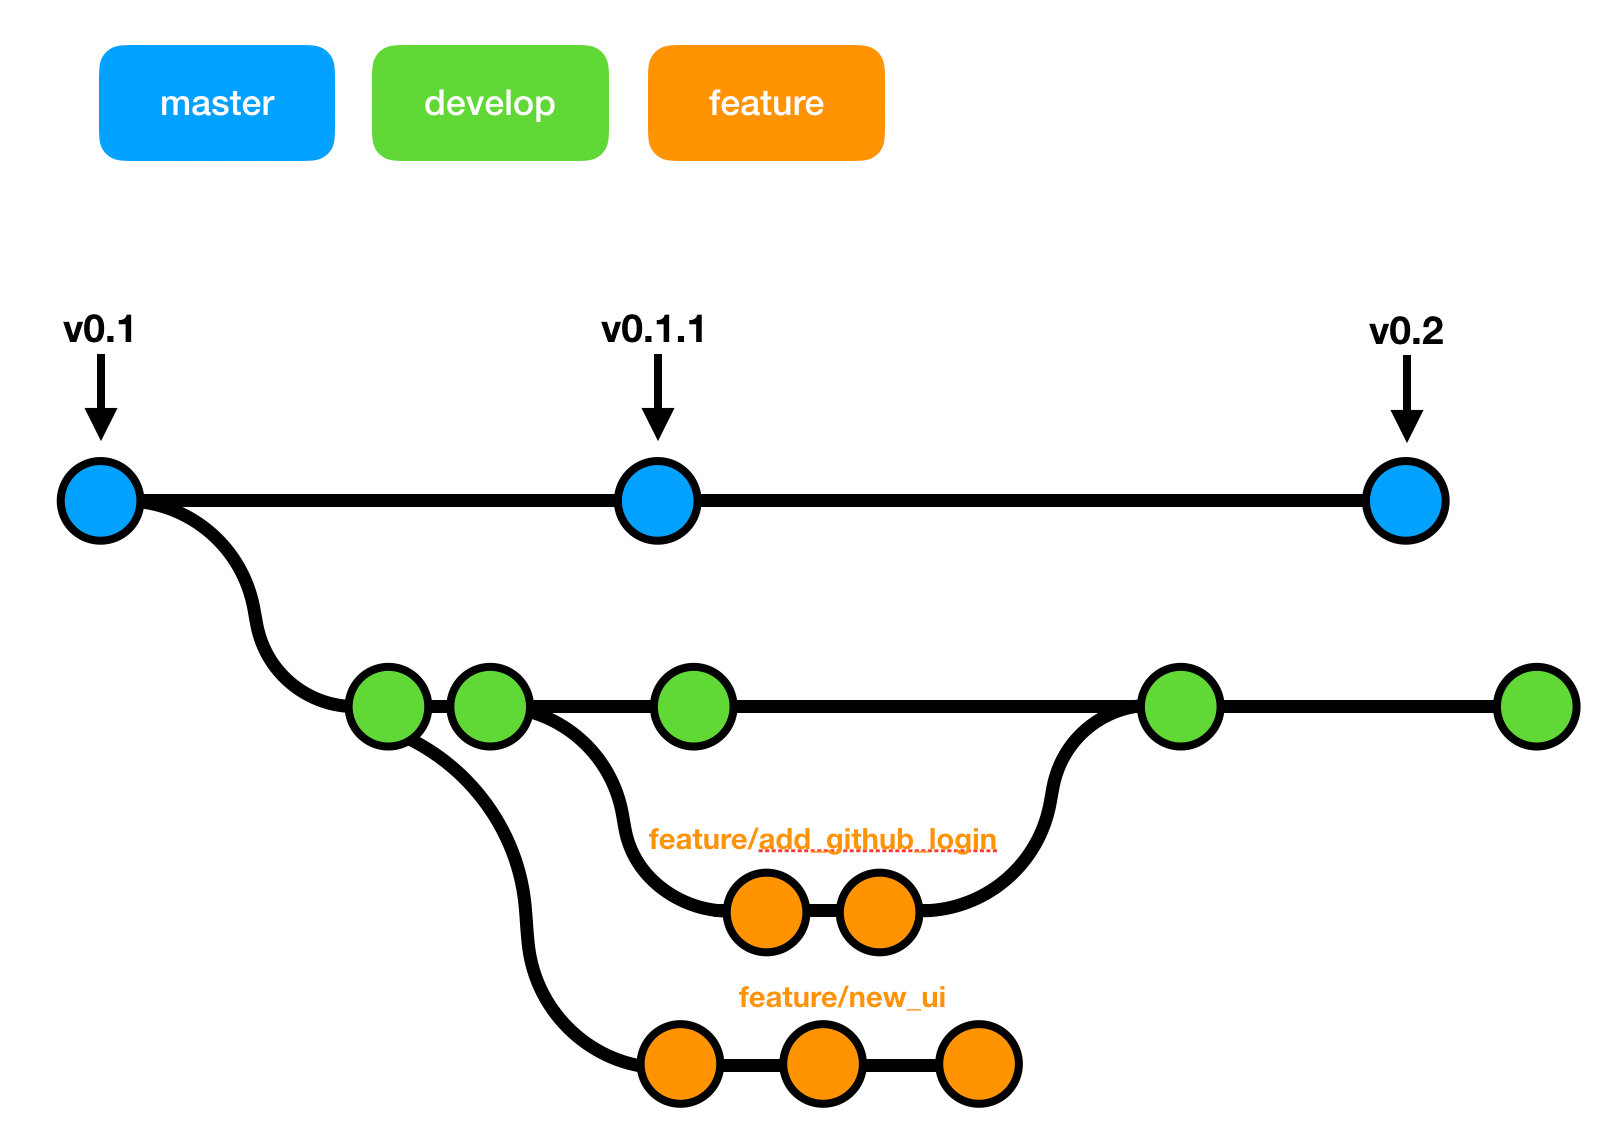
This diagram shows a typical branching workflow. The master branch holds released versions (v0.1, v0.2). The develop branch is where features are integrated. Individual feature branches (like feature/add_github_login) are created from develop for isolated work.
Branching in Practice with VS Code
Now that you understand the "why," let's move to the "how." You don't need to use complex command-line tools to manage branches. VS Code has excellent built-in support for Git that makes branching a straightforward, visual process.
Creating a New Branch
When you're about to start a new piece of work, the first step is to create a new branch. It's a common convention to name branches with a prefix that describes their purpose, such as feature/, bugfix/, or refactor/.
Git Branches and Worktrees in VS Code
This official VS Code documentation provides clear, step-by-step instructions for managing branches within the editor.
Read the section titled "Create new branches". It outlines the process of creating a branch from the Command Palette and gives examples of descriptive naming conventions.
To see this in action, the following video from the Visual Studio Code team provides a quick demonstration.
Git: branches in Visual Studio Code
This short video demonstrates the core branching operations directly within the VS Code UI.
Watch the segment from the beginning of the creation process. Notice how you can open the Command Palette (⇧⌘P on Mac, Ctrl+Shift+P on Windows), type "Create Branch," give it a name, and choose which existing branch to base it on (usually main).
Switching Between Branches
Once you have multiple branches, you'll need to switch between them. In Git, this is called "checking out" a branch. When you check out a branch, VS Code updates all the files in your project to match the state of that branch. This might feel like magic at first—files will appear, disappear, or change content right before your eyes!
Git Branches and Worktrees in VS Code
Let's return to the VS Code documentation to see how to switch branches.
Read the section "Switch between branches". The easiest way is to click the branch name in the bottom-left corner of the Status Bar and select your desired branch from the list.
Again, let's watch a quick demonstration of this.
Git: branches in Visual Studio Code
This part of the video shows just how simple it is to switch your working context.
Watch the segment from "in order to switch between branches". The presenter clicks the branch name in the status bar and simply picks another branch from the list. The UI immediately reflects the change.
A Hands-On Scenario: The Feature Branch Workflow
Let's put this all together with a practical scenario that simulates professional development workflow. Imagine you are working on a new feature, but midway through, an urgent bug needs to be fixed on the main site. Branching makes this manageable.
The following video walks through this exact scenario using the command line. While you will be using the VS Code UI, the concepts are identical. The video provides an excellent visualization of how the project's files and commit history change as you move between branches.
Git Branching and Merging - Detailed Tutorial
This tutorial from SuperSimpleDev gives a fantastic, in-depth walkthrough of creating a feature branch, working on it, and then switching back to the main branch to handle an unrelated task.
Please watch the following sections closely. As you watch the presenter use command-line tools, try to map their actions to the VS Code UI operations you just learned. Creating a Feature Branch (watch here): The presenter creates a new branch called feature-one and switches to it. You would do this using Git: Create Branch in VS Code. Working on the Feature (watch here): They add new code and make commits on the feature branch. This isolates the new, work-in-progress code. Handling an Urgent Bug Fix (watch here): This is the key part. An urgent bug comes up. The presenter switches back to the master branch. Notice how the new feature file disappears! They then create a bug fix and commit it directly to master. The feature-one branch is untouched.
This process demonstrates the core value of branching: you can pause work on a long-running feature, address an urgent issue on your stable main branch, and then switch back to your feature branch to continue, all without your different streams of work interfering with one another.
Conclusion
You have now learned the fundamental Git workflow for managing features and experiments safely. By creating and switching between branches, you can build complex functionality in an isolated environment, ensuring your main branch always remains stable and deployable. This is a cornerstone of "shipping with confidence."
Key Takeaways:
- Branching is for isolation: It creates a safe sandbox for new work without affecting the main codebase.
- It's like duplicating a design: The analogy of duplicating a Figma frame is a powerful mental model for understanding branches.
- The
mainbranch is sacred: It should always represent a stable, working version of your project.
- VS Code makes it easy: You can create, switch, and manage branches visually through the Status Bar and Command Palette.
- Feature branch workflow: A standard professional practice is to create a new branch for every new feature or significant task.
In our next module, we will start building more complex user interfaces. You'll learn how to break down a large design into a hierarchy of smaller, reusable React components. As you build each new component or feature, you will now have the perfect tool—Git branching—to manage that development process cleanly and safely.