Introduction
In our last lesson, you learned how to dynamically render lists of components from data using .map(). This is a powerful technique for creating structured UIs. But what happens when that data is empty? Or what if you want to create an interactive element, like a toggle or a dropdown menu that opens and closes? Static lists aren't enough; user interfaces must react to changing conditions.
This lesson bridges that gap by diving into conditional rendering. You'll learn how to show or hide UI elements based on state and props, a skill that directly translates the different component states you design in Figma into functional, interactive code. This is where your UI/UX expertise truly starts to merge with frontend development, allowing you to build the dynamic, responsive experiences users expect.
To begin, let's consider the different states a component might be in, especially when it depends on external data.
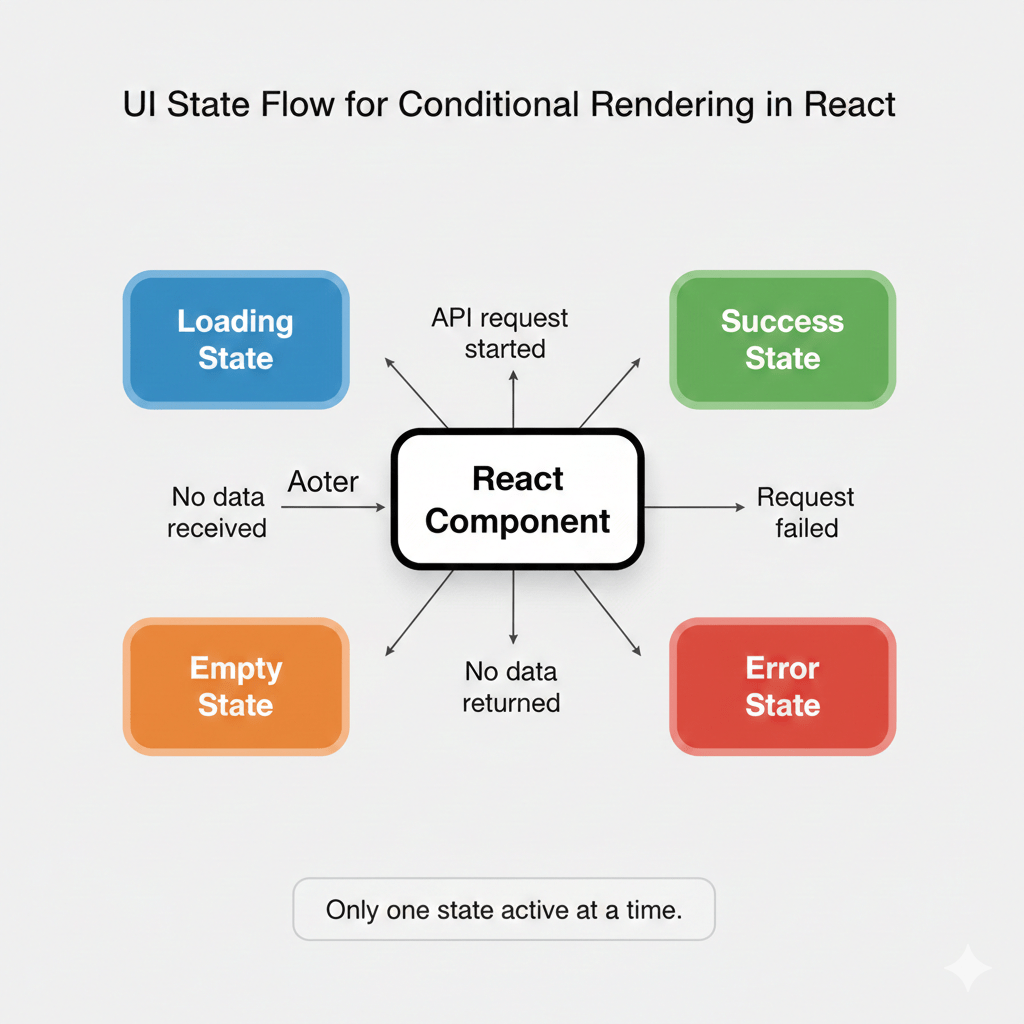
The Core Techniques of Conditional Rendering
In React, you don't learn a new, special syntax for conditions. Instead, you use standard JavaScript logic directly within your components. Let's explore the most common techniques, from simple if statements to more compact inline operators.
1. The if/else Statement
The most straightforward way to handle conditions is with a JavaScript if statement. You can use it to return entirely different JSX blocks depending on a prop or state value.
For example, imagine a StatusMessage component. If a status prop is 'success', you might show a green success message. If it's 'error', you show a red error message.
function StatusMessage({ status }) {
  if (status === 'success') {
    return <p style={{ color: 'green' }}>Operation was successful!</p>;
  }
  if (status === 'error') {
    return <p style={{ color: 'red' }}>An error occurred.</p>;
  }
  return null; // Render nothing if status is neither
}
Notice the return null; at the end. If a condition isn't met and you don't want to render anything, returning null tells React to render nothing. This is a perfectly valid and common practice.
The official React documentation provides a great interactive example of this pattern.
This guide from the React team introduces the foundational concepts of conditional rendering. It clearly explains how to use if statements and how to return null to prevent a component from rendering.
Read the sections "Conditionally returning JSX" and "Conditionally returning nothing with null". Pay close attention to how returning a different JSX tree or null changes the output.
2. The Ternary Operator (? :) for "Either/Or" Logic
While if statements are clear, they can be verbose, especially when you only want to change a small part of your component. For "either-or" situations, the JavaScript ternary operator (condition ? expressionIfTrue : expressionIfFalse) is a more compact and popular choice.
It fits perfectly inside JSX, allowing you to decide which element or text to render on the fly. Let's revisit the isPacked example from the React docs.
function Item({ name, isPacked }) {
  return (
    <li className="item">
      {name} {isPacked ? '✅' : '❌'}
    </li>
  );
}
Here, if isPacked is true, it renders '✅'; otherwise, it renders '❌'. This is much cleaner than writing two separate return statements.
3. The Logical AND Operator (&&) for "Show or Nothing" Logic
What if you only want to render something if a condition is true, and nothing otherwise? You could use a ternary operator (isLoggedIn ? <ProfileIcon /> : null), but there's an even shorter way: the logical AND (&&) operator.
In JavaScript, the expression true && expression always evaluates to expression, and false && expression always evaluates to false. React doesn't render false, null, or undefined, so this works perfectly.
function Mailbox({ unreadMessages }) {
  return (
    <div>
      <h1>Hello!</h1>
      {unreadMessages.length > 0 &&
        <h2>
          You have {unreadMessages.length} unread messages.
        </h2>
      }
    </div>
  );
}
The <h2> is only rendered if unreadMessages.length > 0 is true.
An Important Pitfall to Supervise: Be careful when the left side of && is a number. 0 && <Component /> will render the number 0, not nothing! Always use a boolean expression, like count > 0 && <Component />. This is a classic bug you should watch for in your own and AI-generated code.
This video provides a great walkthrough of these inline techniques.
React 19 Tutorial - 10 - Conditional Rendering
This Codevolution video clearly demonstrates how and when to use the ternary and logical AND operators for cleaner, more concise conditional rendering.
Watch the segment on the ternary operator to see how it handles "either-or" cases. Then, watch the section on the logical AND operator, paying close attention to the pitfall explained around using numbers.
From Figma Properties to React Props
As a Design Engineer, your goal is to create a seamless link between design and code. Conditional rendering is where this connection becomes tangible. A boolean property you define in a Figma component variant should map directly to a prop in your React component.
For example, if you have a Button component in Figma with a boolean property called showIcon, your React component should accept a showIcon prop and use it to conditionally render the icon.
// In your Figma component properties:
// showIcon: boolean

// In your React component:
function Button({ label, showIcon, icon }) {
  return (
    <button>
      {showIcon && <span className="icon">{icon}</span>}
      {label}
    </button>
  );
}
This systematic mapping is a core principle of building scalable design systems.
From Figma to Production Code in 30 Minutes
This article highlights a systematic workflow for translating Figma designs into code. The section on component thinking is particularly relevant here.
Read the sections "Proper Variant Definition" and "Boolean Properties for Conditional Logic". Notice the direct one-to-one mapping they propose from Figma boolean properties to conditional rendering logic in React.
Practical Application: Building a Toggle Switch
Let's apply these concepts to build a common interactive pattern: a toggle switch. A toggle has two visual states (on/off) controlled by a single piece of boolean state.
- We'll use
useStateto store the toggle's state (e.g.,const [enabled, setEnabled] = useState(false);). - An
onClickevent on the switch will toggle this state (setEnabled(!enabled);). - We'll use this
enabledstate with Tailwind CSS classes to conditionally change the appearance of the switch.
Building Accessible Switch/Toggle Buttons with Headless UI React and Tailwind CSS
This video from the Tailwind Labs channel demonstrates building a toggle switch. While it focuses on accessibility with Headless UI, the initial implementation perfectly illustrates our learning outcome.
Watch the first part of the video, from the beginning to the point where the basic toggle is functional. Notice how the enabled state from useState is used to: Control the checked prop of the Switch component. Conditionally apply styles to move the circle and change the background color.
This is the essence of interactive UI in React: state determines what is rendered.
Supervising AI for Conditional Logic
When prompting an AI like Cursor to build components with conditional logic, being explicit is crucial for getting reliable code.
- Weak Prompt: "Make a user profile card that shows if the user is an admin."
- Strong, Supervisable Prompt: "Create a React component named
UserProfileCard. It should accept auserobject prop withname(string) andisAdmin(boolean) properties. Inside the component, render the user's name. After the name, use the&&operator to conditionally render a' (Admin)'badge only ifuser.isAdministrue. Ensure the badge is wrapped in aspanwith a specific class for styling."
When supervising the generated code, you should check for:
- Correct Condition: Does the code check the right prop or state variable (e.g.,
user.isAdmin)? - Appropriate Operator: Did the AI use the best tool for the job? (
&&for show/hide,? :for either/or). - The
0Pitfall: If the condition involves a number (like a count), did the AI correctly usecount > 0 && ...instead of justcount && ...? - Readability: For complex logic, is the code becoming hard to read with nested ternaries? If so, you might refactor it or ask the AI to use a variable to hold the conditional JSX.

Conclusion
You've now learned the fundamental techniques for making your components dynamic and responsive to data. By mastering conditional rendering, you can create UIs that feel alive, providing users with the right information and controls at the right time. This is a skill you will use in nearly every component you build.
Key Takeaways:
- Use JavaScript's
if, ternary (? :), and logical AND (&&) operators to control what your components render. - Return
nullfrom a component to render nothing. - Directly map boolean properties from your Figma designs to props in your React components to drive conditional rendering.
- Combine
useStatewith conditional styling and rendering to build interactive patterns like toggles and dropdowns. - When supervising AI, be explicit about the conditions and operators to use, and always check for common pitfalls like the
&& 0bug.
In our next lesson, we will put this all together. You'll learn how to use the useEffect hook to fetch data from an API when a component first mounts. You'll then use conditional rendering to manage the full UI flow: showing a loading state, displaying the data on success, or showing an error message if something goes wrong.