Welcome back! In our last session, you learned how to programmatically select and modify any part of a webpage using JavaScript and the DOM. You now have the power to change text, styles, and even create elements from scratch. This is the foundation for a dynamic UI, but it's currently static—the changes happen when the script runs, not when the user acts.
Today, we'll connect your DOM manipulation skills to user behavior. This lesson is all about event listeners, the mechanism that makes web pages interactive. You will learn how to "listen" for user actions like clicks and keyboard input, and then run your JavaScript code in response. For a UI/UX designer, this is where your user flows and interaction designs become tangible reality in the browser. You're no longer just describing what should happen when a user clicks a button; you're writing the code that makes it happen.
The Event-Driven World of the Browser
Every interactive website operates on an event-driven model. When a user does something—clicks a mouse, presses a key, submits a form—the browser fires an "event". Our job as developers is to "listen" for these events and provide a "handler" function (also called a "callback") that executes in response.
This flow is the core of all user interface programming. The diagram below provides a simplified but powerful mental model for this process.
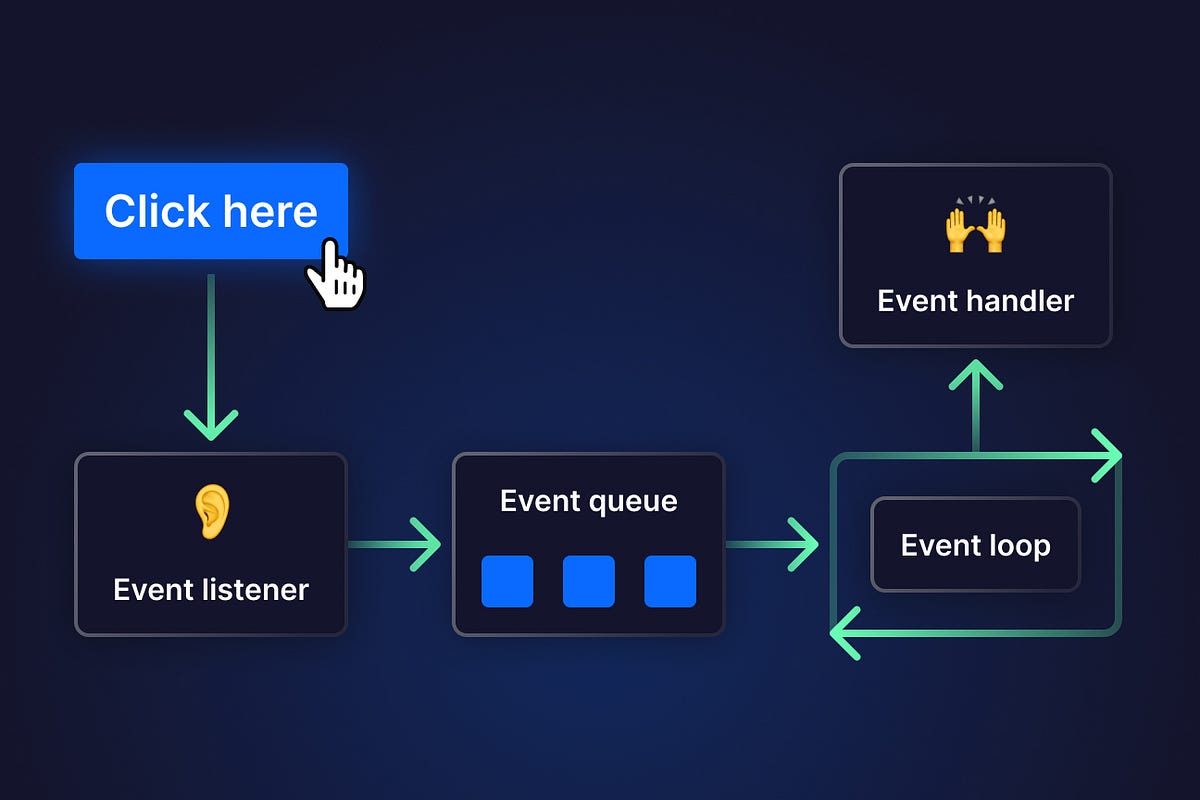
Attaching Listeners with addEventListener()
The modern and most flexible way to handle events in JavaScript is with the addEventListener() method. You call this method on the DOM element you want to observe.
The basic structure looks like this:
const myButton = document.querySelector('#my-button');

myButton.addEventListener('click', () => {
  // Code to run when the button is clicked
  console.log('Button was clicked!');
});
Let's break down its parts:
- The Target Element (
myButton): This is a reference to a DOM node, which you learned to select in the previous lesson. - The Event Type (
'click'): A string that specifies which event to listen for. Note that we use'click', not'onclick'. - The Handler/Callback Function (
() => { ... }): This is the function that will be executed when the event occurs. It can be an anonymous arrow function, as shown above, or a named function.
For a clear, concise introduction to this method and its syntax, the W3Schools documentation is an excellent starting point.
JavaScript HTML DOM EventListener
This guide from W3Schools provides a solid definition and syntax breakdown for addEventListener().
Please read the first three main sections: The introduction, which explains the benefits of this method. The section on Syntax, which details the parameters. The section Add an Event Handler, which shows examples using both anonymous and named functions.
To see this in action, the following short video provides a great visual walkthrough.
Learn JavaScript EventListeners in 4 Minutes
This video from Coding2GO, "Learn JavaScript EventListeners in 4 Minutes," quickly demonstrates the core concept.
Watch the first part of the video from the beginning until the end of the click demo. This will visually reinforce how to select an element and attach a click listener.
Handling Common User Interactions: Clicks and Inputs
As a UI designer, you constantly work with interactive components like buttons, forms, and input fields. In JavaScript, these correspond to specific event types.
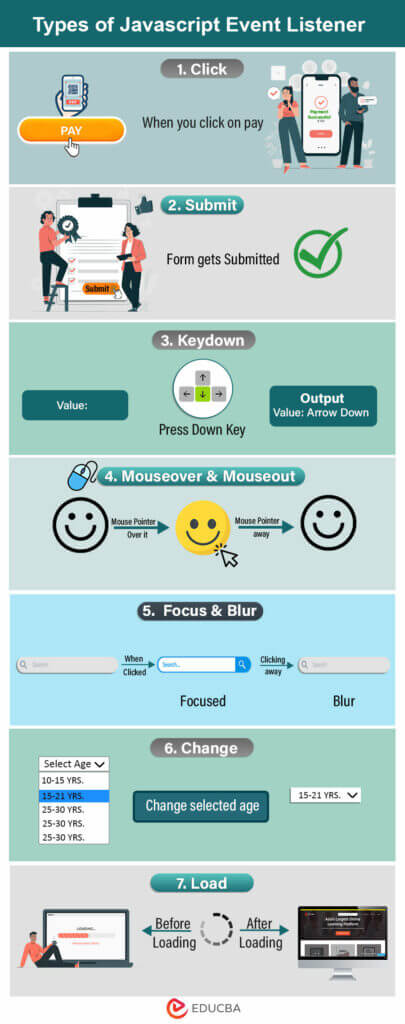
Let's focus on the two most crucial types for this lesson: click and input-related events.
The click Event
This is the most straightforward event. It fires when a user clicks on an element. It's used for buttons, links, navigation items, and any other element that should respond to a mouse click or a tap on a touch screen.
The input and change Events
When dealing with form fields like <input> or <textarea>, you have two primary events to choose from, and their difference is critical for creating the right user experience.
-
input: This event fires immediately every time the value of the element changes. This means it fires on every single keystroke. It's perfect for UIs that need to provide real-time feedback, such as a live character counter or an instant search filter. -
change: This event fires only when the element loses focus (e.g., the user clicks or tabs away) and its value has been modified since it gained focus. It's best for actions that should only happen after the user has finished entering their data, like validating an email format once they move to the next field.
The distinction between input and change is a classic "gotcha" for new developers. This short video explains the difference perfectly.
What's the Difference Between the Input and Change Event in JavaScript?
The dcode channel provides a clear, side-by-side comparison of the input and change events.
Watch the entire video. The presenter first demonstrates the input event, showing how it fires on every keystroke. Then, they contrast this with the change event, which only fires after the input loses focus.
The event Object: Getting Context from the Interaction
When an event occurs and your handler function is called, the browser automatically passes a special object to it as an argument. By convention, we often name this parameter event, evt, or simply e. This object is packed with useful information about the interaction that just happened.
const myInput = document.querySelector('#my-input');

myInput.addEventListener('input', (event) => {
  // 'event' is the special object passed by the browser
  console.log(event);
});
For now, two properties on the event object are most important for you:
event.target: This refers to the actual DOM element that the event originated from. This is incredibly useful, especially when you have one event listener on a parent element managing events for many children.event.target.value: When dealing with input fields, this property gives you the current value of that input. This is how you read what the user has typed.
The mimo.org glossary provides excellent, practical code examples showing how to use these events and the event object.
JavaScript Event Listener Method: Syntax, Usage, and ...
This article provides real-world use cases and code snippets that are directly applicable to the UIs you design.
Focus on these sections: First, read the section on When to Use and the list of use cases to connect these events to familiar UI patterns. Next, study Example 1 and Example 2 in the Examples section. The first shows a simple click handler, and the second is a perfect demonstration of the input event for a live character counter. Finally, read the short section on the event object basics to solidify your understanding of event.target.
Practice Time: Let's Make it Interactive
It's time to combine what you've learned. Create a new HTML file and a linked JavaScript file.
HTML:
<!DOCTYPE html>
<html lang="en">
<head>
    <meta charset="UTF-8">
    <title>Event Listener Practice</title>
</head>
<body>
    <h1>Live Feedback Form</h1>

    <label for="name-input">Enter your name:</label>
    <input type="text" id="name-input" placeholder="e.g., Alex Doe">

    <p>Hello, <span id="name-display">...</span>!</p>

    <button id="reset-btn">Reset</button>

    <script src="app.js"></script>
</body>
</html>
Your Task (in app.js):
-
Live Update:
- Select the
name-inputelement and thename-displayspan. - Add an
inputevent listener to thename-input. - Inside the handler function, get the current value of the input using
event.target.value. - Update the
textContentof thename-displayspan to show the user's input in real-time. If the input is empty, the span should show "...".
- Select the
-
Reset Button:
- Select the
reset-btnbutton. - Add a
clickevent listener to the button. - Inside the handler, clear the value of the
name-inputand reset thetextContentof thename-displayspan back to "...".
- Select the
Try to solve this on your own first. When you're ready, you can compare your code with the solution below.
Click to see the solution
// Select the elements
const nameInput = document.querySelector('#name-input');
const nameDisplay = document.querySelector('#name-display');
const resetButton = document.querySelector('#reset-btn');

// 1. Add listener for the input field
nameInput.addEventListener('input', (event) => {
  const currentName = event.target.value;

  if (currentName) {
    nameDisplay.textContent = currentName;
  } else {
    nameDisplay.textContent = '...';
  }
});

// 2. Add listener for the reset button
resetButton.addEventListener('click', () => {
  nameInput.value = ''; // Clear the input field
  nameDisplay.textContent = '...'; // Reset the display text
});
Conclusion
You've now crossed a major threshold. By combining DOM selection, manipulation, and event listening, you can build the core functionality of any interactive web interface. This is the fundamental loop of front-end development: wait for a user to do something, then update the UI in response.
Key Takeaways:
element.addEventListener('event-name', handlerFunction)is the primary method for making elements interactive.- The
'click'event is used for buttons and other clickable elements. - The
'input'event provides instant feedback as a user types, while the'change'event waits until the user is done. - The
eventobject, passed automatically to your handler, provides crucial context, especiallyevent.target(the element) andevent.target.value(the input's content).
In our next lesson, we'll address an inevitable reality of coding: bugs. As you start building more complex interactions, things won't always work as expected. We will dive into the browser's developer tools and learn how to use the console to debug your JavaScript, a critical skill for efficiently finding and fixing errors, especially when you begin supervising AI-generated code.