Welcome to the next step in your journey to becoming a Design Engineer. In our last lesson, we focused on processing data using JavaScript's powerful array methods like .map() and .filter(). You learned how to transform a raw array of product data into a new array of formatted strings or filtered objects. This is a crucial skill for preparing data, but it's only half the story. The question remains: how do we get this content onto the actual webpage for a user to see?
Today, we will answer that question by diving into the Document Object Model (DOM). This lesson is the bridge between your data and the visual interface. You will learn how to use JavaScript to select any element on a webpage and modify it—changing its text, its style, or even adding and removing elements altogether. This is the fundamental technique for creating dynamic, interactive user experiences and turning a static HTML document into a living application.
What is the DOM? Think of Figma's Layers Panel
As a UI/UX designer, you are intimately familiar with organizing and structuring your designs in a tool like Figma. You work with a layers panel that shows a hierarchical list of all your frames, groups, and elements. A header contains a logo and a navigation menu; a card component contains an image, a title, and a button.
The browser has a very similar concept for web pages, and it's called the Document Object Model (DOM). When a browser loads an HTML file, it doesn't just display it; it creates a live, in-memory tree structure of all the elements. Each HTML tag becomes a "node" or an object in this tree. JavaScript can access this tree to read, change, add, or delete any of its nodes.

To get the formal definition, let's read a quick introduction from The Odin Project, a highly-respected web development curriculum.
This article provides a fantastic introduction to the DOM.
Read the first few sections to understand the core concept: what the DOM is, and the difference between "nodes" and "elements". Focus on the introduction and the section titled Document Object Model.
Step 1: Selecting Elements
Before you can modify an element, you need to select it. This is like clicking on a specific layer in Figma to change its properties. JavaScript provides several methods to do this, but the most powerful and modern ones use the same CSS selector syntax you already know.
The video below from the "Bro Code" channel gives an excellent, clear overview of the different ways to select elements. It also explains an important distinction between the different types of lists that these methods can return (HTMLCollection vs. NodeList).
Learn JavaScript ELEMENT SELECTORS easy! 📑
This video, "Learn JavaScript ELEMENT SELECTORS easy!", focuses exclusively on how to target elements in the DOM.
Watch the following segments. Pay close attention to what each method returns (a single element or a list) and why querySelector is so flexible. getElementById: The classic way to get a single element by its unique ID. getElementsByClassName: This selects multiple elements and returns an HTMLCollection. Note the explanation that it doesn't have a built-in .forEach() method. querySelector: The modern, versatile way to get the first element that matches any CSS selector. querySelectorAll: Selects all elements matching a CSS selector and returns a NodeList, which conveniently does have a .forEach() method.
To summarize, here's a quick comparison:
| Method | Selects By | Returns | Key Feature |
|---|---|---|---|
getElementById('id') |
Unique id |
Single Element | Fast and specific for one item. |
getElementsByClassName('class') |
class |
HTMLCollection |
Returns a live list; lacks array methods like .forEach(). |
querySelector('selector') |
Any CSS selector | First Matching Element | Extremely versatile. Use .nav-link, #header, div p, etc. |
querySelectorAll('selector') |
Any CSS selector | NodeList |
The go-to for selecting multiple elements. You can loop over the result with .forEach(). |
For your work, you will find that querySelector and querySelectorAll are what you'll use 95% of the time. Their flexibility is unmatched because you can use any CSS selector you can think of to pinpoint the exact elements you need.
Step 2: Modifying Elements
Once you have a reference to an element stored in a variable, you can start making changes.
Changing Content: textContent and innerHTML
You can change what's inside an element in two main ways. The Web Dev Simplified video below explains this brilliantly.
Learn DOM Manipulation In 18 Minutes
This video, "Learn DOM Manipulation In 18 Minutes", provides a rapid and clear tour of the most common DOM manipulation tasks.
Watch these two clips to understand how to change an element's content and the important security considerations involved. innerText vs textContent: Learn the subtle but important differences between these two properties for setting text. textContent is generally faster and more predictable. innerHTML: See how to inject HTML directly into an element. Pay close attention to the security warning. You should almost never use innerHTML with content that comes from a user, as it can expose your site to attacks.
Changing Styles: classList and the style property
As a designer, you'll want to change styles frequently. There are two approaches:
- Directly via the
styleproperty:element.style.color = 'red';This adds an "inline style" to the element. It's quick for one-off changes but can get messy. It's like applying a manual override to a single layer in Figma instead of using a style library. - Via CSS classes:
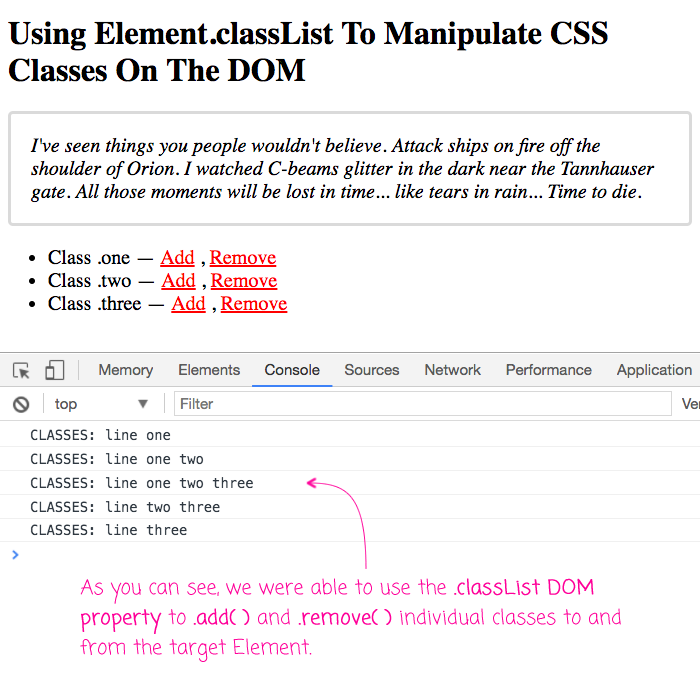
element.classList.add('active');This is the preferred method. You define your styles in your CSS file (.active { background-color: blue; }) and use JavaScript simply to toggle these classes on and off. This keeps your structure (HTML), presentation (CSS), and behavior (JS) separate and organized—a core principle of good web development that aligns perfectly with design systems thinking.
This image shows the classList property in action, demonstrating how add() and remove() can be used to dynamically change the classes on an element.
Let's return to the Web Dev Simplified video to see how classList and style work in practice.
Learn DOM Manipulation In 18 Minutes
Continuing with "Learn DOM Manipulation In 18 Minutes".
Watch these two final clips on styling: classList: See how to add, remove, and toggle classes. Toggling is especially useful for things like opening/closing a menu or marking a tab as active. The style property: Learn how to set individual CSS properties directly. Notice that CSS properties with a hyphen, like background-color, are written in camelCase in JavaScript: backgroundColor.
Step 3: Creating and Removing Elements
The most powerful feature of DOM manipulation is the ability to create brand new elements and add them to the page, or remove existing ones. This is how you can take an array of product data from the last lesson, loop through it, and generate a product card for each item on the fly.
The Odin Project article provides a very clear, step-by-step guide to this process.
This article clearly explains the methods for creating, adding, and modifying elements from scratch.
Please read the following sections carefully: Start at Element creation. This introduces document.createElement(). Notice the key point: this only creates the element in memory, it doesn't add it to the page yet. Continue reading the subsections on Append elements and Remove elements to learn about appendChild() and removeChild(). Next, read through the sections on Altering elements, which summarize how to add styles, attributes, and classes to the elements you've just created. Finally, review the complete example. Start at the review to see how all these pieces (querySelector, createElement, classList.add, textContent, and appendChild) come together to add a new div to the page.
Practice Time: Build a UI with JavaScript
Theory is great, but practice is where the learning sticks. The following exercise from The Odin Project will challenge you to use everything we've just covered.
Create a new HTML file and a linked JavaScript file on your computer. Your HTML body can start completely empty except for a single <div id="container"></div> and the <script> tag pointing to your JS file.
Your task is to add the following elements inside the #container div using ONLY JavaScript:
- A
<p>element with red text that says “Hey I’m red!” - An
<h3>element with blue text that says “I’m a blue h3!” - A
<div>with a black border and a pink background. Inside thisdiv, add the following elements:- Another
<h1>that says “I’m in a div” - A
<p>that says “ME TOO!”
- Another
Hint: For the third item, create the outer div first. Then, create the h1 and p, and appendChild them to the outer div. Finally, append the fully assembled outer div to the main #container.
Try to complete this on your own. When you're ready, you can check your work against the solution below.
Click to see the solution
// Get a reference to the main container
const container = document.querySelector('#container');

// 1. Create and add the red paragraph
const pRed = document.createElement('p');
pRed.style.color = 'red';
pRed.textContent = 'Hey I’m red!';
container.appendChild(pRed);

// 2. Create and add the blue h3
const h3Blue = document.createElement('h3');
h3Blue.style.color = 'blue';
h3Blue.textContent = 'I’m a blue h3!';
container.appendChild(h3Blue);

// 3. Create the div with a black border and pink background
const pinkDiv = document.createElement('div');
pinkDiv.style.border = '1px solid black';
pinkDiv.style.backgroundColor = 'pink';

// 3a. Create the h1 to go inside the div
const h1InDiv = document.createElement('h1');
h1InDiv.textContent = 'I’m in a div';

// 3b. Create the p to go inside the div
const pInDiv = document.createElement('p');
pInDiv.textContent = 'ME TOO!';

// 3c. Append the h1 and p to the pink div
pinkDiv.appendChild(h1InDiv);
pinkDiv.appendChild(pInDiv);

// 3d. Append the fully assembled pink div to the main container
container.appendChild(pinkDiv);
Conclusion
You have just unlocked a fundamental superpower of frontend development. By understanding and manipulating the DOM, you can now programmatically control the structure, content, and style of a webpage.
Key Takeaways:
- The DOM is the browser's live, scriptable tree representation of your HTML, much like a layers panel in a design tool.
- You can select elements using methods like
querySelector(for one) andquerySelectorAll(for many) with standard CSS selectors. - Once selected, you can modify an element's content with
.textContent, its styles by toggling classes with.classList, or by directly setting the.styleproperty. - You can create new elements from scratch using
document.createElement(), assemble them, and add them to the page withappendChild().
In our next lesson, we will make our UI truly interactive. You now know how to change things on the page. Next, you will learn how to make those changes happen in response to user actions. We will explore event listeners, which allow you to run your JavaScript code whenever a user clicks a button, types in a field, or moves their mouse.