Welcome back. In our last lesson, you mastered the crucial "review and fix" cycle, transforming you from a mere prompter of AI into a supervisor of its output. By systematically comparing generated code against your Figma designs and testing for responsiveness, you've learned to ensure the final product is a perfect translation of your design vision.
Now that you have a polished piece of code, the next logical step is to save and share it. This lesson introduces Git and GitHub, the industry-standard tools for version control and code collaboration. Think of this as establishing a permanent, professional home for your work. Mastering this workflow is a cornerstone of the "Shipping with Confidence" skill, allowing you to track your progress, collaborate with others, and deploy your projects to the web.
What are Git and GitHub?
Before we dive into the practical steps, it's essential to understand the two tools we'll be using and how they relate to each other. People often use the names interchangeably, but they serve distinct purposes.
- Git is a version control system. It's a program that runs on your computer. Its job is to track every change you make to your project's files over time. Imagine an infinite "history" panel for your entire project folder, allowing you to save snapshots (called "commits") and revert to any previous state if needed.
- GitHub is a web-based hosting service for Git repositories. It's where you store your projects in the cloud. Think of it as a specialized Dropbox or Google Drive for your code, but with powerful features for collaboration, code review, and project management.
The fundamental goal is to use Git on your local machine to manage your project's history and then use GitHub to keep a synchronized copy of that project in a remote, online location.
The following video from Design Pilot gives a clear overview of this core concept of keeping your local (your computer) and remote (GitHub) environments in sync.
Sync and Save: A Beginner’s Guide to GitHub with AI
This video, "Sync and Save: A Beginner’s Guide to GitHub with AI," is an excellent introduction to the core ideas behind using Git with GitHub.
Watch the opening segment from the beginning to understand the fundamental relationship between your local computer, the remote cloud, and how GitHub acts as the service to keep them synchronized.
The Core Git Workflow
The process of moving your code from a file on your computer to a project on GitHub follows a clear, logical path. This workflow involves four distinct areas.
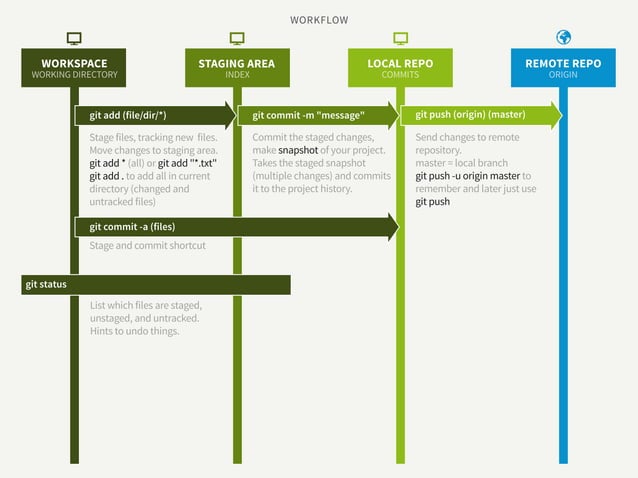
Let's break down these four stages:
- Workspace (or Working Directory): This is simply the project folder on your computer where you are actively editing your
index.html, CSS, or other files. - Staging Area (or Index): This is a crucial intermediate step. Before you save a snapshot of your project, you must first add your changes to the staging area. Think of it as gathering all the specific edits you want to include in your next save point. This allows you to be selective; you might have ten changed files but only want to save five of them in a particular commit.
- Local Repository: This is the complete history of your project, stored on your computer inside a hidden
.gitfolder within your project directory. Every time you "commit," you are saving a new snapshot from the staging area into this local history. - Remote Repository: This is the version of your project stored on GitHub. When you "push," you are uploading your local commits to this remote repository, updating the cloud version with the changes you made on your machine.
The key commands map directly to this flow:
git add: Moves changes from the Workspace to the Staging Area.git commit: Saves a snapshot of the Staging Area into the Local Repository.git push: Sends your committed changes from your Local Repository to the Remote Repository on GitHub.
Setting Up for Success (One-Time Only)
Before you can push your first project, you need to do a brief, one-time setup to install Git and introduce yourself to it. Since you're using Cursor, the process is streamlined.
The article "Git for Designers" provides a simple, non-intimidating guide to this initial setup.
Git for Designers: The Only Guide You'll Ever Need (Beginner ...
This guide is tailored for designers and explains Git concepts in an approachable way. We'll use it to get your system ready.
Read the section titled First-Time Setup. Follow the instructions to install Git if you haven't already. Then, open the terminal directly within Cursor (you can open it via the View > Terminal menu) and run the two git config commands to set your name and email. This is how Git will label your commits. You've already installed Cursor, so you can skip the VS Code part.
You will also need a GitHub account, which is part of the tool setup for this course. If you haven't created one yet, now is the time.
From Local Project to Live on GitHub
Now, let's walk through the process of taking the project you've been building and publishing it to GitHub. We will create a new home for it on GitHub and then use Cursor's built-in tools to push your code there.
The video "Sync and Save" provides a complete visual walkthrough of this entire process, from creating a repository to committing and pushing your changes, all within a modern, AI-assisted workflow.
Sync and Save: A Beginner’s Guide to GitHub with AI
We will follow the steps demonstrated in this video to get your project onto GitHub. The presenter uses Cursor, so the interface will be very familiar.
Follow along with these sections: Initializing and Committing (Making Your First Commits): Watch how a new project is initialized as a Git repository. Pay close attention to how changed files appear in the Source Control panel in Cursor. Observe the process of writing a commit message and saving your first snapshot. This part covers the "add" and "commit" steps. Publishing to GitHub (Pushing Your Repository): This section shows how to "publish" your local repository to GitHub. It walks through creating the project on GitHub and then using the "Publish Branch" button in Cursor to push your local files and commit history to the remote repository.
Let's consolidate this into a step-by-step action plan for you:
-
Create an Empty Repository on GitHub:
- Go to GitHub.com and sign in.
- Click the "New" button to create a new repository.
- Give it a name (e.g.,
product-card-component). - You can add a short description.
- Keep it Public.
- Do not initialize it with a README, .gitignore, or license. We want an empty repository to push our existing project into.
- Click "Create repository". You will be taken to a page with some command-line instructions. You can ignore them; we'll be using Cursor's visual interface.
-
Initialize and Push from Cursor:
- Open your project folder in Cursor.
- Click on the Source Control icon in the left-hand sidebar (it looks like three circles connected by lines).
- If your project isn't already a Git repository, you will likely see a blue button that says "Initialize Repository". Click it. This performs the
git initstep. - Your project files will now appear under a "Changes" list. This is your working directory.
- Click the
+icon next to "Changes" to stage all your files. This performs thegit addstep. - The files will move to a "Staged Changes" list.
- In the "Message" box at the top, type a descriptive commit message. For your first one, something like
Initial commit: Create responsive product cardis perfect. - Click the "Commit" button. This performs the
git commitstep. - Now, you should see a button that says "Publish Branch". Click it.
- Cursor will ask you where to publish the repository. Choose the "Publish to GitHub private/public repository" option. You will be prompted to select the repository you just created on GitHub.
- Cursor will then upload your files. This performs the
git pushstep.
-
Verify Your Work:
- Go back to your repository's page on GitHub and refresh. You should now see all your project files listed. You have successfully shipped your code to GitHub!
Conclusion
Congratulations! You've just mastered one of the most fundamental workflows in modern software development. By learning to initialize a repository, commit your changes, and push them to GitHub, you've established a robust system for saving, tracking, and sharing your work.
Key Takeaways:
- Git is the version control system on your computer that tracks changes.
- GitHub is the cloud platform that hosts your projects.
- The core workflow is to add changes to a staging area, commit them to your local history with a message, and push that history to GitHub.
- Your code editor, Cursor, has powerful, integrated visual tools that handle this entire process, allowing you to focus on the concepts rather than complex commands.
This skill is not just a technical exercise; it's the foundation of professional practice. In our upcoming lessons, as we dive into JavaScript to make our pages interactive, you will use this Git workflow every day to save your progress and build your projects incrementally.
In the next module, we'll shift gears from the static world of HTML and CSS to the dynamic world of JavaScript, starting with the very basics of how to bring your designs to life with interactivity.