Hello! In our last lesson, we laid the architectural blueprint for our movie search application. We broke the UI down into reusable components like MovieList, MovieListHeading, and SearchBox, and organized them using a professional folder structure. This gave us a static, but well-organized, foundation.
Today, we're going to breathe life into that structure. Our goal is to implement a search component that captures user input and triggers API requests. This is where our app transitions from a static page to a dynamic, interactive experience. You'll apply the controlled component pattern you've learned previously and connect our frontend to a real-world data source, the Open Movie Database (OMDb) API.
The Search Component in the Application Architecture
Before we dive into the code, let's zoom out and see how the search functionality fits into our application's design. The search bar isn't an isolated element; it's a crucial part of a system that communicates with an external API to fetch and display data.
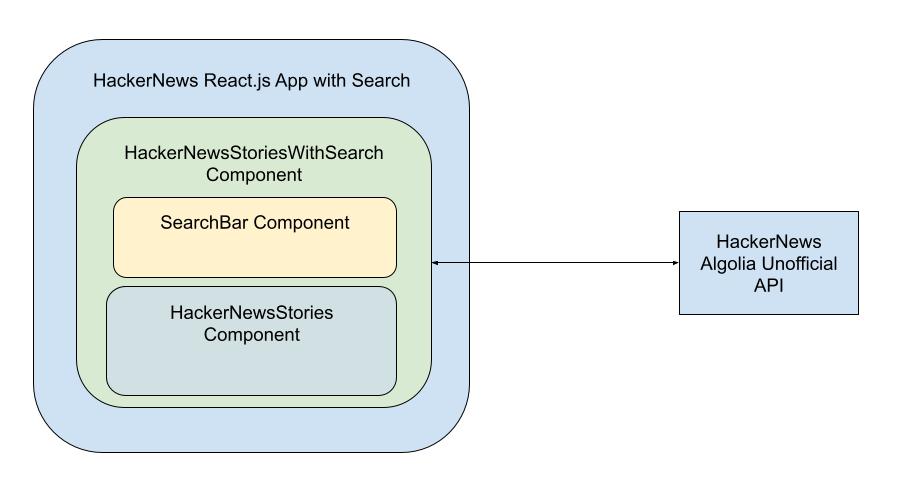
Our process today will mirror this flow:
- Capture user input from our
SearchBoxcomponent. - Use that input to make a request to the OMDb API.
- Store the results of that request in our application's state.
Step 1: Capturing User Input with a Controlled Component
The first step is to know what the user is typing. We'll use the controlled component pattern for this. This means React state will be the "single source of truth" for the input field's value. In the previous lesson, we passed placeholder props to SearchBox. Now, we'll make them functional.
React Movie App Tutorial - Build A Fun Portfolio Project ...
The freeCodeCamp article we've been following provides a clear guide on how to set this up. It demonstrates creating a state variable in App.js and passing both the value and the setter function down to the SearchBox component.
Please read the sections 'How to add the Search Input' and 'How to save the Search Input to state'. This will walk you through creating the SearchBox.js component and then connecting it to a new searchValue state in App.js.
To summarize the pattern you just read about:
- In
App.js, you create a state variable to hold the search query:const [searchValue, setSearchValue] = useState(''); - You pass both the state and the setter function as props to your
SearchBoxcomponent:<SearchBox searchValue={searchValue} setSearchValue={setSearchValue} /> - In
SearchBox.js, the component becomes a "controlled" component. It receives the value and the update function from its parent:const SearchBox = (props) => { return ( <input value={props.searchValue} onChange={(event) => props.setSearchValue(event.target.value)} placeholder='Type to search...' /> ); };
With this in place, App.js always knows the current search query.
Step 2: Triggering API Requests on Input Change
Now that we have the user's search term, we need to use it to fetch movies from the OMDb API. We'll use the useEffect hook to perform this "side effect" whenever the searchValue changes.
First, let's get our API credentials.
React Movie App Tutorial - Build A Fun Portfolio Project ...
The OMDb API is free to use for personal projects, but it requires an API key. This section of the freeCodeCamp article explains how to get one.
Read the section 'How to Get an API Key'. Follow the instructions to sign up and get your personal key. You'll need it for the next step.
Once you have your key, we can write the function to call the API and hook it into our component's lifecycle.
React Movie App Tutorial - Build A Fun Portfolio Project ...
This final part of the freeCodeCamp article shows how to tie everything together. It modifies the useEffect hook to re-run whenever searchValue changes, dynamically calling the API with the new query.
Read the section 'How to call the API when the Search Value changes'. Pay close attention to two key changes: the API URL now uses a template literal to include the searchValue, and searchValue is added to the useEffect dependency array.
The core logic is in App.js:
const getMovieRequest = async (searchValue) => {
    // Replace YOUR_API_KEY with the key you received
    const url = `http://www.omdbapi.com/?s=${searchValue}&apikey=YOUR_API_KEY`;

    const response = await fetch(url);
    const responseJson = await response.json();

    if (responseJson.Search) {
        setMovies(responseJson.Search);
    }
};

useEffect(() => {
    getMovieRequest(searchValue);
}, [searchValue]); // <-- The effect depends on searchValue
This code does the following:
- The
useEffecthook is set up to run thegetMovieRequestfunction. - The dependency array
[searchValue]tells React: "re-run this effect only when thesearchValuestate changes." - When it runs, it fetches the data, and if it receives a valid
Searchproperty in the response, it updates ourmoviesstate.
At this point, you should have a working search bar! Try typing a movie title into the input field. You won't see anything on the screen yet (that's for the next lesson), but you can use the React DevTools to inspect the App component's state and see the movies array being populated with data from the API.
Test your understanding!
Currently, our application sends a new API request on every single keystroke. What are two potential problems with this approach in a real-world, production application?
Show answer
- Inefficient API Usage & Cost: Many APIs have usage quotas or are priced per request. Firing a request for "a", "av", "ave", "aven", etc., is highly wasteful. You're making many more requests than necessary, which can lead to hitting rate limits (getting blocked temporarily) or incurring higher costs.
- Poor User Experience & Performance: As the user types quickly, the application is busy sending requests and processing responses. This can create a race condition where results for an older, shorter query (e.g., "thor") might arrive after the results for the newer, complete query ("thor ragnarok"), causing the UI to flicker with incorrect data. It also puts unnecessary strain on the user's network and device.
Step 3: A Professional Touch - Optimizing with Debouncing
As you just identified, making API calls on every keystroke is not ideal. The professional solution to this problem is debouncing.
Debouncing is a technique that delays the execution of a function until a certain amount of time has passed without it being called again. In our case, it means: "Wait until the user has stopped typing for a moment (e.g., 500ms), and then make the API call." This drastically reduces the number of requests.
Your CSE background will help you appreciate the elegance of this small algorithm. We'll use setTimeout to schedule the API call and clearTimeout to cancel the previous schedule every time the user types a new character.
Build a Movie Search App using ReactJS | React Movie App | ReactJS Projects
This video from The Indian Dev provides an excellent, concise demonstration of how to implement debouncing in a React search component.
Watch from 34:59 to 38:49. The video explains the concept and then implements it using a timeoutId state to keep track of the scheduled timeout. This is a very common and effective pattern.
Here is how you can integrate the debouncing logic into your App.js:
-
Add a state for the timeout ID:
const [timeoutId, setTimeoutId] = useState(); -
Modify your
onChangehandler (you'll need to move it from theSearchBoxcomponent toApp.jsand pass it down as a prop):// In App.js const onTextChange = (event) => { clearTimeout(timeoutId); // Clear the previous timeout const newSearchValue = event.target.value; setSearchValue(newSearchValue); // Schedule a new API call const newTimeoutId = setTimeout(() => { // Check if the search value is not empty before making the call if (newSearchValue) { getMovieRequest(newSearchValue); } }, 500); // 500ms delay setTimeoutId(newTimeoutId); };You would then pass
onTextChangeto yourSearchBoxand use it in theonChangeevent. This is a common pattern called "lifting state up". -
With this change, you no longer need the
useEffecthook that depends onsearchValue, because the API call is now triggered directly from the debouncedonChangehandler.
After implementing debouncing, you have a much more efficient and professional search component.
Conclusion
In this lesson, you've turned a static input field into a dynamic, data-driven component. This is a huge step in building our application.
Key Takeaways:
- Controlled Components: You reinforced your understanding of how to use
useStateto manage form input, making React the single source of truth. - Side Effects with
useEffect: You learned how to trigger an API call in response to state changes by using theuseEffecthook with a dependency array. - Debouncing for Performance: You implemented debouncing, a critical optimization technique for any search-as-you-type feature. This is a practical skill that directly contributes to building robust, production-quality applications.
You've successfully set up the logic to capture user input and fetch the corresponding data. In our next lesson, we will focus on the UI: "Display fetched data in a grid of movie cards, passing data via props." We'll take the movies array that you are now populating and render it beautifully on the screen.