Hello! In our last lesson, we learned how to build our first React components using JSX. You now know how to create self-contained UI pieces, but so far, they've been static. For example, your Greeting component could only greet "Alex". What if you wanted to greet different users without rewriting the component each time?
This is where props come in. Today's lesson is all about making your components reusable and dynamic by passing data into them. This is the fundamental way components communicate in React and is a concept you will use constantly.
By the end of this lesson, you will be able to pass data—like strings, numbers, or even objects—from a parent component to a child component, unlocking the true power of component reusability.
From Static to Dynamic: The Need for Props
Imagine you have a UserCard component. If all the user information is hardcoded inside it, you'd need a new component for every single user, which defeats the purpose of reusability. We need a way to pass unique data into each instance of the UserCard.
This data flow is always unidirectional, from parent to child. The parent component holds the data and passes it "down" to its children.

The best way to understand this is by seeing the problem of code duplication and how props solve it. The following video starts by building a small app with hardcoded data and then brilliantly refactors it using props. It draws a powerful parallel between props in React and arguments in a regular JavaScript function—a concept that should be very familiar from your programming background.
Watch the first part of 'React Props are Easy' by Sam Meech-Ward. It perfectly demonstrates the 'why' behind props and introduces them using an analogy to plain JavaScript functions.
Watch from the beginning until 06:40. Pay close attention to: The initial code with duplicated joke elements. The first refactor into a static Joke component. The key part: the analogy of passing parameters to a JavaScript function to make it dynamic. This is the conceptual core of props.
The Syntax: Passing and Receiving Props
As the video explained, props are the React equivalent of function arguments. You pass them to a component as if you were setting attributes on an HTML tag, and the component receives them as a single object argument.
Let's break down the two sides of the process:
1. Passing Props (Parent Component):
You add props to a component tag using key={value} syntax.
- For string literals, you can use double quotes:
name="SpongeBob". - For any other JavaScript value (numbers, booleans, objects, variables), you must use curly braces:
age={30}oruser={userDataObject}.
2. Receiving Props (Child Component):
Your component function receives a single argument: an object that contains all the props passed by the parent. By convention, this object is named props.
You can access the data using dot notation (e.g., props.name), but a much cleaner and more common approach is to destructure the props object directly in the function's parameter list.
// Accessing via props object
function Greeting(props) {
  return <h1>Hello, {props.name}</h1>;
}

// Accessing via destructuring (preferred)
function Greeting({ name }) {
  return <h1>Hello, {name}</h1>;
}
Let's continue with the video to see this syntax in action.
This next segment of the same video demonstrates the concrete syntax for passing props in JSX and receiving them in the child component.
Continue watching from 06:40 to 10:54. This section shows you how to: Pass key-value pairs to your component in the parent's JSX. Receive the props object in the child component. Use the passed data to render dynamic content.
For a written guide and a different example, the official React documentation is an excellent resource.
The official React docs, 'Passing Props to a Component', provide a concise, step-by-step walkthrough. It's a great reference to solidify your understanding.
Read the first two sections, 'Step 1: Pass props to the child component' and 'Step 2: Read props inside the child component'. Notice how they immediately use destructuring, as it's the modern standard.
Test your understanding!
Let's modify the Greeting component from the last lesson.
- Modify
Greeting.jsxso that theGreetingcomponent accepts anameprop. It should display "Hello, [name]!". - In
App.jsx, render three instances of yourGreetingcomponent, passing a different name to each one. For example:<Greeting name="Alex" />,<Greeting name="Ben" />, and<Greeting name="Chloe" />.
Show answer
Your Greeting.jsx file should now look like this:
// src/Greeting.jsx

function Greeting({ name }) { // Destructuring the 'name' prop
  return <h1>Hello, {name}!</h1>;
}

export default Greeting;
And your App.jsx could look something like this:
// src/App.jsx

import Greeting from './Greeting';

function App() {
  return (
    <>
      <Greeting name="Alex" />
      <Greeting name="Ben" />
      <Greeting name="Chloe" />
    </>
  );
}

export default App;
Handling Different Data Types and Best Practices
Props can be any JavaScript value. This next video demonstrates passing strings, numbers, and booleans. It also introduces two important best practices for writing robust components: defaultProps and propTypes.
defaultProps: Provides fallback values for props if the parent component doesn't pass them. This prevents errors and makes your component more resilient.propTypes: A mechanism to ensure the props your component receives are of the correct data type. In development mode, React will show a console warning if a prop of the wrong type is passed (e.g., astringwhere anumberwas expected). This is incredibly helpful for debugging. While modern projects often use TypeScript for type safety,propTypesis the go-to solution in plain JavaScript React projects.
The video 'PROPS in React explained' by Bro Code offers a different example and clearly covers passing various data types, propTypes, and defaultProps.
Watch the following segments: 02:46 - 04:52: See how to pass numbers and booleans. Note the use of the ternary operator to display text based on a boolean, as true/false values don't render directly. 07:56 - 11:47: This part covers setting up propTypes for type validation and defaultProps for fallback values. This is great practice for building professional, maintainable code.
The Special children Prop
There's one special prop that works a bit differently: children. This prop isn't passed like a key-value attribute. Instead, it represents whatever content you put between the opening and closing tags of your component.
This is extremely useful for creating "wrapper" or "layout" components, like a Card, Modal, or Sidebar, that can contain any content you want.
<Card>
  {/* This h1 and p are passed as props.children to the Card component */}
  <h1>About Me</h1>
  <p>I'm a software developer learning React!</p>
</Card>
Inside the Card component, you would render {children} to display the nested content.
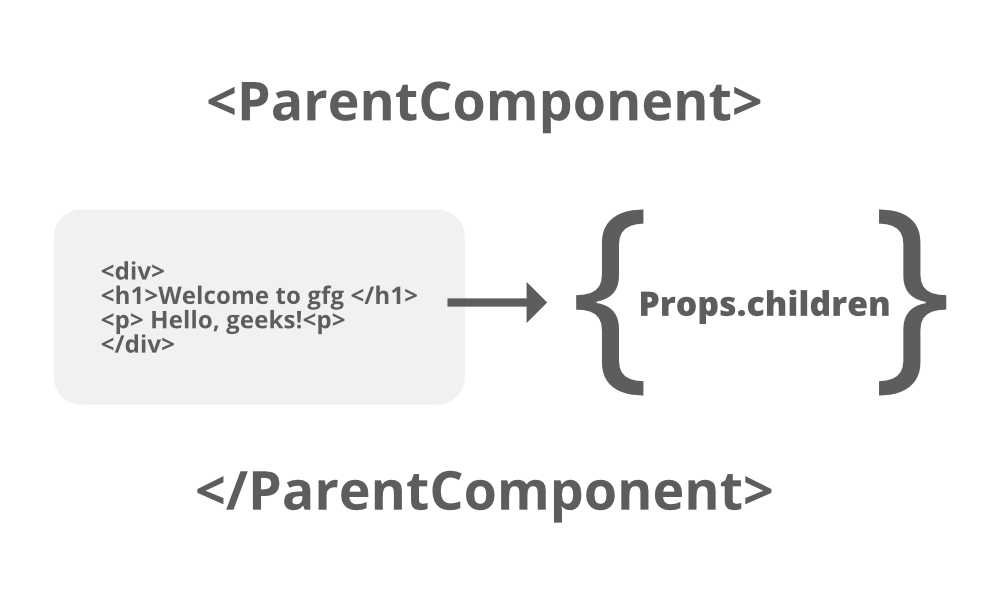
The official documentation has a great section on this.
Let's return to the React docs to learn about this powerful pattern.
Read the section titled 'Passing JSX as children'. It concisely explains this concept and provides a clear example of a Card component.
A Critical Rule: Props are Read-Only
This is one of the most important rules in React: A component must never change its own props.
Props are immutable (unchangeable) from the perspective of the child component that receives them. They are a snapshot of data at a point in time. If a component needs to change something in response to user interaction or new data, it must ask its parent to pass it new props.
Think of it this way: a function shouldn't reach out and modify the variables that were passed into it. This principle of "pure functions" makes your components predictable and easier to debug. When data only flows down, you can trace issues back up to the source without worrying about a child component secretly changing things.
The final section of the React documentation on props emphasizes this point.
The last section of 'Passing Props to a Component' covers the immutability of props.
Read the section 'How props change over time'. The key takeaway is in bold: Don’t try to “change props”.
You might be thinking, "If I can't change props, how do I handle things like a user typing into a search bar or clicking a 'like' button?" That's the perfect question, and it leads directly to our next topic: state.
Conclusion
Great job! You've just learned one of the most essential concepts in React. By mastering props, you've unlocked the ability to build complex UIs from small, simple, and reusable components.
Key Takeaways:
- Props (properties) are used to pass data from a parent component to a child component.
- Data flow is unidirectional (parent to child).
- Props are passed as attributes in JSX (
propName={value}) and received as a single object in the child component. - Destructuring props in the child component's function signature is the standard, clean way to access them.
- The special
childrenprop allows you to create flexible wrapper components. - Props are read-only. A component must not modify the props it receives.
In our next lesson, we'll answer the question of how to manage data that does change over time. We will introduce the useState hook, which allows a component to have its own internal memory, or "state". This is the other half of the puzzle for creating truly interactive applications.