Welcome back! In our last lesson, you successfully set up a complete React development environment with Vite. You've already seen your first React component, App.jsx, and witnessed the power of Vite's Hot Module Replacement.
Today, we're diving into the two most fundamental concepts in React that you'll use every single day: Components and JSX. We'll move beyond just editing the default App.jsx and learn how to create our own reusable UI pieces from scratch. Understanding these concepts is the first major step toward building the dynamic web applications you're aiming for.
By the end of this lesson, you will be able to create your own functional components and use JSX to define what they look like, effectively building the visual building blocks of a React application.
What are React Components?
Think of a complex web page, like a social media feed. It's made up of many smaller, repeatable pieces: a navigation bar, a profile sidebar, individual posts, comment sections, like buttons, and so on. In React, each of these self-contained UI pieces is a component.
A component is essentially a reusable, independent snippet of your user interface. It's a JavaScript function that returns a description of the UI. This approach allows you to break down a complex UI into manageable, isolated parts.
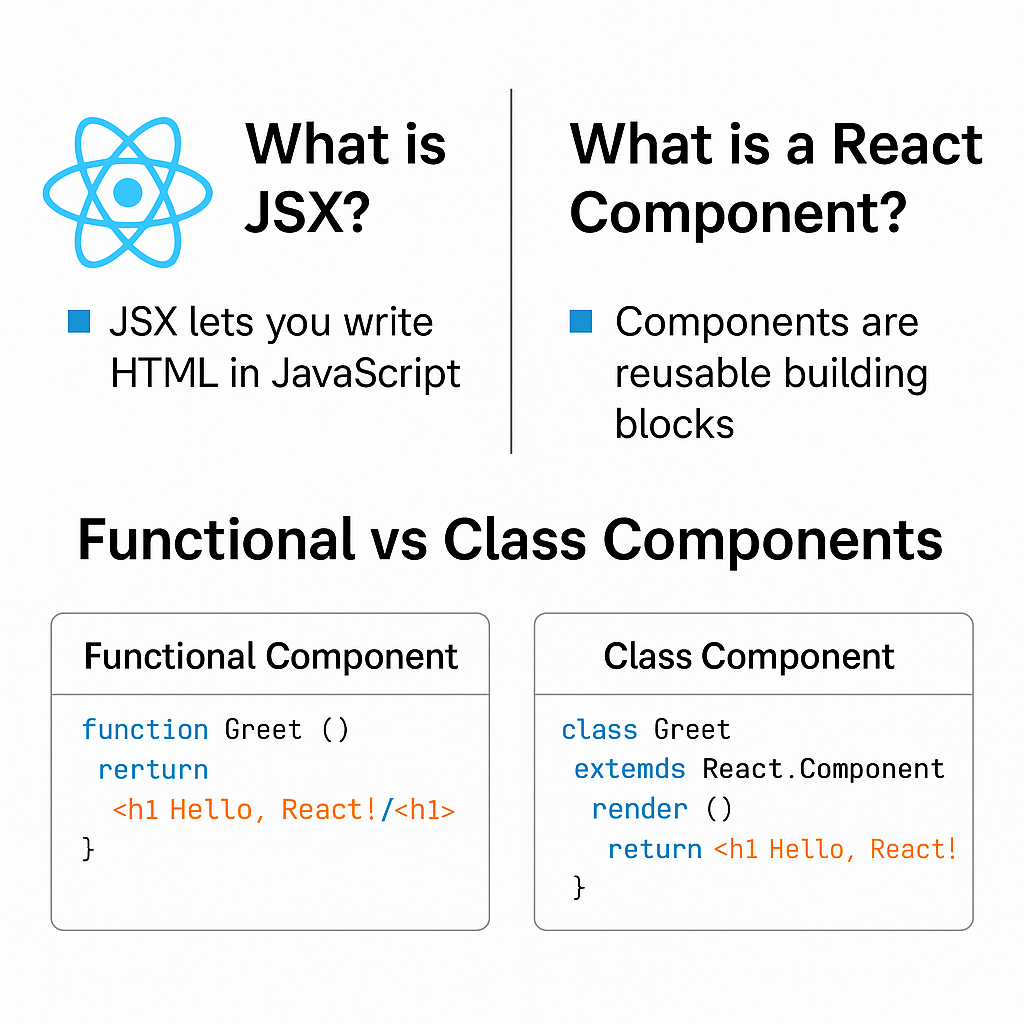
To get a solid grasp on this idea, the official React documentation provides the best introduction.
The official React documentation, 'Your First Component', explains the core philosophy behind components. It's a foundational read.
Please read the introduction and the sections 'Defining a component', 'Using a component', and the final 'Recap'. Pay close attention to: The three steps to building a component (export, define the function, add markup). The critical naming rule: Component names must start with a capital letter. How to use (or 'render') a component inside another component.
What is JSX?
You've now read that a component is a function that returns "markup". But what we write isn't standard HTML. It's JSX (JavaScript XML).
JSX is a syntax extension for JavaScript that lets you write HTML-like code directly inside your JavaScript files. While you can write React without JSX, it's far more verbose and less intuitive. JSX makes your code more readable and declarative.
Under the hood, a build tool like Vite transforms your JSX into standard JavaScript function calls that the browser can understand, specifically React.createElement(). You almost never need to write these calls yourself, but seeing the comparison makes it crystal clear why JSX is so popular.
This video does an excellent job of demonstrating the difference.
The video 'ReactJS Tutorial - 8 - JSX' from Codevolution provides a perfect side-by-side comparison of writing a component with and without JSX.
Watch the segment from 03:22 to 08:00. You don't need to code along with the React.createElement part, but focus on how much simpler and more readable the JSX version is. Also, notice the explanation of why we use className instead of class.
As you saw, the React.createElement() version quickly becomes cumbersome, while JSX remains clean and readable.
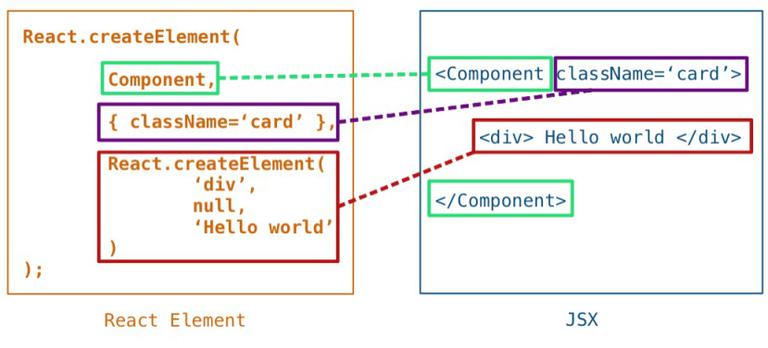
The Rules of JSX
Because JSX is stricter than HTML, there are a few key rules you must follow:
- Return a single root element: A component can only return one top-level element. If you have multiple elements, you must wrap them in a single parent, like a
<div>, or use a Fragment (<>...</>), which is an invisible wrapper. - Close all tags: Self-closing tags in HTML like
<br>or<img>must be explicitly closed in JSX:<br />and<img />. - Use
classNamefor CSS classes: Sinceclassis a reserved keyword in JavaScript (for creating classes), you must useclassNameto assign CSS classes to elements. - Use camelCase for most attributes: HTML attributes with hyphens, like
tab-indexoronclick, become camelCased in JSX:tabIndexandonClick.
The React documentation provides a concise guide to these rules. It's a great reference.
Let's turn to the official docs again for a definitive guide on 'Writing Markup with JSX'.
Read the sections 'Converting HTML to JSX' and 'The Rules of JSX'. This will solidify your understanding of the three main rules and why they exist.
Hands-On: Creating and Using Your First Component
Now it's time to apply this knowledge in your Vite project. The best way to learn is by doing. We will create a new, separate component and then use it inside our main App component.
The following video provides a clear, step-by-step walkthrough of this exact process. Please follow along in your own code editor.
React JS Tutorial - #2 - Components & JSX
The 'React JS Tutorial - #2 - Components & JSX' video by Austin Davis is a fantastic, practical guide. You'll create a component, import it, and see it appear in your app.
Follow along from 04:26 to 11:10. This covers: Creating a new component file (Button.jsx). Defining and exporting the component function. Importing and rendering the new component in App.jsx. Embedding JavaScript variables directly into your JSX using curly braces {}.
By completing that walkthrough, you've practiced the entire component lifecycle:
- Creation: Defining a function that returns JSX.
- Exporting: Making the component available to other files.
- Importing: Bringing the component into the file where you want to use it.
- Rendering: Using the component like an HTML tag (
<MyComponent />). - Dynamic Content: Using
{}to make your component's output depend on JavaScript variables and logic.
Test your understanding!
Now, try creating a component on your own.
- In your
srcfolder, create a new file namedGreeting.jsx. - Inside
Greeting.jsx, create a functional component namedGreeting. - Inside the
Greetingcomponent function, define a variable:const userName = "Alex"; - The component should return an
<h1>element that displays the text "Hello, Alex!". Use theuserNamevariable you created. - Export the
Greetingcomponent. - Finally, import and render your
<Greeting />component insideApp.jsx(you can place it above or below the other content).
Show answer
Your Greeting.jsx file should look like this:
// src/Greeting.jsx

function Greeting() {
  const userName = "Alex";
  return <h1>Hello, {userName}!</h1>;
}

export default Greeting;
And your App.jsx file should be modified to import and use it:
// src/App.jsx

import Greeting from './Greeting'; // Add this import at the top
// ... other imports

function App() {
  // ... existing code
  return (
    <>
      {/* ... existing JSX ... */}
      <Greeting /> {/* Add this line */}
    </>
  );
}

export default App;
Note: We use export default in the example. The video used a named export. Both are valid ways to export from a JavaScript module, but export default is very common for components where one file defines one main thing.
Conclusion
Excellent work! You've just mastered the fundamental building blocks of every React application. You now understand that React apps are built by composing small, reusable components, and that we use JSX to describe the UI for those components in a declarative, readable way.
Key Takeaways:
- A Component is a JavaScript function that returns UI. Its name must always be capitalized.
- JSX is a syntax extension that allows us to write HTML-like markup in our JavaScript files.
- JSX has a few key rules: you must return a single root element, close all tags, and use
classNameinstead ofclass. - You can embed any JavaScript expression inside JSX by wrapping it in curly braces
{}. - Components are used by importing them and then rendering them like custom HTML tags (e.g.,
<MyComponent />).
In the next lesson, we will explore one of the most powerful features of components: props. You'll learn how to pass data from a parent component to a child component, making your components even more flexible and dynamic. This is how you'll go from a static <Greeting /> to a reusable one you can greet anyone with.