Hello! In our last lesson, we explored how props allow us to pass data down from parent to child components. We also established a critical rule: props are read-only. A component can never change the props it receives.
This led to a crucial question: If props are immutable, how do we manage data that needs to change in response to user interaction, like a counter that increments, an input field that updates as the user types, or a button that toggles a setting?
Today, we'll answer that question by introducing state. State is the memory of a component—data that it can hold and update over time. You'll learn to use the useState hook, React's primary tool for giving your components this memory and making them truly interactive.
By the end of this lesson, you will be able to manage component-level state with the useState hook, enabling you to build dynamic UIs that respond to user actions.
What is State and Why Do We Need It?
In React, state is any data that can change over time within a component. Unlike a regular JavaScript variable that disappears when a function finishes running, a state variable is preserved by React between renders. The most important feature of state is that when you update it, React automatically re-renders the component and its children to reflect the new data.
Mastering React Hooks: Part 1- useState in Real-life ...
To start, let's get a clear definition of state and why it's different from traditional JavaScript DOM manipulation. This brief article section from Grace Chiamaka on Medium explains it well.
Read the section titled 'What is a state'. Focus on the idea that React handles the UI update for you when state changes.
To manage state in functional components, we use hooks. A hook is a special function that lets you "hook into" React features. The most fundamental hook is useState.
The useState Hook: Syntax and Core Mechanics
The useState hook is a function that you call at the top level of your component to declare a "state variable".
Here’s the syntax:const [stateValue, setStateValue] = useState(initialValue);
This might look unusual, but it's just JavaScript's array destructuring, which you've seen before. useState returns an array with exactly two items:
stateValue: The current value of your state variable.setStateValue: A special function that you use to update the state value.initialValue: The value you want the state to have on the very first render.
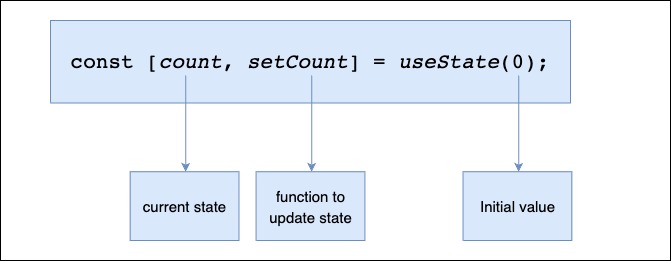
The key is that you never modify the state variable directly. You always use the setter function. Calling the setter function does two things:
- It tells React to update the state value.
- It queues a re-render of your component with the new state value.
Let's see why this is so important.
React useState() hook introduction 🎣
This video from Bro Code provides an excellent demonstration of why a normal variable won't work for updating the UI and how useState solves the problem.
Watch from the beginning to 06:08. Pay close attention to the part where he first tries to update a regular variable (let name = ...) and it fails to update the screen. This perfectly illustrates the problem that state solves.
Making UIs Interactive: useState in Action
State can hold any type of JavaScript data: a number, a string, a boolean, an array, or an object. Let's look at some common patterns.
1. Managing Numbers (e.g., a Counter)
The "counter" is the classic "Hello, World!" of state. It's simple but clearly demonstrates the render cycle.
The process is:
- Initialize state:
const [count, setCount] = useState(0); - Display the state:
<p>Count: {count}</p> - Update on event:
<button onClick={() => setCount(count + 1)}>Increment</button>

2. Managing Strings (e.g., Controlled Input Fields)
A very common use case is tracking the value of an input field. In React, this is called a controlled component. You hold the input's value in state and update it every time the user types.
function MyInput() {
  const [text, setText] = useState('');

  function handleChange(event) {
    setText(event.target.value);
  }

  return (
    <>
      <input value={text} onChange={handleChange} />
      <p>You typed: {text}</p>
    </>
  );
}
Here, the input's value is always driven by the text state, and the onChange event handler uses the setter to keep them in sync.
3. Managing Booleans (e.g., Toggling Visibility)
Booleans are perfect for handling on/off states, like showing/hiding an element or toggling a checkbox. You can use conditional rendering to show content based on the boolean state.
function Toggle() {
  const [isVisible, setIsVisible] = useState(true);

  return (
    <div>
      <button onClick={() => setIsVisible(!isVisible)}>
        {isVisible ? 'Hide' : 'Show'}
      </button>
      {isVisible && <p>Now you see me!</p>}
    </div>
  );
}
Test your understanding!
Let's apply these concepts. Using the Vite project you set up in the previous module, create a new component CharacterCounter.jsx.
This component should:
- Have a
textareaelement. - Use
useStateto store the text inside thetextarea. - Display the number of characters currently in the
textareain real-time below it (e.g., "Character count: 52").
Hint: You'll need to use the controlled component pattern and the .length property of a string.
Show answer
Here's a possible solution for CharacterCounter.jsx:
import { useState } from 'react';

function CharacterCounter() {
  // 1. Initialize state for the textarea's text
  const [text, setText] = useState('');

  // 2. Event handler to update state on every change
  function handleTextChange(event) {
    setText(event.target.value);
  }

  return (
    <div>
      <textarea
        value={text}
        onChange={handleTextChange}
        placeholder="Type something..."
      />
      {/* 3. Display the length of the state variable */}
      <p>Character count: {text.length}</p>
    </div>
  );
}

export default CharacterCounter;
You can then import and render <CharacterCounter /> in your App.jsx to see it work. The key is that onChange triggers setText, which causes a re-render, displaying the new text.length.
Mastering State Updates: Professional Patterns
While setCount(count + 1) works for simple cases, there are more robust ways to handle state updates, especially when the new state depends on the previous one.
Functional Updates
What if you need to update state multiple times in the same event handler?
// This will NOT work as expected!
function handleTripleIncrement() {
  setCount(count + 1); // count is still 0 here
  setCount(count + 1); // count is still 0 here
  setCount(count + 1); // count is still 0 here
}
The counter would only increment by 1. This is because React batches state updates, and count has the same value on each line within a single render.
The solution is the functional update form. Instead of passing a new value, you pass a function. React will call this function with the guaranteed latest state.
// This works perfectly!
function handleTripleIncrement() {
  setCount(prevCount => prevCount + 1);
  setCount(prevCount => prevCount + 1);
  setCount(prevCount => prevCount + 1);
}
Rule of thumb: If your new state depends on the previous state, always use the functional update form.
Updating Objects and Arrays in State
This is one of the most important concepts to master. State setters replace the old state; they do not merge it.
If your state is an object, you must copy the old properties using the spread syntax (...) when you update it.
// INCORRECT: This will delete the `lastName` property!
setUser({ firstName: 'Jane' });

// CORRECT: Spread the old object, then overwrite what you need to change.
setUser(prevUser => ({ ...prevUser, firstName: 'Jane' }));
The same rule applies to arrays. Never push, pop, or directly modify an array in state. Always create a new array.
// To add an item:
setTodos(prevTodos => [...prevTodos, newTodo]);

// To remove an item (using its index):
setTodos(prevTodos => prevTodos.filter((_, i) => i !== indexToRemove));
This practice of not modifying state directly is called immutability, and it's central to how React works.
Learn useState In 15 Minutes - React Hooks Explained
The video 'Learn useState In 15 Minutes' from Web Dev Simplified covers these advanced patterns brilliantly. It explains functional updates, handling objects, and the general rules of hooks.
Watch the following segments: 01:46 - 04:18: Focus on the Rules of Hooks (always call them at the top level, never in conditions/loops). 05:47 - 08:26: This is a critical section on functional updates. Pay close attention to the example of why calling setCount multiple times fails without it. 11:12 - 15:25: This explains how to handle objects in state, the need for the spread operator, and why it's often better to use multiple useState hooks for unrelated data.
Conclusion
You've now learned the other essential half of making components dynamic. While props are for passing data down, state is for managing data that changes within a component.
Key Takeaways:
- State is a component's private, preserved memory.
- The
useStatehook declares a state variable and gives you a setter function:const [value, setValue] = useState(initialValue). - Updating state with the setter function triggers a re-render of the component.
- Never modify state directly. Always use the setter function.
- For state that depends on the previous value (like a counter), use the functional update form:
setValue(prevValue => ...). - When updating objects or arrays, you must create a new one, typically using the spread syntax (
...) to copy the old values.
You now have the two main tools for managing data in React: props and state. But what happens when you need your component to do something that isn't directly related to rendering, like fetching data from an API when it first appears, or setting up a timer?
In our next lesson, we'll introduce the useEffect hook, which allows you to handle these "side effects" and connect your React application to the outside world.