Hello! Welcome back to our journey of building a RESTful API.
In the last lesson, you did the critical work of an architect by designing the database schema for our blog application. You now have a solid blueprint detailing the tables, columns, and relationships needed to store our data.
Today, we transition from architect to builder. We'll take that blueprint and construct the first functional part of our API. The most fundamental operation for any data-driven application is retrieving a list of items. Therefore, our goal is to implement a GET endpoint that retrieves all records from a database table. This is the first step in bringing your backend to life.
The Anatomy of a GET Request
Before we write any code, let's visualize the journey of a request to fetch all users:
- Client Request: An API client (like a browser or Postman) sends a
GETrequest to our server, for example, athttp://localhost:5001/api/users. - Express Server: Our Express server receives the request.
- Routing: Express matches the path
/api/usersto a specific handler function we'll define. - Database Query: The handler function connects to the PostgreSQL database and executes a SQL query, something like
SELECT * FROM users;. - Database Response: PostgreSQL returns the requested data (a list of all users) to our application.
- Server Response: Our handler function formats this data into a JSON array and sends it back to the client with a
200 OKstatus code.
We are going to build this entire flow from scratch.
Setting Up the API Project
Every house needs a foundation. For our API, this means setting up the project structure, installing the necessary tools, and creating a basic server. The following video provides a comprehensive walkthrough of this entire process, establishing a professional and scalable project structure that you'll use in real-world applications.
Build a CRUD Rest API with Node.js, Express, PostgreSQL & Docker
Watch this segment from the video 'Build a CRUD Rest API with Node.js, Express, PostgreSQL & Docker' by Dipesh Malvia. It covers initializing the project, installing dependencies, setting up a robust folder structure, and creating the initial Express server.
Watch from 02:40 to 09:18. Pay close attention to: The dependencies being installed: express, pg (the PostgreSQL client), and nodemon (for auto-restarting the server). The project structure (src folder with controllers, models, routes, etc.). This separation of concerns is a key software engineering practice. The basic index.js server setup and adding "type": "module" to package.json to enable modern ES6 import syntax.
After following the video, you should have a basic Express server running and a clean folder structure ready for our API logic.
Connecting to the Database and Creating Our Table
With the server running, the next step is to connect it to our PostgreSQL database. We also need to create the actual users table based on the schema we designed previously. The video continues by showing how to do both of these things programmatically.
Build a CRUD Rest API with Node.js, Express, PostgreSQL & Docker
Let's continue with the same video. This part covers two crucial steps: establishing a connection pool to PostgreSQL and writing a script to create our users table automatically when the server starts.
First, watch from 15:08 to 18:48 to see how a db.js file is created to manage the database connection using a 'pool'. A connection pool is much more efficient than creating a new connection for every query. Next, watch from 39:33 to 43:29. This is where the schema design from our last lesson becomes code. The video shows how to write a CREATE TABLE IF NOT EXISTS query and run it on application startup. This is an excellent practice for ensuring your database is always in the correct state.
By now, your application can connect to the database, and it ensures the users table exists. We're finally ready to retrieve some data.
Implementing the GET Endpoint
We will implement our endpoint using a common pattern that separates data logic from request/response handling.
- Service (or Model): A function whose only job is to talk to the database.
- Controller: A function that handles the incoming request, calls the service to get data, and sends the final response.
- Route: The Express definition that links a URL path to a controller.
This separation makes your code cleaner, easier to test, and more maintainable.
1. The Service: Querying the Database
First, let's create the function that fetches all users from the database. This function will live in the models folder (which the video author uses for data-related services).
Build a CRUD Rest API with Node.js, Express, PostgreSQL & Docker
This clip shows how to create the 'getAllUsersService' function. This is the heart of our data-fetching logic.
Watch from 26:54 to 28:51. Focus on the getAllUsersService function. Notice the key line: const result = await pool.query('SELECT * FROM users'); This asynchronously executes the SQL query. The actual list of users is in the result.rows property, which the function returns.
The core of this step is pool.query(). It takes a SQL string, sends it to PostgreSQL, and returns a result object. The rows property of this object is an array of JavaScript objects, where each object represents a row from your table. Using async/await makes the asynchronous nature of database calls clean and easy to read.
2. The Controller and Route: Handling the Request
Now we need a controller to call our new service and a route to trigger the controller.
Build a CRUD Rest API with Node.js, Express, PostgreSQL & Docker
Finally, let's wire everything together. This segment shows the creation of the controller function and the Express route.
First, watch from 22:33 to 25:04 to see how the userRoutes.js file is set up using express.Router(). This is the standard way to organize routes in a modular fashion. Then, watch from 35:29 to 36:16. This shows the getAllUsers controller. See how it calls getAllUsersService(), and upon receiving the users data, sends it back to the client using res.status(200).json(...). The try...catch block is essential for error handling.
You now have a complete endpoint! The request comes into /api/user, the router passes it to the getAllUsers controller, the controller calls the getAllUsersService, which queries the database, and the results flow all the way back to the client.
Testing Your First Endpoint
The final step is to verify that our endpoint works. You can't just open this URL in a browser if you have no data yet. The best way to test an API is with a dedicated API client. Popular choices include Postman or a VS Code extension like Thunder Client, which is used in the video.
The video shows testing both a POST request (to add data) and then the GET request.
Build a CRUD Rest API with Node.js, Express, PostgreSQL & Docker
Let's see the result of our work. This part of the video demonstrates testing the API endpoints.
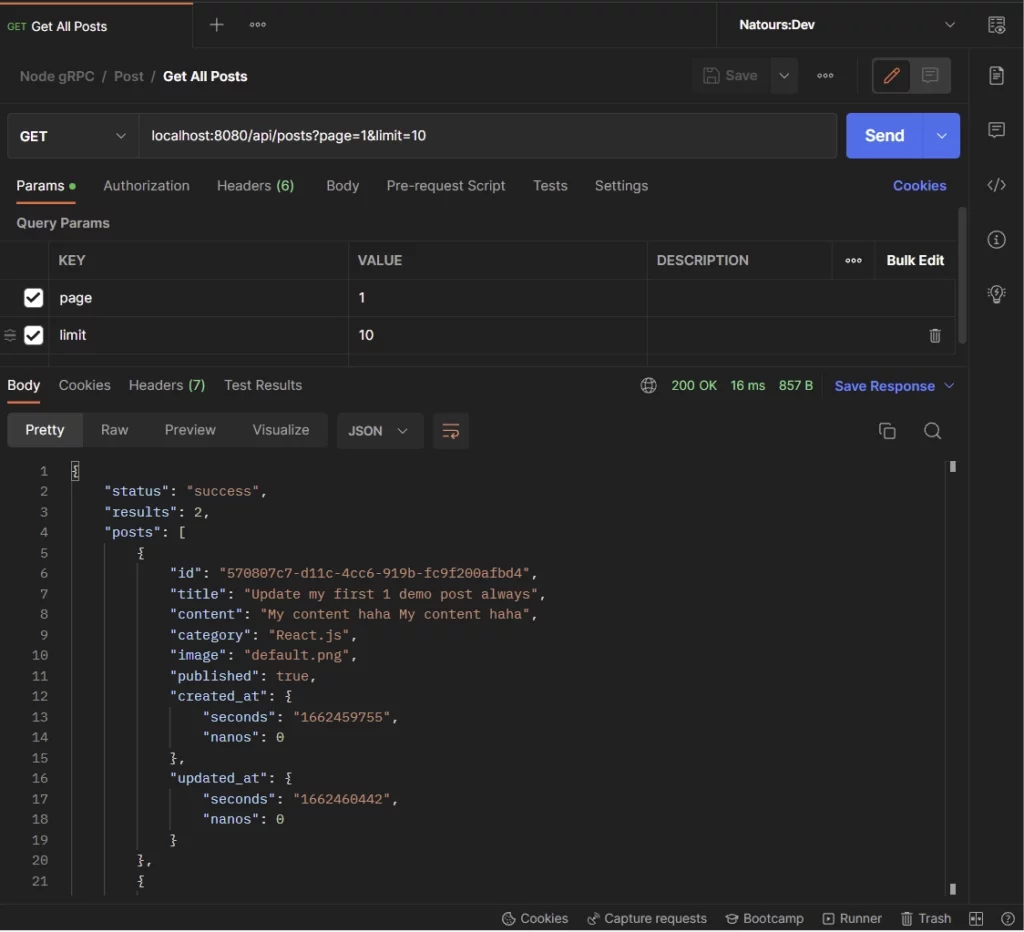
Watch from 43:37 to 44:52. The author first uses a POST request to add a couple of users to the database. Then, he makes a GET request to /api/user and successfully retrieves the list of users he just created. This is the moment of truth!
When you test your GET endpoint, you should see a JSON response containing an array of all the user records in your database, just like in this image:
Test your understanding!
Based on the patterns you've just learned, imagine you also have a posts table in your database. What would the service function, getAllPostsService, look like? Write the function signature and the core pool.query line.
Show answer
The function would look very similar to the one for users. It would be an async function that queries the posts table.
import pool from '../config/db.js'; // Assuming db config is in this path

export const getAllPostsService = async () => {
  const result = await pool.query('SELECT * FROM posts ORDER BY created_at DESC');
  return result.rows;
};
The core logic is the same: SELECT * FROM table_name. I've added an ORDER BY clause, which is common for fetching blog posts to show the newest ones first.
Conclusion
Congratulations! You have successfully built and tested your first API endpoint. This is a massive step. You've connected a server to a database and exposed data to the outside world in a structured way.
Key Takeaways:
- Connection Pooling: Use the
pglibrary'sPoolto efficiently manage database connections. - Separation of Concerns: Splitting logic into Routes, Controllers, and Services/Models makes your code organized and scalable.
- The Core Query: The
pool.query('SELECT * FROM table_name')command is the key to fetching all records. - Async/Await: This syntax is essential for handling asynchronous database operations cleanly.
- JSON Response: APIs communicate using JSON. Send data back using
res.status(200).json(data). - API Clients: Use tools like Postman or Thunder Client to test your endpoints thoroughly.
Preview of the Next Lesson:
Fetching all records is useful, but often we need to retrieve just one specific item. In the next lesson, we will build on today's code to implement a GET endpoint that retrieves a single record by its ID (e.g., /api/users/1). This will introduce you to route parameters and the SQL WHERE clause.