Hello! Welcome to the first lesson in our course on Cardiology. As you prepare for your NEET-PG and university exams, building a rock-solid foundation in clinical skills is paramount. Your goal of achieving exhaustive knowledge, from pathophysiology to clinical application, begins here.
This lesson will focus on a cornerstone of cardiology: the physical examination. We will systematically learn how to interpret findings from inspection, palpation, and auscultation. By the end of this 60-minute session, you will be able to correlate specific clinical signs—like the character of the apex beat, the presence of thrills, different heart sounds, and murmurs—with their underlying cardiac pathologies. This skill is not just for exams; it is the art of clinical medicine.
Let's begin with the first step of any examination: looking at the patient.
1. Inspection: The First Clues
A skilled clinician gathers vital information before even touching the patient. The cardiovascular examination begins with a general inspection, looking for peripheral and central signs that may point towards a cardiac issue.
Physical Examination of the Cardiovascular System
To start, let's review the key signs to look for during a general inspection. This article from Lecturio provides a concise overview.
Please read the section titled 'Observation'. Focus on the descriptions and images of chest deformities (pectus excavatum/carinatum), eye signs (xanthelasma), extremity findings (clubbing, cyanosis, lesions of infective endocarditis), and the basics of observing for Jugular Venous Distention (JVD).
Key findings from your observation can suggest:
- Hyperlipidemia: Xanthelasma (yellowish cholesterol deposits around the eyelids).
- Chronic Hypoxemia: Digital clubbing (seen in cyanotic congenital heart disease) or central cyanosis.
- Infective Endocarditis: Splinter hemorrhages, Janeway lesions (painless), and Osler nodes (painful).
- Right Heart Failure or Volume Overload: Elevated Jugular Venous Pressure (JVP).
The JVP is a direct reflection of the pressure in the right atrium. Observing the neck veins, specifically the internal jugular vein, provides a non-invasive way to estimate this pressure.
Cardiovascular Examination - Cardiovascular Disorders
The Merck Manual offers a professional-level summary on how to examine neck veins and interpret the findings. This is a crucial skill.
Read the section titled 'Neck veins'. Pay close attention to how to estimate venous pressure, the significance of an elevated JVP, and the descriptions of hepatojugular reflux and Kussmaul sign. Take a quick look at the 'Normal Jugular Vein Waves' figure to familiarize yourself with the a, v, x, and y components.
In summary, an elevated JVP suggests increased right atrial pressure, commonly seen in conditions like right-sided heart failure, tricuspid valve disease, or cardiac tamponade.
2. Palpation: Feeling the Heart's Action
After inspection, we move to palpation of the precordium. This allows us to assess the size and function of the ventricles and detect the vibrations of turbulent blood flow.
The Apex Beat (Point of Maximal Impulse - PMI)
The apex beat is the palpable impulse made by the left ventricle's apex as it strikes the chest wall during systole. Its location, character, and duration provide valuable diagnostic clues.
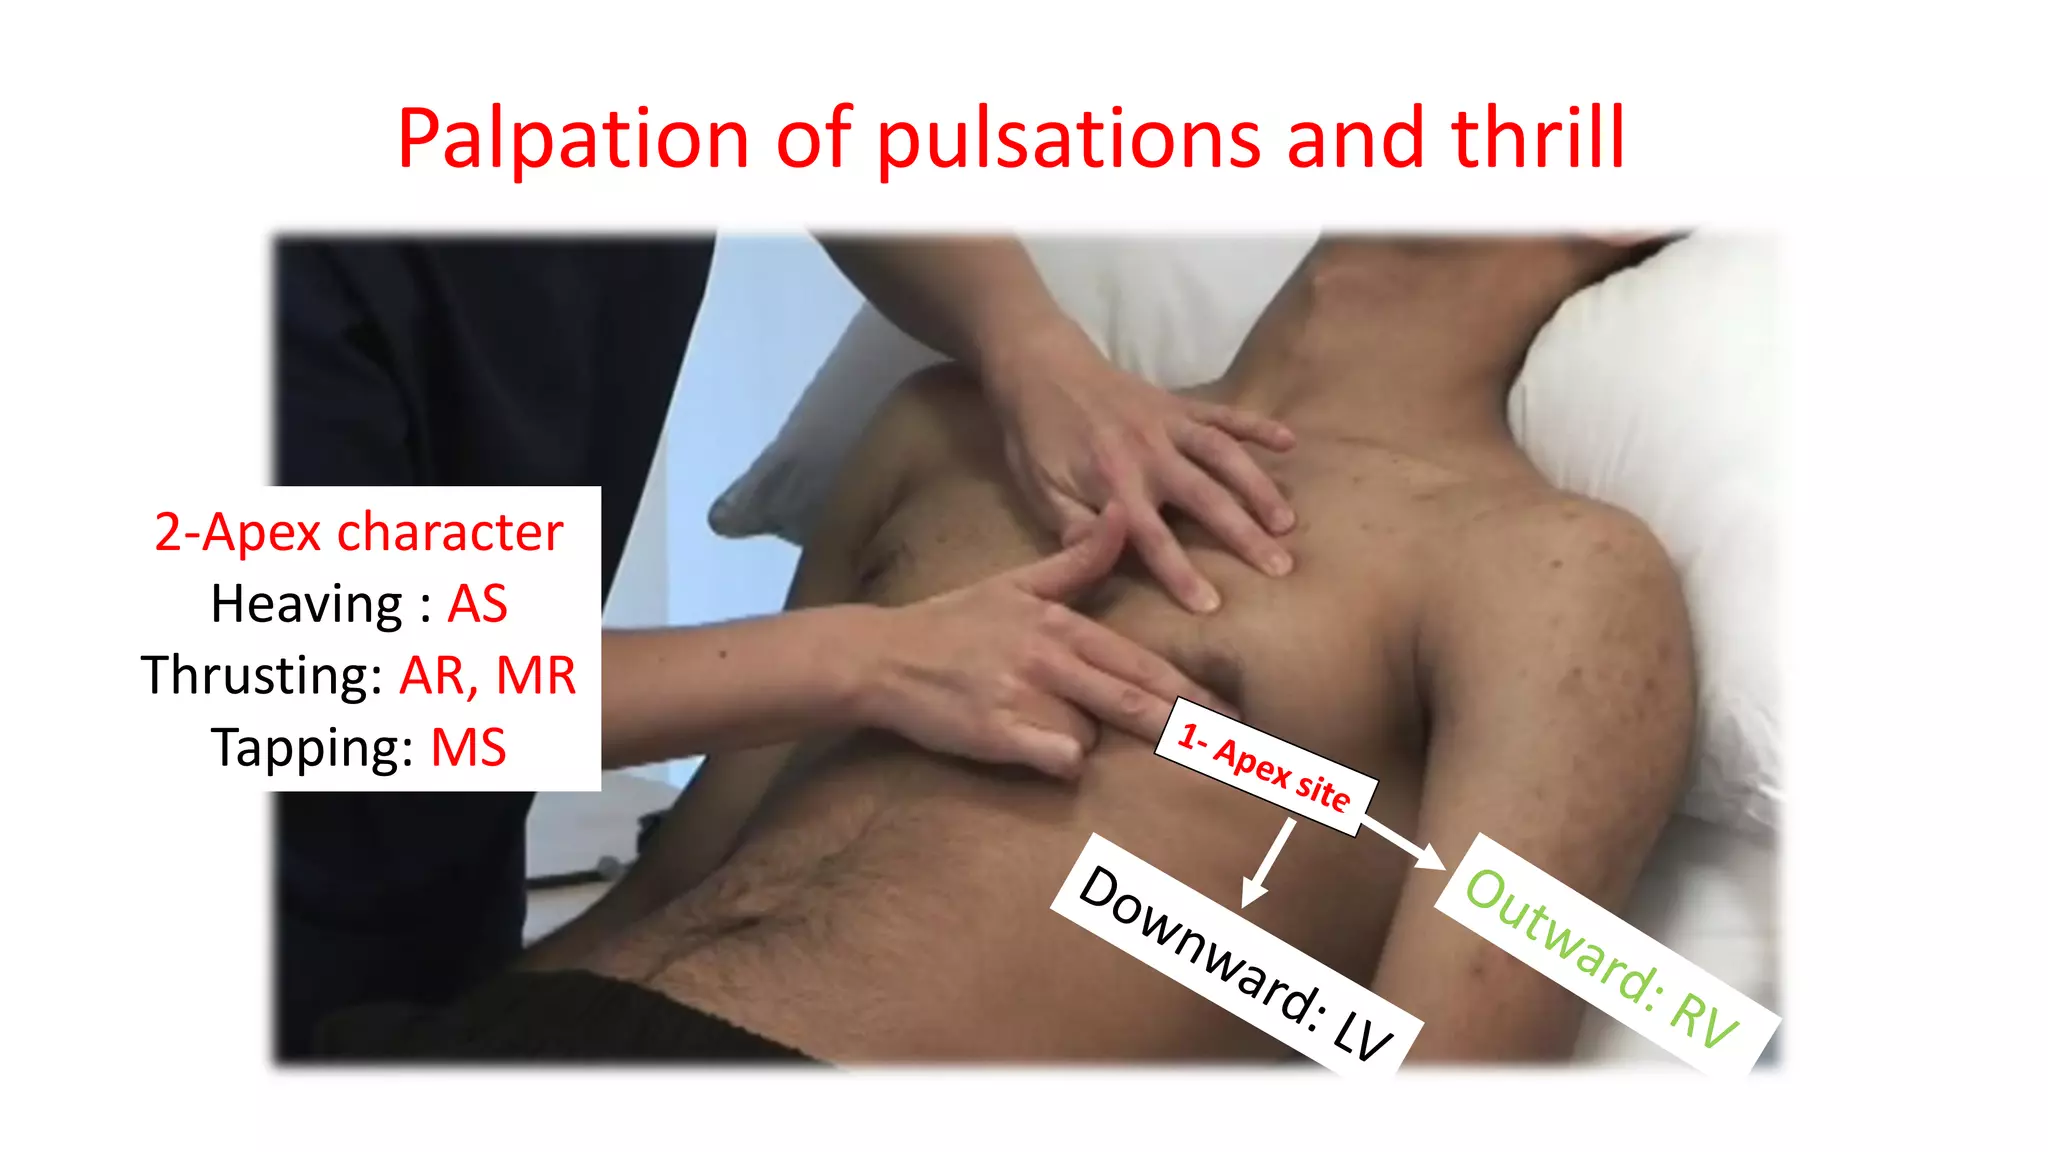
To understand the character of the apex beat, it's essential to grasp the underlying physiology.
Normal Apex Beat vs Heaving Apex Beat | Cardiology
Dr. Najeeb provides a detailed explanation of the normal apex beat and the pathophysiology behind a 'heaving' apex beat, which is a key sign of pressure overload. His detailed style will suit your preference for in-depth understanding.
Watch the video from the beginning to 26:25. Focus on: The definition and normal location of the apex beat (00:01 - 17:00). The distinction between a normal and a 'heaving' apex beat (17:00 - 19:13). The mechanism of a heaving apex beat: pressure overload leading to concentric left ventricular hypertrophy (LVH) (19:13 - 26:25).
Let's consolidate the types of apex beat:
- Normal: A brief, gentle tap felt at the 5th left intercostal space in the midclavicular line, lasting for less than half of systole.
- Displaced: An apex beat shifted inferiorly and laterally suggests left ventricular enlargement (e.g., in dilated cardiomyopathy or volume overload states like aortic regurgitation).
- Heaving (Sustained): A forceful and prolonged impulse, characteristic of pressure overload, which causes concentric LVH. You'll feel the impulse "heave" against your fingers throughout much of systole.
- Causes: Aortic stenosis, systemic hypertension, hypertrophic cardiomyopathy (HCM).
- Thrusting (Hyperdynamic): A forceful but brief, ill-sustained impulse. This is typical of volume overload, which causes eccentric hypertrophy and dilation. The large, dilated ventricle strikes the chest wall forcefully but retracts quickly.
- Causes: Aortic regurgitation, mitral regurgitation, high-output states.
- Tapping: A sharp, palpable first heart sound (S1), classically felt in mitral stenosis. It's due to the forceful closure of the thickened mitral valve leaflets.
Heaves and Thrills
-
Parasternal Heave/Lift: A palpable lifting sensation to the left of the sternum. This indicates right ventricular hypertrophy (RVH), often due to conditions like pulmonary hypertension or pulmonic stenosis. Notice the distinction: a heaving apex suggests LVH, while a parasternal heave suggests RVH.
-
Thrills: These are palpable murmurs, felt as a buzzing or vibrating sensation on the chest wall. They signify significant turbulent blood flow, typically from a severe valve lesion or a septal defect.
Cardiovascular Examination - Cardiovascular Disorders
For a concise summary of how to interpret precordial heaves and the location of thrills, please review this section from the Merck Manual.
Read the subsections under 'Palpation'. Focus on the descriptions of a 'central precordial heave' (for RVH) and a 'sustained thrust at the apex' (for LVH). Then, study the table 'Location of Thrills and Associated Disorder' to connect the location of a thrill to its likely cause.
Test your understanding!
A 68-year-old male with a long history of poorly controlled hypertension presents for a check-up. On examination, you palpate a forceful, sustained impulse at the 6th left intercostal space, 2 cm lateral to the midclavicular line. What is the most likely character of this apex beat, and what underlying physiological process does it represent?
Show answer
The finding describes a displaced and heaving (sustained) apex beat.
- Displacement (inferior and lateral) indicates left ventricular enlargement.
- The heaving character signifies pressure overload from chronic hypertension, leading to concentric left ventricular hypertrophy (LVH). The hypertrophied ventricle contracts forcefully and for a prolonged duration against high systemic pressure.
3. Auscultation: Listening to the Heart
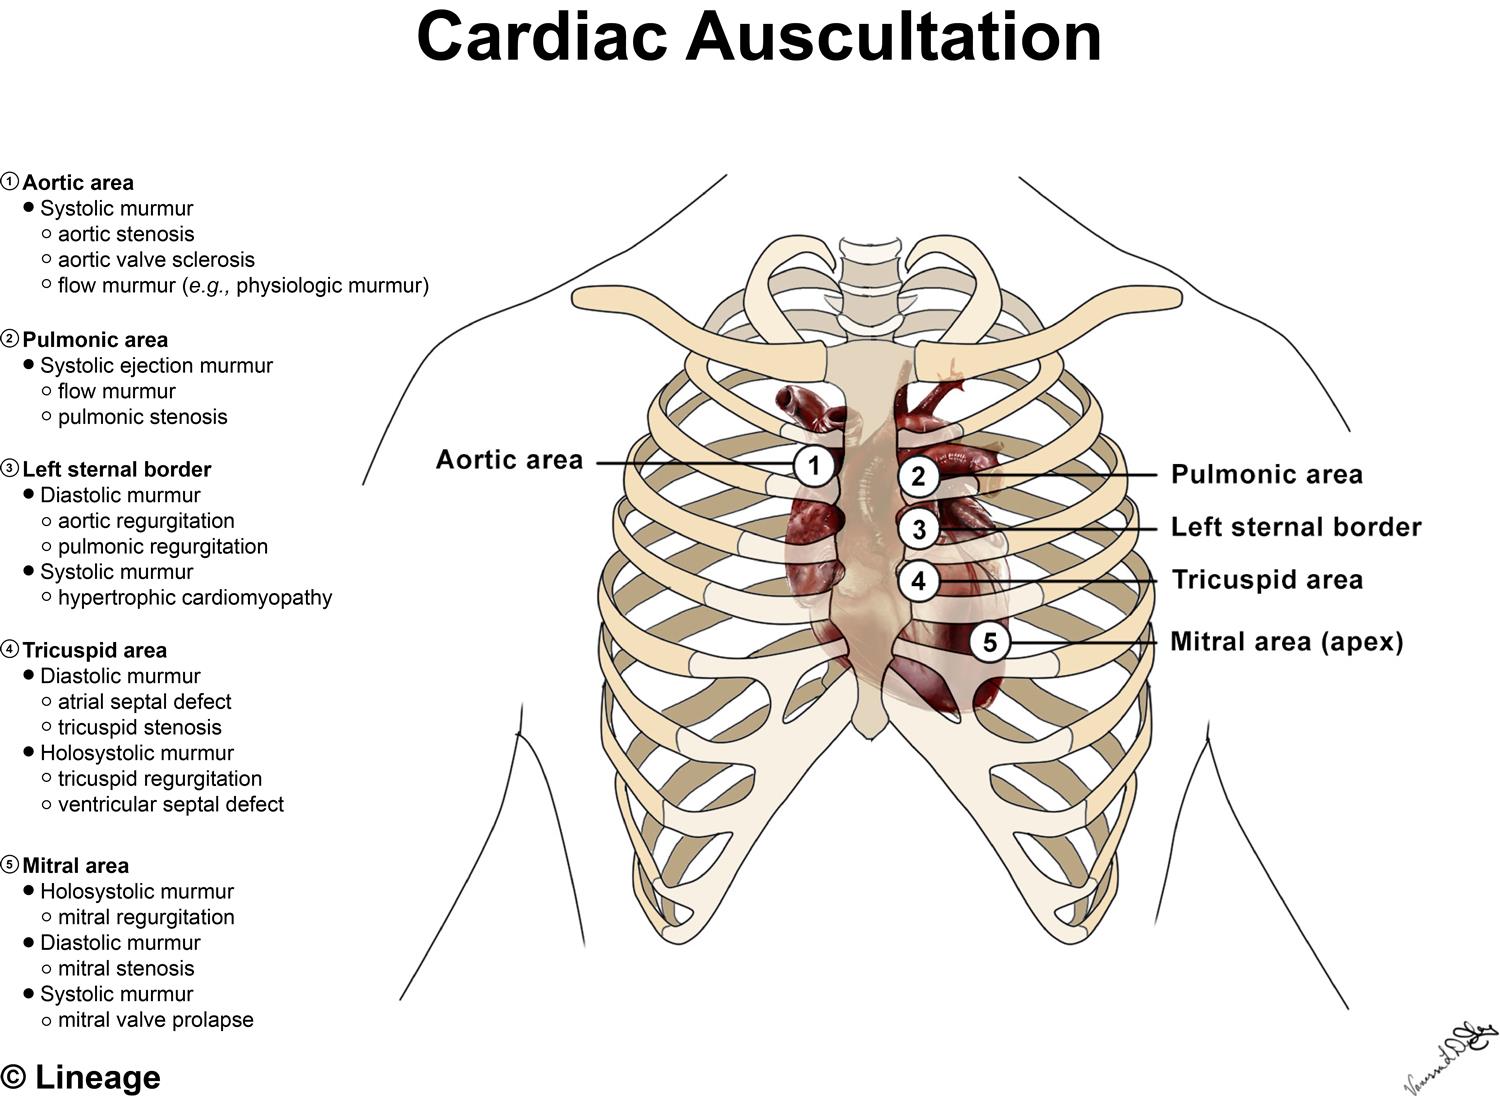
Auscultation is often considered the most complex part of the cardiac exam. A systematic approach is key. First, let's establish our landmarks.
Heart Sounds (S1, S2, S3, S4) and Splitting
Understanding the normal and extra heart sounds is the foundation for identifying murmurs.
Heart Sounds & Murmurs | Clinical Medicine
The Ninja Nerd channel provides an exceptional, detailed walkthrough of all heart sounds. This video will form the core of our auscultation section. We will break it down into manageable parts.
First, let's master the heart sounds. Watch from 00:58 to 21:19. Normal Sounds (S1 & S2): Pay attention to which valve closures create S1 and S2 (00:58 - 03:29). Added Sounds (S3 & S4): Focus on the mechanism for each sound. Note that S3 is related to a dilated, volume-overloaded ventricle ('Kentucky' gallop), while S4 is related to a stiff, pressure-overloaded ventricle ('Tennessee' gallop) (03:29 - 09:21). S2 Splitting: Understand the difference between physiological, wide, fixed, and paradoxical splitting and their classic causes (e.g., ASD, RBBB, LBBB) (09:21 - 21:19).
Summary of Heart Sounds:
- S1: Closure of Mitral and Tricuspid valves (start of systole).
- S2: Closure of Aortic (A2) and Pulmonic (P2) valves (start of diastole).
- Physiological S2 Split: A2 precedes P2. This gap widens on inspiration due to increased venous return to the right heart, delaying P2 closure.
- Wide Split: A persistently split S2 that widens further on inspiration. Seen in conditions that delay RV emptying, like RBBB or pulmonic stenosis.
- Fixed Split: A split S2 that does not vary with respiration. The pathognomonic sign of an Atrial Septal Defect (ASD).
- Paradoxical Split: The split narrows or fuses on inspiration (P2 closes before A2). Seen in conditions that delay LV emptying, like LBBB or severe aortic stenosis.
- S3 (Ventricular Gallop): Early diastolic sound. Caused by rapid filling into a compliant, dilated ventricle. Pathological in adults (systolic heart failure, severe MR/AR), but can be physiological in children and pregnant women.
- S4 (Atrial Gallop): Late diastolic sound. Caused by atrial contraction into a stiff, non-compliant ventricle. Always pathological. Seen in LVH, acute MI, and diastolic heart failure.
Heart Murmurs
Murmurs are sounds generated by turbulent blood flow. We characterize them by their Timing (systolic/diastolic), Shape (e.g., crescendo-decrescendo), Location, Radiation, and change with Maneuvers.
Now, let's use the same Ninja Nerd video to understand the different types of murmurs.
Heart Sounds & Murmurs | Clinical Medicine
Continuing with the Ninja Nerd video, we will now cover the classification of murmurs.
Watch from 21:19 to 35:05. Systolic Murmurs: Learn to differentiate the murmurs of aortic stenosis, HCM, mitral regurgitation, MVP, and VSD based on their timing, shape, and location (21:19 - 30:23). Diastolic Murmurs: Focus on the 'decrescendo' murmur of aortic regurgitation and the 'rumbling' murmur with an opening snap of mitral stenosis (30:23 - 33:32). Continuous Murmur: Understand the classic 'machine-like' murmur of Patent Ductus Arteriosus (PDA) (33:32 - 35:05).
Dynamic Auscultation: The Power of Maneuvers
Often, the final diagnostic clue comes from how a murmur changes with physiological maneuvers that alter cardiac hemodynamics (preload, afterload). This is a very high-yield topic for your exams.
Heart Sounds & Murmurs | Clinical Medicine
Finally, let's learn how maneuvers can help us differentiate murmurs. This last segment of the Ninja Nerd video is crucial.
Watch from 35:45 to 40:21. Create a mental chart or notes on how each maneuver affects preload and afterload, and consequently, the intensity of key murmurs like AS, MR, HCM, and MVP.
Summary of Maneuvers:
- Inspiration: Increases venous return (preload) to the right heart. Increases intensity of all right-sided murmurs (e.g., tricuspid regurgitation, pulmonic stenosis).
- Valsalva / Standing: Decreases venous return (preload) to both sides of the heart. Decreases intensity of most murmurs, but increases the intensity of murmurs from Hypertrophic Cardiomyopathy (HCM) and Mitral Valve Prolapse (MVP).
- Squatting / Leg Raise: Increases venous return (preload) and increases afterload. Increases intensity of most murmurs (e.g., AS, MR, VSD), but decreases the intensity of HCM and MVP murmurs.
- Handgrip: Increases afterload. This makes it harder for the LV to eject blood forward, thus increasing backward flow. Increases intensity of regurgitant murmurs (MR, AR, VSD). It decreases forward flow murmurs like AS and HCM.
Test your understanding!
You are examining a young, athletic patient who complains of shortness of breath during exercise. You hear a harsh crescendo-decrescendo systolic murmur at the left lower sternal border. The murmur's intensity increases when the patient performs a Valsalva maneuver. What is the most likely diagnosis?
Show answer
The most likely diagnosis is Hypertrophic Cardiomyopathy (HCM).
- The murmur is a systolic ejection-type murmur, consistent with LV outflow tract obstruction.
- The key diagnostic clue is the increase in intensity with the Valsalva maneuver. Valsalva decreases preload, making the LV cavity smaller and worsening the dynamic obstruction in HCM. This is one of only two murmurs (the other being MVP) that get louder with Valsalva.
Conclusion
In this lesson, we have systematically deconstructed the cardiac physical examination. You have learned to connect what you inspect, palpate, and auscultate to the underlying cardiac anatomy and pathophysiology.
Key Takeaways:
- Systematic Approach: A thorough exam moves from inspection (general clues, JVP) to palpation (apex beat, heaves, thrills) to auscultation.
- Apex Beat is Key: Its location tells you about heart size, and its character (heaving vs. thrusting) differentiates pressure from volume overload.
- Sounds Tell a Story: S3 points to a dilated, failing ventricle, while S4 indicates a stiff, hypertrophied one. Pathological splitting of S2 can diagnose septal defects and bundle branch blocks.
- Murmurs Have Fingerprints: By analyzing a murmur's timing, shape, location, and response to maneuvers, you can accurately identify most common valvular and structural heart diseases.
This foundational clinical skill will be invaluable as we proceed. In our next lesson, we will move to another essential diagnostic tool: "Interpreting complex 12-lead ECGs," focusing on axis deviation, chamber hypertrophy, and bundle branch blocks. You will see how the physical findings we learned today often correlate directly with ECG abnormalities.