Hello!
In our last lesson, we finalized the entire planning phase of your wedding dress project by creating a comprehensive materials list. You now have a detailed "bill of materials" that covers everything from the main fabrics to the internal structuring agents and specialized tools.
With that crucial planning complete, we now shift from 'what' to 'how'. This module marks our entry into the hands-on construction techniques that will bring your design to life. We'll begin with the signature element of your gown: the vertically pleated bodice.
This first lesson is all about understanding the theory before we put needle to fabric. Your design thinking background has taught you the importance of understanding your materials and methods before implementation. Today, we will do just that by deeply exploring the characteristics of the specific pleat you'll be using.
Your learning outcome for this lesson is to: Identify the characteristics of knife pleats for a structured bodice.
1. The Goal: Architectural Pleats
Your vision is for a modern, architectural bodice with strong vertical lines. The technique that achieves this is the knife pleat. When used correctly, these pleats can transform a flat piece of fabric into a structured, sculpted form.
Let's start by looking at a finished garment that uses this technique in a way that is very similar to your own design goal.

As you can see, the pleats create a sense of rhythm and texture while maintaining a clean, sharp silhouette. Now, let's break down what a knife pleat actually is.
For a quick visual definition, let's watch the very beginning of the video 'Forming Knife Pleats' from FSBTV.
Watch from 00:16 to 00:37. This short clip provides a simple, direct definition and shows how the pleats look when folded in sequence.
In essence, knife pleats are a series of folds pressed crisply in the same direction. What makes them so versatile is how their geometry can be manipulated to achieve different effects.
2. The Anatomy of a Knife Pleat
To understand how to use knife pleats effectively, we first need to deconstruct their basic structure and learn the correct terminology. This is akin to understanding the spec sheet for a component before you integrate it into a larger system.
The article 'Sewing Pleats 101' from Craftematics provides an excellent explanation of the basic construction of a knife pleat.
Read the section titled 'Basic Knife Pleats'. Focus on the description of folding the fabric to make a 'Z shape'. This is the fundamental building block of this pleat type.
That "Z shape" is composed of three parts. Let's define them with some essential vocabulary.
A complete guide to the most common fashion pleats
Now, let's get precise with our language by reviewing the 'A complete guide to the most common fashion pleats' from LetsLearnToSew.org.
Please read the 'Terminology' section. Pay close attention to the definitions and diagrams for 'Pleat depth', 'Pleat underlay', and 'Pleat spacing'.
To summarize and visualize these terms:
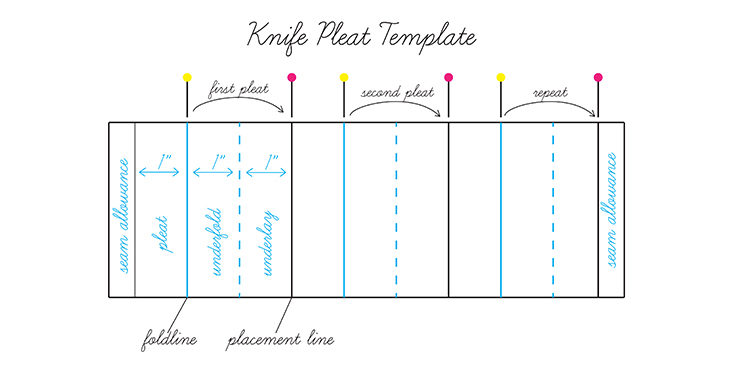
- Pleat Depth: The visible width of the finished pleat on the outside of the garment.
- Pleat Underlay: The hidden fabric folded underneath the pleat. The underlay is always twice the pleat depth. This is the "cost" in fabric required to create the pleat.
- Pleat Spacing: The distance between one pleat and the next. If the spacing is zero, the pleats meet edge-to-edge.
This diagram brings all these concepts together, showing how the flat fabric is marked and folded.
3. Key Characteristics for a Structured Bodice
Now that you can identify the parts of a knife pleat, let's explore why it's the right choice for your structured bodice. It comes down to a few key characteristics that give you, the designer, a high degree of control.
Characteristic 1: Controls Fullness without Adding Volume
This is the most critical property for your design. Gathers or ruffles also reduce a wide piece of fabric to a narrow one, but they do so by creating soft, billowy volume. Knife pleats, by contrast, compress the fabric flat against itself.
The Craftematics article you read earlier puts it perfectly: knife pleats are used "where the fabric needs to be gathered in without increasing the volume or lifting the garment as it moves away from the body." This is exactly what you want for a close-fitting, architectural bodice.
Characteristic 2: Creates Direction and Structure
As the designer, you can control the visual flow of the garment.
- Directionality: Knife pleats have a clear direction. For your bodice, you will use vertical pleats, which create strong lines that lead the eye upwards, enhancing the architectural feel.
- Topstitching for Structure: You can permanently set the pleats and add even more rigidity by stitching along the fold of each pleat. This is called topstitching.
Let's refer back to the Craftematics article to see this in more detail.
Let's revisit 'Sewing Pleats 101' to understand these concepts.
Re-read the paragraph in the 'Basic Knife Pleats' section that begins 'An important note - knife pleats have a direction.' Then, read the section on 'Topstitched Knife Pleats'. Notice how topstitching holds the pleat flat and reinforces the line.
For your bodice, creating a series of narrow, vertical, topstitched knife pleats will produce the precise, structured, and linear effect you're looking for.
Conclusion
In this lesson, we dissected the theory behind the key design feature of your gown. You've moved from a visual idea of "vertical pleats" to a technical understanding of their construction and properties.
Key Takeaways:
- Knife pleats are a series of folds pressed in a single direction, based on a fundamental 'Z' shape.
- The key components are the pleat depth (visible width) and the pleat underlay (hidden fabric, which is twice the depth).
- Their most important characteristic for a structured bodice is their ability to control fabric fullness without adding soft volume.
- The direction of knife pleats is a powerful design tool to guide the viewer's eye.
- Topstitching can be used to lock the pleats in place, creating a more defined and rigid structure suitable for an architectural bodice.
Now that you have a firm grasp of the what and the why, you're ready for the how. In our next lesson, we will take these principles and apply them by marking, folding, and pressing your first pleat samples. This will be your first step in prototyping the bodice construction.