Hello! Welcome to the fourth lesson in our "Patterning the Gown" module.
In the last lesson, you created an accurate, durable copy of your basic bodice block. You now have the clean "master file" ready for modification. This is where your product design mindset truly comes into play as we move from a standard template to a custom-designed component.
Today's learning outcome is to adapt the bodice block to create a strapless pattern with appropriate negative ease. We will transform your basic, shoulder-supported block into a structured pattern that can stand on its own, defying gravity. This is the architectural foundation of your wedding dress bodice.
The Challenge: From Supported to Strapless
A standard bodice block is designed to be supported by the shoulders. The fabric drapes from the shoulder points over the bust. When you remove the straps and shoulders, you create two immediate problems:
- Gravity: The garment will want to slide down.
- Gaping: The fabric will pull away from the body in the curved areas above the bust, creating unflattering gaps.
To solve this, we can't just cut the top off the block. We need to re-engineer the pattern to cling to the body's contours. This process is called contouring, and it results in a pattern with negative ease.
In product design, you might create a part with a "friction fit" that's slightly larger than its housing to create tension. Negative ease in sewing is the opposite: we make the garment pattern slightly smaller than the body's measurements at key points. This creates tension that allows the garment to grip the body and stay up.
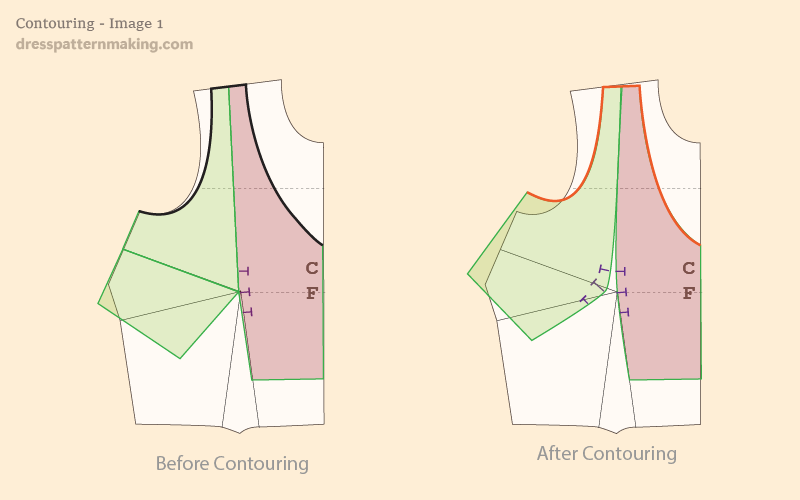
To understand the core problem of gaping more deeply, let's start with a foundational explanation.
Contouring - Dresspatternmaking
This article from Dresspatternmaking.com provides an excellent overview of why contouring is necessary. It explains how a 2D pattern relates to the 3D curves of the body.
Please read 'Part 1: The Need for Contouring'. Focus on the explanation of why a standard block, when used for designs with lower necklines, results in gaping and poor shaping.
The Principles of Contouring
Contouring works by removing small wedges of fabric, known as "gape darts," from specific points on the pattern. For a strapless bodice, the most critical areas are:
- Along the new top edge (where the straps used to be).
- In the space between the bust points.
- At the side of the body, under the arm.
This video provides a clear visual map of these key contouring zones.
BODICE CONTOURING PRINCIPLES | HOW TO CONTOUR THE BASIC BODICE | LA MODÉLISTE
Let's watch this demonstration from LA MODÉLISTE to see where contouring is typically applied. Think of these as strategic interventions to solve the problem of gaping.
Start with the contour guidelines introduction. Don't worry about memorizing the exact measurements; instead, focus on where the adjustments are made and the rationale for each: Cut-out Necklines: This is the main adjustment for the top edge of your strapless design. Armhole Gaping: Removes excess at the side of the bust. Empire Contour: Tightens the bodice under the bust for support. Side Seam Access: Nips in the side for a closer fit. Between the Busts: Shapes the center front.
A Step-by-Step Guide to Drafting Your Strapless Pattern
Now, let's apply these principles to your traced bodice block. We will convert your block into a strapless pattern with princess seams, which is an ideal base for your architectural, corset-style design.
Step 1: Draw Your New Neckline
On your paper pattern, use a pencil and a curved ruler to draw the top edge of your strapless design. You can start with a simple straight line from the center front to the side seam. Your design specifies a sweetheart neckline, which you can also sketch in.
Step 2: Combine Gape Darts for a Strapless Design
As the resources show, a strapless design essentially combines the gape darts from the neckline, armhole, and center front into one significant adjustment.
Contouring - Dresspatternmaking
The Dresspatternmaking.com article specifically explains this combination.
Read 'Part 6: Strapless' to learn about strapless dart merging. The diagram here is key. It shows how the various gape darts are merged into one large dart that will be removed from the top edge of the pattern. This is the core technique.
Step 3: The "Slash and Close" Technique
Once you've drawn these gape darts, you need to remove them from the pattern. You do this by cutting along one leg of the dart to the bust point (the pivot point), and then closing the dart and taping it shut. This action transfers the volume of the gape dart into the main waist dart, effectively moving the shaping from the top edge down into the body of the bodice.
BODICE CONTOURING PRINCIPLES | HOW TO CONTOUR THE BASIC BODICE | LA MODÉLISTE
Seeing this physical manipulation of the paper pattern is the best way to understand it. This short clip shows the 'slash and close' method clearly.
Starting around 11 minutes and 42 seconds, watch the contouring process. Notice how closing the small gape darts with tape makes the larger waist dart open up more. This is dart manipulation in action.
Step 4: Putting It All Together: Creating a Princess Seam Bodice
Now, let's follow a complete workflow that combines all these steps to create a strapless bodice with princess seams. This is a common and very effective structure for strapless gowns.
How to Draft the FRONT Strapless (Bustier / Tube) Pattern From A One-Dart Bodice Block Foundation 2
This video from Bobbin And Drew provides a fantastic, clear walkthrough of the entire process on a one-dart block. It's an excellent practical guide to follow along with your own pattern.
Watch this video from about 01:24 to 07:37, and feel free to pause and apply the steps to your own paper pattern. Plotting contour guides: See how they plot new dart lines to remove fabric for the princess seam and the strapless top edge. Drawing style line & Side Ease: This step finalizes the princess seam line and removes ease at the side seam. Adjusting for boning: This is a preview of a future topic! The extra curve added to the seam lines creates space for boning channels, which provide vertical support. Finalizing pattern pieces: Once the block is cut into a center front and side front panel, you have your new pattern pieces. Don't forget to mark the grainlines.
By following this process, you will have physically transformed your basic block into two new, shaped pattern pieces: a "Center Front" and a "Side Front." These pieces, when sewn together, will create the contoured, close-fitting shape required for your bodice.
Conclusion
You've now performed your first major piece of pattern surgery, moving beyond a standard block to create a custom-designed foundation. By contouring the pattern, you have engineered it to fit the body's three-dimensional curves without shoulder support.
Key Takeaways:
- Strapless garments require contouring to prevent gaping and negative ease to stay up.
- Contouring is achieved by creating and closing "gape darts" to remove excess fabric from the pattern's top edge.
- This shaping is transferred into the main body of the garment, often by creating new style lines like princess seams.
- The final pattern pieces will have a top edge that measures less than the body, creating the tension needed for a secure fit.
In our next lesson, we will shift our focus to the bottom half of your gown. The learning outcome will be to draft a custom A-line skirt pattern based on your waist measurement and desired fullness. You'll learn how to create the sweeping silhouette that will perfectly complement the structured bodice you've just patterned.