Hello! Welcome to your third lesson in the "Patterning the Gown" module.
In our last session, you learned to read the "technical blueprint" of a garment by decoding the symbols and markings on a commercial sewing pattern. You now understand the language of grainlines, notches, and darts. Today, we put that knowledge into direct, practical use.
The goal for this lesson is to trace a basic bodice block pattern, transferring all markings accurately. Think of this as moving from reviewing a design specification to creating your own working file. In product design, you wouldn't edit the original source file; you'd create a copy to iterate on. We're doing the exact same thing here. By the end of this lesson, you will have a durable, accurate "master" copy of your bodice pattern, ready for the design adaptations we'll make in the next lesson.
Why Trace a Pattern?
Before we dive into the "how," let's quickly cover the "why." Commercial patterns are printed on fragile tissue paper. Tracing your pattern onto sturdier paper serves several key purposes:
- Preservation: It keeps your original pattern intact, especially if it's a multi-size pattern and you might want to use a different size later.
- Durability: A traced pattern on card or heavyweight paper can withstand multiple uses, which is essential for the prototyping (muslin) phase.
- Modification: It provides a clean, single-size base for making alterations and design changes—exactly what we'll be doing to create your strapless bodice.
This short video introduction explains these benefits clearly.
5 METHODS TO TRACE A SEWING PATTERN... So you keep your original patterns intact!
Let's start with this video from Evelyn Wood, which summarizes the value of tracing your patterns.
Watch the first part of this video to understand the key reasons why creating a traced copy is a standard practice in sewing.
Your Toolkit for Tracing
To trace your pattern accurately, you'll need a few essential tools. Your experience with design tools will make you appreciate the precision these simple items offer.
- Pattern Paper: This can be anything from specialized Swedish tracing paper or dot-and-cross paper to simple rolls of plain paper or even baking parchment. The key is that it's wide enough for your pattern pieces and ideally somewhat transparent.
- Pattern Weights: To hold the original pattern and tracing paper flat and prevent them from shifting. Cans of food or any small, heavy objects work perfectly.
- Pencil and Eraser: For drawing your lines. A mechanical pencil provides a consistently fine line.
- Rulers: A long, clear ruler for straight lines and a French curve for replicating curved lines like necklines and armholes.
- Tracing Wheel: This is a crucial tool for accurately transferring internal lines like darts.

There are two main types of tracing wheels. For tracing on paper, a needle-point or spiky wheel is most effective as it creates clear perforations.
What Is A Tracing Wheel And How To Use It In Sewing/Pattern-Making
This article from Doina Alexei provides a good overview of tracing wheels. We'll focus on the types and their primary use.
Please read the sections titled 'Types of Tracing Wheels' (which covers the wheel types) and 'How And When To Use a Tracing Wheel' (which details its common applications). This will help you understand the tool's function and why a needle-point wheel is a good choice for this task.
Methods for Tracing Your Pattern
There are several effective methods for tracing. The best approach often combines a couple of techniques for maximum accuracy. Let's review the most common ones.
5 METHODS TO TRACE A SEWING PATTERN... So you keep your original patterns intact!
The same video from Evelyn Wood that we started with demonstrates several tracing methods. We'll look at the most relevant ones.
Watch the following segments to see different tracing techniques in action: Starting at 1:34, Method 1: See-Through Paper: This is the most direct method, tracing with a pencil. Immediately following at 2:12, Method 2: DIY Lightbox: A great trick if your paper isn't very transparent. Skipping ahead to 3:57, Method 3: The Tracing Wheel: Pay close attention to this method. It is the most accurate way to transfer internal lines like darts and pleats.
For your architectural bodice, precision is key. I recommend this combined approach:
- Place your tracing paper over the original bodice block pattern piece. Secure everything with pattern weights.
- Use a pencil and your rulers (straight and French curve) to trace the outer cutting lines for your size.
- Use your tracing wheel to trace over all internal markings: the grainline, dart legs, and any dots or circles. Apply firm, even pressure.
Transferring All Markings Accurately
A traced pattern without its markings is just an empty shape. The real information is in the symbols you learned about in the last lesson. Transferring them accurately is non-negotiable.
The process involves two steps: making the marks with the wheel, then connecting the dots.
What Is A Tracing Wheel And How To Use It In Sewing/Pattern-Making
Let's return to the Doina Alexei article for a clear, step-by-step guide on using the tracing wheel on paper.
Read the section 'Using a Tracing Wheel To Transfer Markings From a Working Pattern To a Final Pattern'. Follow the workflow steps from laying out your paper (Step 2) to connecting the dots (Step 5). This walks you through the entire workflow.
The most critical markings to transfer to your new bodice block are:
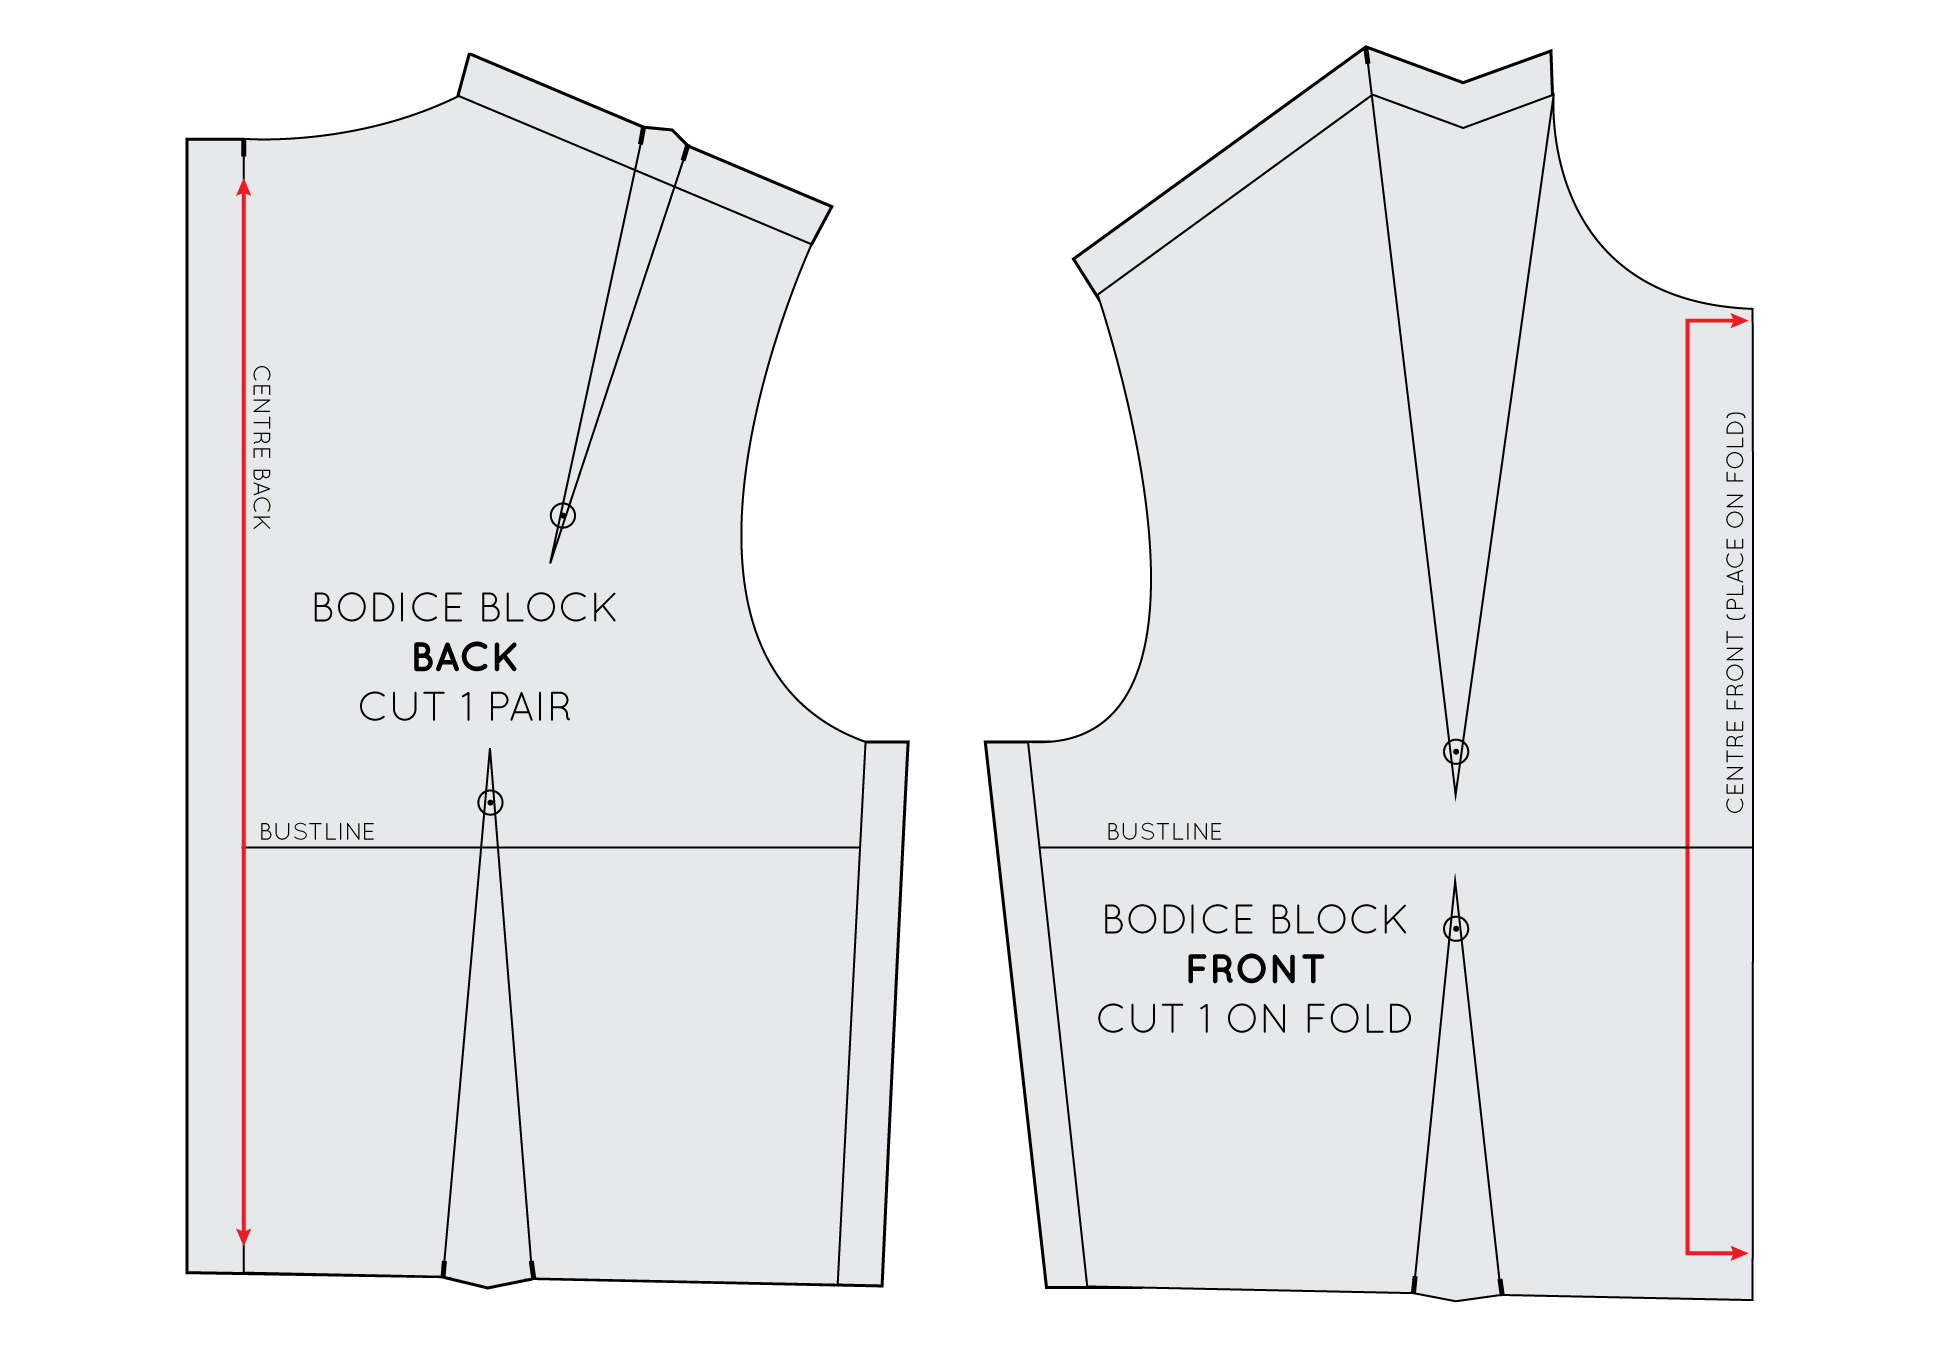
- The Grainline Arrow: This is the most important marking. Use your long ruler to draw it perfectly straight, connecting the perforations made by your tracing wheel.
- Darts: Trace the dart legs and the dart point. Use a ruler to connect the perforations into clear lines.
- Notches: Mark the position of all notches along the outer edge.
- Circles/Dots: These are pivot points or matching points. Mark them clearly.
- Labels: Once traced, label your new pattern piece immediately. Write the piece name (e.g., "Front Bodice"), the size you traced, and the cutting instructions (e.g., "Cut 1 on Fold"). This prevents confusion later.
This video, while focused on transferring marks to fabric, gives excellent visual demonstrations of how to handle specific markings like dots and notches. The principles are identical for paper.
Sewing Pattern Markings: How to Transfer Pattern Markings onto Fabric | The Daily Sew
This video from The Daily Sew provides excellent close-ups of transferring different types of marks.
Watch these sections to see the techniques for transferring different symbols: Key Markings: A great recap of which marks are essential (notches, dots, dart legs). Marking Notches & Pleats: See how notches indicate where pieces align and pleats are formed. Marking Dots with a Pin: This pin-prick technique is a fantastic, precise way to mark the exact center of a dot before you draw it in.
When you are finished, your traced pattern pieces should look like clean, clear blueprints.
Conclusion
You have now successfully created a durable, single-size working pattern of your bodice block. This is a crucial transition from understanding theory to hands-on pattern work. By accurately tracing the pattern and all its markings, you've built the solid foundation upon which we will design your wedding dress bodice.
Key Takeaways:
- Tracing patterns preserves the original and creates a durable copy for modifications and prototyping.
- A combination of pencil tracing for outlines and a tracing wheel for internal markings ensures accuracy.
- It is critical to transfer all markings, especially the grainline, darts, and notches.
- Always label your traced pattern pieces immediately with their name, size, and cutting instructions.
In our next lesson, the design work begins in earnest. We will take the basic block you've just created and start adapting it into your specific vision. Our next learning outcome is to adapt the bodice block to create a strapless pattern with appropriate negative ease. You'll learn how to modify the neckline and build in the close-fitting structure required for a strapless gown.