Hello! Welcome to your next lesson in the "Patterning the Gown" module.
In our last session, you meticulously gathered your body measurements, creating the core dataset for your dress. Think of that as completing the user research phase of your project. Today, we move from data to documentation. You're about to learn how to read the "technical blueprint" of a garment: the sewing pattern. Your background in product design, where you translate abstract ideas into concrete specifications using wireframes and schematics, will be a great asset here. You are essentially learning a new design language.
Our learning outcome for this lesson is to read and interpret commercial pattern markings including notches, grainlines, and construction symbols. By the end of our session, the seemingly cryptic lines and symbols on a pattern will become a clear set of instructions for building your gown.
A First Look at the Language
Before we break it down, let's get a sense of the "visual vocabulary" we'll be covering. Just like a legend on a map or a key in a technical drawing, sewing patterns use a standardized set of symbols.
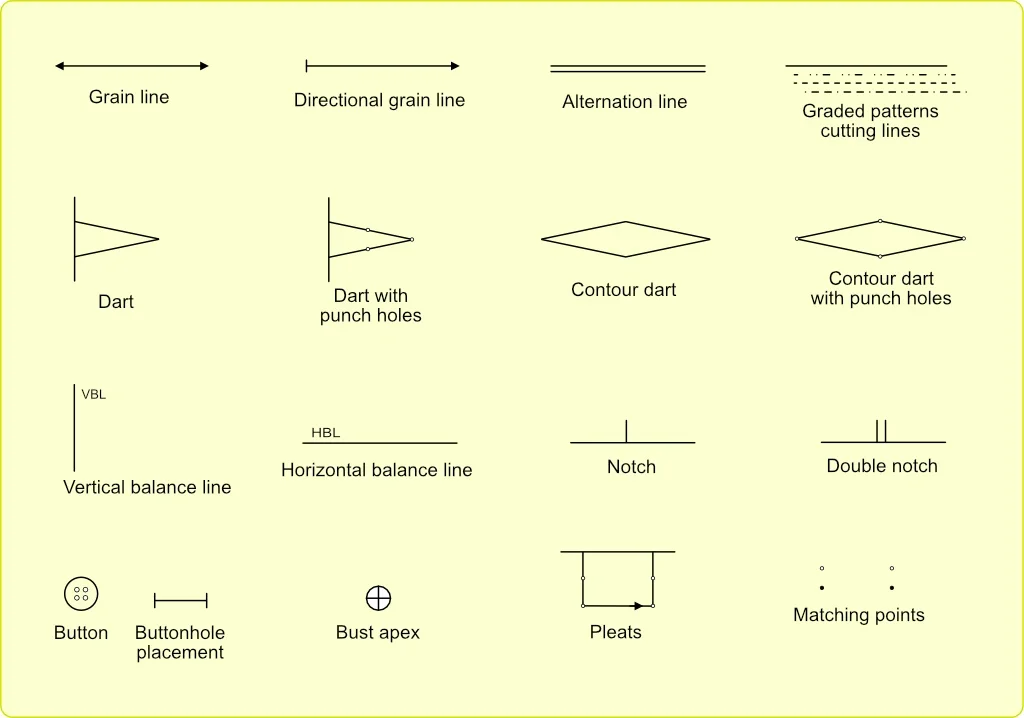
1. Deconstructing the Pattern Package: The Project Brief
A commercial sewing pattern is more than just the tissue paper; it's a complete project package. We'll start by looking at the information provided on the envelope and in the instruction booklet.
This first video gives an excellent tour of a commercial pattern package. We'll focus on the envelope and the tissue markings.
Let's watch this guide from Simplicity McCall's UK. It breaks down the entire pattern system, from the information on the envelope to the symbols on the tissue paper.
Please watch two key segments: The Envelope (00:16 - 04:34): Pay close attention to how to find your size, fabric suggestions, and the list of 'notions' (the extra supplies like zippers and interfacing). The Tissue Markings (05:58 - 07:00): This is a quick but essential overview of the markings you'll find on the pattern pieces themselves. We will dive deeper into these next.
As you saw, the pattern envelope acts as your project summary, outlining:
- Sizing Charts: These relate body measurements to pattern sizes. Note that sewing pattern sizes are not the same as retail clothing sizes. You must use your measurement chart from the last lesson to choose your size.
- Fabric Recommendations: Crucial for achieving the intended drape and structure.
- Yardage Requirements: How much fabric to buy.
- Notions: A checklist of all other materials needed (zippers, hooks, boning, etc.).
The instruction sheet contains the step-by-step assembly guide and, importantly, the lay plans, which are diagrams showing the most efficient way to lay out your pattern pieces on the fabric before cutting.
2. The Language of the Pattern Tissue
Now for the core of our lesson: the markings on the thin tissue paper itself. These symbols are the precise instructions for cutting and sewing. Let's use a visual guide to examine the most common ones you'll encounter.
Sewing 101: Sewing Pattern Markings and Symbols Guide
The article 'Sewing 101: Sewing Pattern Markings and Symbols Guide' from Fabricated Closet provides a clear, illustrated dictionary of pattern symbols. We'll use it as a reference.
Please read through the descriptions for the following symbols in the article. Focus on understanding the function of each one: Single, Double, and Triple Notch: Found under the heading 'Single Notch'. Cut on fold: Found under its own heading. Little circles / Large circles, squares, triangles: Found under their respective headings. Dart lines: Found under its own heading. Pleat lines: Found under its own heading. Size guidelines: Found under its own heading. Lengthen and shorten lines: Found under its own heading.
Let's consolidate the key symbols and their functions:
-
Size & Adjustment Lines:
- Nested Cutting Lines: A series of different line styles (dashes, dots) that correspond to different sizes. You'll choose one line to follow based on your measurements.
- Lengthen/Shorten Lines: Two parallel lines indicating the correct place to add or remove length from a pattern piece without distorting the overall shape.
-
Alignment & Placement Symbols:
- Notches (Triangles): These are critical for aligning two pieces of fabric accurately. You'll match the notches on one piece to the corresponding notches on another. The convention is often single notches for the front and double notches for the back (e.g., on a sleeve).
- Cut on Fold Bracket: This symbol, with arrows pointing to the edge of the pattern piece, indicates that this edge must be placed on the fold of your fabric. This creates a single, symmetrical piece (like a full front bodice from a half-pattern).
- Dots/Squares/Triangles: These are placement markers. They might show where a dart starts, where to attach a pocket, or where to stop sewing a seam.
-
Shaping Symbols:
- Darts: These are wedge-shaped markings used to add three-dimensional shape to a flat piece of fabric, contouring it to the body's curves. They are fundamental to creating a well-fitting bodice.

* **Pleats:** These markings, often a combination of solid and dashed lines with arrows, indicate where to fold fabric to create pleats. Understanding this now will be vital when you draft the vertical pleats for your bodice later.
3. A Deep Dive: The Grainline
Of all the symbols on a pattern, the most important is the grainline. Ignoring it can ruin a garment. The grainline determines how the garment hangs, drapes, and stretches. For your architectural gown, respecting the grainline is non-negotiable for achieving the desired structure.
Let's watch a video that explains this concept visually.
Seamwork Sewing Lab: How Important Is the Grainline?
The channel Seamwork has an excellent video explaining the importance of the grainline. The use of gingham fabric makes the concept very clear.
Watch the following segments: What is the Grainline? (00:35 - 00:55): A quick introduction. The Three Grains (00:55 - 02:34): Focus on the definitions of lengthwise/straight grain, cross-grain, and bias for woven fabrics. Aligning the Pattern (03:42 - 04:28): See how to align the grainline arrow on your pattern piece with the grain of the fabric. What Happens When It's Off-Grain? (04:28 - 05:09): This is a crucial visualization of why the grainline matters so much.
To summarize the key points for your woven silk fabrics:
- Lengthwise Grain (Straight of Grain): Runs parallel to the fabric's finished edges (the selvedges). This is the most stable direction with the least amount of stretch. The standard grainline arrow on a pattern piece must be aligned parallel to this grain unless specified otherwise.
- Cross-grain: Runs perpendicular to the selvedges. It has slightly more give than the lengthwise grain.
- Bias: The 45-degree angle between the lengthwise and cross-grains. This is the stretchiest direction of a woven fabric, which allows for beautiful, fluid drape but can also be unstable and prone to stretching out of shape.
The grainline marking on a pattern piece is a long line with arrows at one or both ends. Your job is to ensure this line is perfectly parallel to the selvedge of your fabric when you lay out your pieces for cutting.
Conclusion
You've now decoded the language of sewing patterns. What once looked like a confusing jumble of lines should now read as a clear set of instructions. You understand how to get project information from the envelope, and more importantly, how to interpret the critical symbols on the pattern tissue that will guide your cutting and sewing.
Key Takeaways:
- A sewing pattern is a complete system: the envelope is the brief, the instructions are the manual, and the tissue is the blueprint.
- The most important markings on the blueprint are the grainline (for drape and stability), notches (for alignment), and the 'cut on fold' symbol (for symmetry).
- Shaping markings like darts and pleats are the instructions for turning a 2D material into a 3D form that fits the body.
- Always use your body measurements to select your pattern size, and always align the pattern's grainline with the fabric's straight of grain.
In our next lesson, we will put this knowledge into immediate practice. The learning outcome will be to trace a basic bodice block pattern, transferring all markings accurately. Now that you can read the map, your next task is to chart your own course by creating a working copy of your pattern, ready for the prototyping stage.