Hello! Welcome to the first lesson of our "Patterning the Gown" module.
In our last session, we built a sample seam library, which gave you a hands-on understanding of how your chosen fabrics behave. This was the material science phase of our project. Now, we shift our focus to the architectural foundation of the dress: the pattern. Your background in product design has taught you that a successful product must be built around the user's specific needs and dimensions. In garment making, this is literally true.
Today's learning outcome is to take accurate body measurements for bodice and skirt pattern drafting. This step is the foundational data-gathering phase of your project. The precision of these numbers will directly influence the fit of your gown, so we'll approach this with the same methodical care you'd apply to a critical design project.
1. Preparation: Setting the Stage for Accuracy
Before you even pick up a tape measure, proper preparation is key. Inaccurate measurements are the primary cause of fit issues, so let's establish a set of best practices. This is about controlling your variables to ensure clean, reliable data.
First, please watch this short segment on common mistakes and how to avoid them.
How to Take Accurate Body Measurements for a Perfect Fit! | UPDATED
The YouTube channel Felicia's Craft provides an excellent overview of common mistakes made during measuring. Paying attention to these tips now will save you a lot of trouble later.
Watch the segment from 06:18 to 07:25. Focus on the four key tips: ensuring the tape is snug but not tight, wearing appropriate close-fitting clothing, choosing the right undergarments, and maintaining a natural posture.
To summarize and expand on these crucial points:
- Get a Partner: You cannot take accurate measurements on your own. Ask a friend or family member for help.
- What to Wear: Wear form-fitting clothes like leggings and a tank top or camisole. Avoid measuring over bulky clothing.
- Undergarments are Crucial: Wear the exact bra and any shapewear you intend to wear with your wedding dress. A strapless dress requires a specific foundation, and measuring without it will lead to a bodice that doesn't fit correctly.
- Posture: Stand up straight but in a natural, relaxed pose. Don't suck in your stomach or hold your breath.
2. Establishing Your Body's Grid System
To ensure all your vertical measurements are taken from consistent horizontal points, we will create a simple "grid system" on your body using elastic bands. This systematic approach will ensure that your "waist" is the same point for every measurement that references it.
- Find Your Natural Waist: Tie a piece of string or narrow elastic around your torso. Bend from side to side; the elastic will naturally settle into the narrowest part. This is your natural waistline.
- Mark Your Bust and Hips: Using two more pieces of elastic, create rings that are snug but not tight.
- Place one around the fullest part of your bust. Use a mirror to ensure it's parallel to the floor all the way around.
- Place the other around the fullest part of your hips and buttocks. Again, ensure it is level with the floor.
You should now have three horizontal lines on your body. These are your fixed reference points for the entire measuring process.
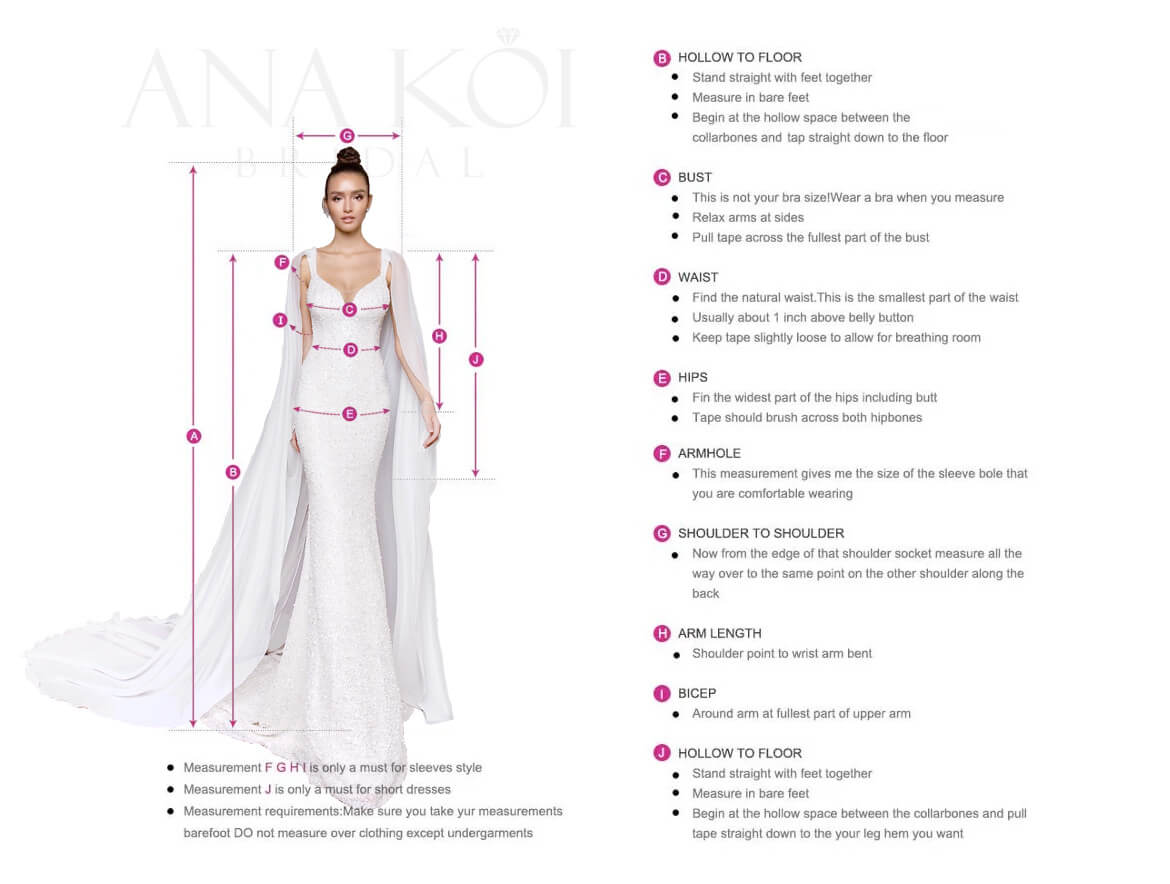
3. Taking the Key Measurements
Now you are ready to start measuring. We will watch two videos that demonstrate the process. Both offer slightly different tips, and seeing the process from multiple angles is beneficial.
How to Take Accurate Body Measurements for a Perfect Fit! | UPDATED
First, let's watch selections from Felicia's Craft. Her technique for finding the waist and her clear explanation of circumference measurements are excellent.
Watch the following segments to see these key measurements demonstrated: Finding the Waistline: (00:52 - 01:21) Vertical Bodice Lengths: (01:47 - 02:19) for Shoulder to Half-Length Back & Shoulder to Bust. Skirt Lengths: (02:52 - 03:15) for Waist to Hip & Waist to Knee. Circumferences: (03:15 - 04:22) for Bust, Underbust, Waist, and Hip. Note the tip about making sure the tape can slide over the hips. Apex to Apex: (05:29 - 05:36) for the bust point to bust point measurement.
PATTERN MAKING: How to Take Body Measurements // How to Measure Yourself Sewing Patterns
Next, let's watch parts of the video from London-based designer GigiZanti. She offers some great practical tips for finding bony landmarks on the body.
Focus on these measurements, which are critical for your dress: Bust & Underbust: (04:39 - 05:18) Waist: (05:18 - 05:53) Note her 'dance around' trick to find the natural waist. High & Full Hip: (05:53 - 07:25) Vertical Front Lengths: (08:26 - 09:10) for Shoulder to Bust (Nipple) and Shoulder to Waist. Side Seam & Skirt Lengths: (10:34 - 11:19 for side seam and waist-to-hip) and (15:30 - 16:08 for waist-to-knee and waist-to-floor).
As a final static reference, this webpage provides clear images for each measurement, which you can keep open while you work.
How to Measure for Custom Wedding Dress Design - A.Cherie
This 'How to Measure' guide from A.Cherie, a custom bridal designer, has excellent photos for each measurement. It's a great visual checklist.
Scroll through the numbered list of measurements in this section. You don't need to take all 29, but use the images as a visual guide for the measurements listed in the chart below. For example, refer to images #11 (Bust), #12 (Underbust), #22 (Natural Waist), and #24 (Hip Circumference).
4. Your Measurement Chart
Record your measurements in a chart. This document will be the "single source of truth" for your project's fit. Be precise and write down the numbers as your partner calls them out. Use either inches or centimeters and be consistent.
Copy the following Markdown table into a notebook or a digital document.
| Measurement Category | Measurement Name | Your Value | Notes |
|---|---|---|---|
| Circumferences | 1. Upper Bust (High Bust) | Around the body, under the arms, above the bust | |
| 2. Bust | Around the fullest part of the bust, parallel to floor | ||
| 3. Underbust | Directly under the bust, where a bra band sits | ||
| 4. Natural Waist | The narrowest part of the torso | ||
| 5. High Hip | Around the top of the hip bones, approx. 3-4" below waist | ||
| 6. Hip | Around the fullest part of hips and buttocks | ||
| Vertical (Front) | 7. Shoulder to Bust Point | From top of shoulder down to the bust apex (nipple) | |
| 8. Shoulder to Waist | From top of shoulder, over the bust apex, to the waist | ||
| 9. Bust Span (Apex to Apex) | From one bust apex to the other | ||
| 10. Underarm to Waist (Side) | From the armpit crease down to the waist at your side | ||
| Vertical (Back) | 11. Back Neck to Waist | From the prominent bone at the base of the neck to the waist | |
| Skirt Lengths | 12. Waist to Hip | From the waist to the full hip level at your side | |
| 13. Waist to Floor | From the side waist down to the floor (without shoes) |
Take each measurement twice to ensure consistency. If you get different numbers, take it a third time.
Conclusion
You have now completed a critical step in the creation of your dress. By systematically preparing, creating a reference grid, and carefully recording your body's unique dimensions, you have created the essential dataset that will guide the entire pattern-making process.
Key Takeaways:
- Preparation is paramount: The right undergarments, close-fitting clothes, and a helper are non-negotiable for accuracy.
- A grid system ensures consistency: Using elastics to mark your bust, waist, and hip lines provides stable reference points for all other measurements.
- Measure twice, cut once: Double-checking each measurement minimizes errors that are difficult to fix later.
- These numbers are your blueprint: Your measurement chart is the foundational document for achieving a bespoke fit.
In our next lesson, we will move on to the patterns themselves. We'll learn how to read and interpret commercial pattern markings including notches, grainlines, and construction symbols. You'll start to see how these patterns are a language, and with your measurements in hand, you'll be able to translate them to fit you perfectly.