Hello! Welcome to your final lesson in the "Patterning the Gown" module.
In our last session, you did some impressive pattern engineering, transforming a standard bodice block into a contoured, strapless foundation for your dress. You now have the custom pattern pieces for the architectural top half of your gown.
Today, we complete the master pattern by drafting the bottom half. The learning outcome is to draft a custom A-line skirt pattern based on your waist measurement and desired fullness. We'll move from the structured complexity of the bodice to the graceful geometry of the skirt, creating the elegant A-line silhouette that is central to your design vision.
Understanding the A-Line Skirt
First, let's visually place the A-line skirt in context. It's a classic shape that flares gently from the waist to the hem, creating a silhouette resembling the letter 'A'.
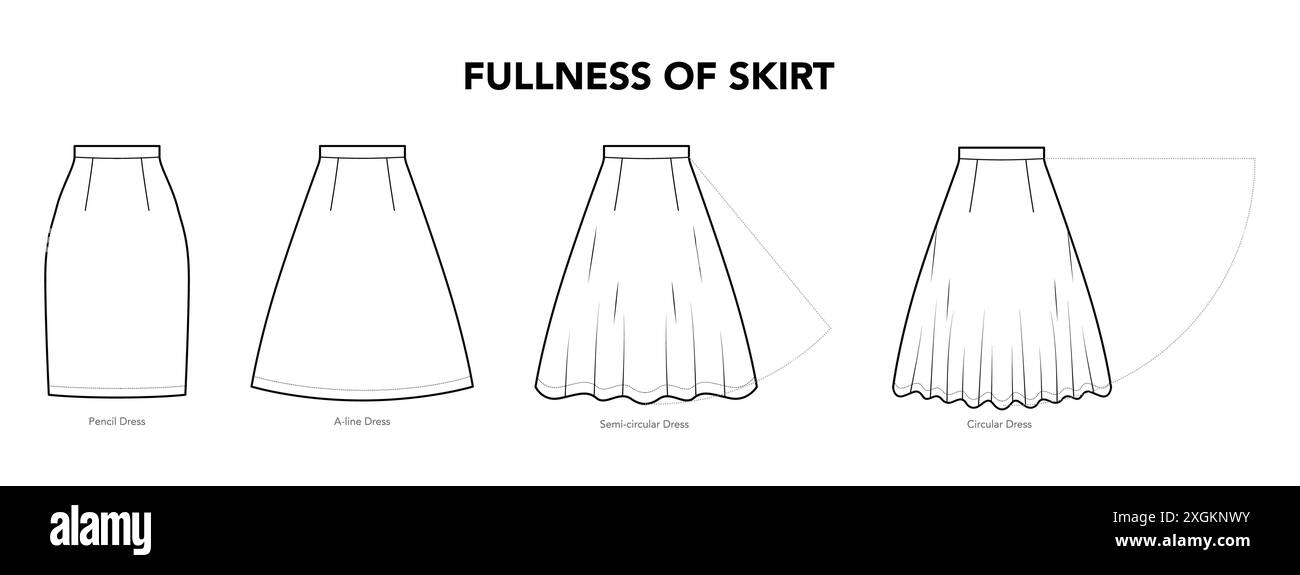
There are two primary methods for drafting a flared skirt like an A-line. Understanding both will give you a deeper insight into how 2D patterns create 3D shapes—much like understanding different modeling techniques in product design.
- The Circle Method: This geometric approach treats the skirt pattern as a segment of a circle. It's precise, mathematical, and very efficient for creating a standard, even flare.
- The Slash-and-Spread Method: This is a more sculptural technique where you start with a basic straight pattern and cut and spread it open to introduce flare. It's highly adaptable and offers a more tactile way to control the final shape.
Let's start by exploring the core principle of the circle method.
How to pattern ANY kind of flared skirt | How the math works | gathered, a-line, circle skirts, etc.
This video from Mariah Pattie provides an excellent conceptual overview of how different types of flared skirts relate to sections of a circle. This will help you understand the 'why' behind the geometry.
Please watch from the beginning to 01:50. Pay close attention to two key ideas: Waist Fullness: The difference between a skirt that fits the waist smoothly (100%) versus one that is gathered or pleated (200-300%). For your A-line design, we'll be using 100% fullness. Circle Percentage: How a quarter-circle skirt, half-circle, and full-circle create different amounts of hem fullness. As she mentions, a quarter-circle skirt is an A-line skirt.
Now, let's turn these principles into a pattern. We'll focus on the quarter-circle method first, as it's the most direct route to the classic A-line silhouette you're aiming for.
Method 1: Drafting a Quarter-Circle A-Line Skirt
This method uses your waist measurement and desired skirt length to calculate the pattern's dimensions. It's a beautifully simple system that produces a very elegant result.
Step 1: Get Your Measurements
You'll need two key measurements you took in a previous lesson:
- Waist Circumference (W): The full measurement around your natural waist.
- Skirt Length (L): The distance from your natural waist to where you want the hem to end (e.g., the floor).
Step 2: The Magic Formula (Calculating the Radius)
To create a pattern that fits your waist perfectly when flared, we need to calculate the radius of the inner (waist) circle. For a quarter-circle skirt, the formula is:
For example, if your waist measurement is 72 cm (approx 28.3 inches):
Use your own waist measurement to calculate your specific radius.
Step 3: Draft the Pattern
Now, watch how this calculation is used to draw the actual pattern.
How to pattern ANY kind of flared skirt | How the math works | gathered, a-line, circle skirts, etc.
Let's return to Mariah Pattie's video. She will now demonstrate the drafting process for a quarter-circle skirt. Even though she's using different measurements, the technique is exactly what you will follow.
Watch the section from 07:08 to 08:34. This covers drafting a fitted quarter-circle skirt. Then, watch 03:40 to 04:39 to see the general drafting technique applied. \nHere’s a summary of the steps you'll take: On a large sheet of pattern paper, draw a perfect 90-degree angle (a corner). Using your calculated radius (r), swing an arc from one straight edge to the other. This is your waistline stitching line. From that waistline arc, measure down your desired Skirt Length (L) at several points and make marks. Connect these marks to swing a second, larger arc. This is your hemline. Add seam allowances after you've drawn these stitching lines. Add a 1.5 cm allowance outside the waistline and hemline. Also, add a 1.5 cm allowance to one of the straight sides for the side seam. The other straight side will be placed on the fold of the fabric (Center Front or Center Back).
This single pattern piece represents half of your skirt front (or back). You will place the straight edge without seam allowance on the fold of your fabric to cut a full front piece, and repeat for the back.
Method 2: The Slash-and-Spread Technique
This alternative method is more akin to physical prototyping. You begin with a basic straight shape and manipulate it to create the flare. It's a great technique to understand, as it's fundamental to many other pattern adjustments.
Drafting a Custom Skirt Pattern
Bridal couturier Brooks Ann Camper provides a wonderful real-world example of creating a custom skirt pattern. Her process clearly illustrates the 'slash-and-spread' method.
Read the section titled 'The Skirt'. Notice how she starts by defining three key data points: length, waist fullness, and hem fullness. Then, observe the process shown in the images where she drafts a rectangle, slashes it, and spreads the strips to create the A-line flare. This is the core of the technique.
To use this method, you would start with a basic straight skirt block. Since we haven't drafted one, you can simulate it by drawing a simple rectangle whose width is 1/4 of your hip measurement and whose length is your desired skirt length. You would then add a dart at the waist to remove the excess between your hip and waist measurements.
The image below shows a technical diagram of this process.

For your current project, the quarter-circle method is likely the most efficient path to your desired A-line skirt. However, the slash-and-spread method is a powerful tool for your design toolkit, perfect for creating custom flare shapes in the future.
Finalizing Your Skirt Pattern
Now it's time to create your final paper pattern.
- Choose Your Method: I recommend using the quarter-circle method for a clean, classic A-line.
- Draft Your Piece: Following the steps from the video, draft one pattern piece on paper based on your waist and length measurements.
- Add Markings: This is crucial. Before you cut it out, label your pattern piece clearly:
- "A-Line Skirt - Cut 2 on Fold" (This means you'll cut one front and one back piece, each from a folded piece of fabric).
- Mark the grainline parallel to the straight edge that will go on the fabric fold.
- Clearly label the "Center Front / Center Back - Place on Fold" edge.
- Label the "Side Seam" edge.
- Draw notches at the hip line on the side seam to help with alignment later.
You now have the pattern for the graceful, sweeping skirt that will be the counterpart to your structured bodice.
Conclusion
Congratulations on completing the full draft of your wedding dress pattern! You've tackled both the intricate, form-fitting bodice and the geometric, flowing skirt.
Key Takeaways:
- An A-line skirt can be drafted using two main methods: the geometric quarter-circle method or the sculptural slash-and-spread method.
- The quarter-circle method requires only your waist circumference and desired length to create a precise pattern using the formula .
- The amount of flare at the hem is a key design decision. A standard A-line provides an elegant flare without excessive volume.
- Clear and accurate pattern markings (grainline, notches, seam allowances) are essential for the next stage of cutting and sewing.
In our next lesson, we will move from the 2D world of paper patterns into the 3D world of fabric. You'll enter the prototyping phase, starting with selecting the right weight of muslin to simulate your final dress fabrics and preparing to cut and assemble your first test garment.