Hello!
In our last lesson, you did the crucial work of finalizing your master patterns. You translated every adjustment from your muslin fittings into a perfected 2D blueprint. Think of it as finalizing the schematics before production—a process you're very familiar with from product design.
Today, we'll use those precise blueprints for a very practical and exciting purpose: figuring out exactly how much fabric to buy. Getting this calculation right is key. It ensures you have enough of your beautiful final fabrics to cut every piece with confidence, while avoiding costly over-purchasing. We'll approach this systematically, treating it like a resource planning task.
Your learning outcome for this lesson is to: Calculate final fabric yardage requirements for all layers based on the finalized patterns.
1. The Standard Method: A Strategic Layout
The most reliable way to calculate fabric needs is to physically determine the most efficient layout for your pattern pieces. This involves simulating your fabric's width on a large flat surface (like your floor) and arranging your patterns to find the shortest length required. It’s like a strategic game of Tetris where the goal is to minimize waste.
The single most important variable in this process is the width of the fabric you plan to buy. Bridal silks often come in widths like 114 cm (45 inches) or 140 cm (55 inches), but this can vary. Before you can do your calculation, you need to decide on a target width for each of your fabrics.
This video from Melly Sews provides an excellent visual demonstration of this layout method.
Figure Out How Much Fabric to Buy
Watch 'Figure Out How Much Fabric to Buy' to see how to mock up fabric widths on your floor and arrange pattern pieces within those boundaries.
Please watch from 00:40 to 03:18, and then from 04:30 to 05:16. Focus on: How she uses tape to mark out the two common fabric widths (representing fabric folded in half). The way she arranges the pattern pieces, respecting the fold line. How a narrower fabric width forces a different layout and requires more length.
For a more detailed, step-by-step guide that you can refer to as you work, the following article from Cashmerette is very helpful. It reinforces the same principles with clear photos.
How much fabric do I need? How to calculate fabric yardage
This article, 'How much fabric do I need? How to calculate fabric yardage', breaks down the process. It's a great practical guide for our task.
Read 'Step 3: Figure out the width of your fabric' and 'Step 4: Create your layout'. \nPay close attention to the instructions for creating a layout on the floor. Note the advice on keeping grainlines parallel to the edge and leaving a bit of space between pieces for comfortable cutting. Your finalized patterns should have the grainline clearly marked on every piece.

2. The Special Case: Calculating for the Pleated Bodice
The standard layout method works perfectly for flat pieces, but it won't work for your pleated bodice front. Your pattern piece for the pleated section represents the finished dimensions, but creating the pleats themselves will consume a significant amount of extra fabric.
For knife pleats, the standard rule of thumb is that you need three times the fabric for the finished width of the pleated area.
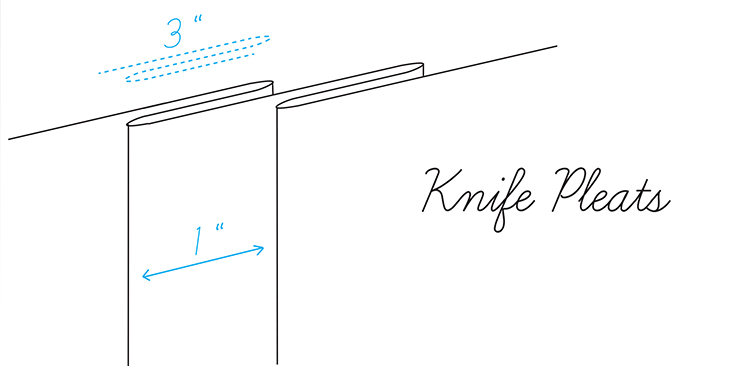
So, how do you apply this? The process is straightforward:
- Measure the finished width of your pleated bodice pattern piece.
- Multiply that width by three.
- Add your seam allowances for both sides.
The following video clearly demonstrates this exact calculation.
Tutorial on Making Pleats & Calculating How Much Fabric is Needed #diy #fashion #dominican
This 'Tutorial on Making Pleats' provides a very clear, practical explanation of how to calculate the fabric needed.
Watch these key segments: 02:38 - 03:45: This shows the fundamental concept of why one pleat requires three times its width in fabric. 03:45 - 06:20: The presenter expands this to calculate for multiple pleats, reinforcing the logic. 07:33 - 09:06: This is the most important part. Watch how she calculates the total fabric needed for a pleated section based on a final measurement (in her case, a waistline). The formula is: (Finished Width x 3) + Seam Allowances = Total Fabric Width Needed.
3. Your Action Plan: Creating the Master List
Now it's time to put this all together. You will perform separate calculations for each type of fabric in your dress.
Task 1: Layout for Non-Pleated Pieces
- Decide on a Target Width: For your silk organza (skirt), skirt underlining, and bodice lining, assume a standard apparel width, for example 140 cm / 55 inches.
- Mock-up the Fabric: On a large, clear floor space, use painter's tape to mark out a long rectangle with your chosen fabric width. If you plan to cut on the fold, your rectangle's width will be half the total fabric width (e.g., 70 cm for a 140 cm fabric).
- Lay Out the Pieces:
- Place all your skirt pieces (for one layer) and your bodice lining pieces within the taped area.
- Ensure all grainline markings are parallel to the long edge of your taped rectangle.
- Arrange them as efficiently as possible to minimize the total length used.
- Measure: Once arranged, measure the total length from the start to the end of your layout. This is your required length for that fabric.
Task 2: Calculation for the Pleated Bodice
- Take your finalized front bodice pattern piece (the one that will be pleated).
- Measure its width (the dimension that will be pleated).
- Apply the formula:
(Pattern Piece Width x 3) + (2 x Seam Allowance) = Total Width Needed. - The length will be the height of your bodice pattern piece. You will need one rectangular piece of fabric with these dimensions for your pleated panel. Add this to the layout for your other main bodice pieces (sides and back) to get a total for your primary bodice fabric.
Task 3: Consolidate and Add a Buffer
Create a list and record your measurements. For each fabric, you need to add a buffer to account for potential pre-washing shrinkage, cutting errors, or the need to re-cut a piece. A 15% buffer is wise for a project of this importance.
Your final calculation for each fabric will be: (Measured Length x 1.15).
| Fabric Type | Pieces to Include | Method | Measured Length (inches/cm) | Length with 15% Buffer | Final Yardage/Meterage (Rounded Up) |
|---|---|---|---|---|---|
| Bodice Shell (e.g., Silk Crepe) | Side front, Back, Rectangular piece for front pleats | Layout + Calculation | |||
| Skirt Underlining | All skirt panels | Layout | |||
| Skirt Overlays (e.g., Silk Organza) | All skirt panels (You'll need multiple layers) | Layout | (Length for one layer) x (Number of layers) | ||
| Bodice Lining | All bodice lining panels | Layout |
Finally, convert your final length into yards or meters, as that is how fabric is sold. Remember to round up to the nearest increment the store sells (e.g., half-yard or full yard).
- 1 yard = 36 inches
- 1 meter = 100 cm ≈ 1.1 yards
Conclusion
Congratulations on completing this essential planning stage. You have moved from a creative design to a quantifiable list of materials. This systematic approach demystifies the shopping process and ensures you are fully prepared.
Key Takeaways:
- For standard pattern pieces, use the layout method: simulate fabric width and arrange pieces efficiently to find the required length.
- For your pleated bodice, use the 3x multiplier formula to calculate the fabric needed before pleating.
- Always perform separate calculations for each fabric type, as they may have different widths and requirements.
- A 15% buffer is a crucial safety net for a project like a wedding dress.
With your yardage calculated, you're almost ready to go shopping. In our next lesson, we will round out your shopping list by identifying all the necessary notions, interfacings, and specialized tools required to bring your design to life.