Hello! Welcome to your next lesson.
In our last session, you prototyped your pleated bodice panel, testing the design on your second muslin. This process of creating a tangible test is fundamental to your product design background, and in sewing, it provides invaluable data about how a 2D pattern behaves in 3D.
Today, we translate that data into a final, perfected blueprint. This lesson is about taking all your fit adjustments and design decisions from your muslin fittings and transferring them permanently onto your paper patterns. By the end of this session, you will have a complete, accurate, and fully-notated set of master patterns for your bodice and skirt, ready for the final fabric.
This is the equivalent of locking down the final CAD model before production. Every line, notch, and instruction must be precise, as this pattern is the single source of truth for your gown.
Your learning outcome for this lesson is to: Finalize all bodice and skirt patterns, incorporating all fit and design changes.
1. The Mindset: From 3D Muslin to 2D Blueprint
Throughout your fittings, you have been shaping, pinning, and marking your muslin in three dimensions. The task now is to systematically translate those 3D changes back into a flat, 2D paper pattern. This process ensures that the fit you perfected on the dress form is captured accurately.
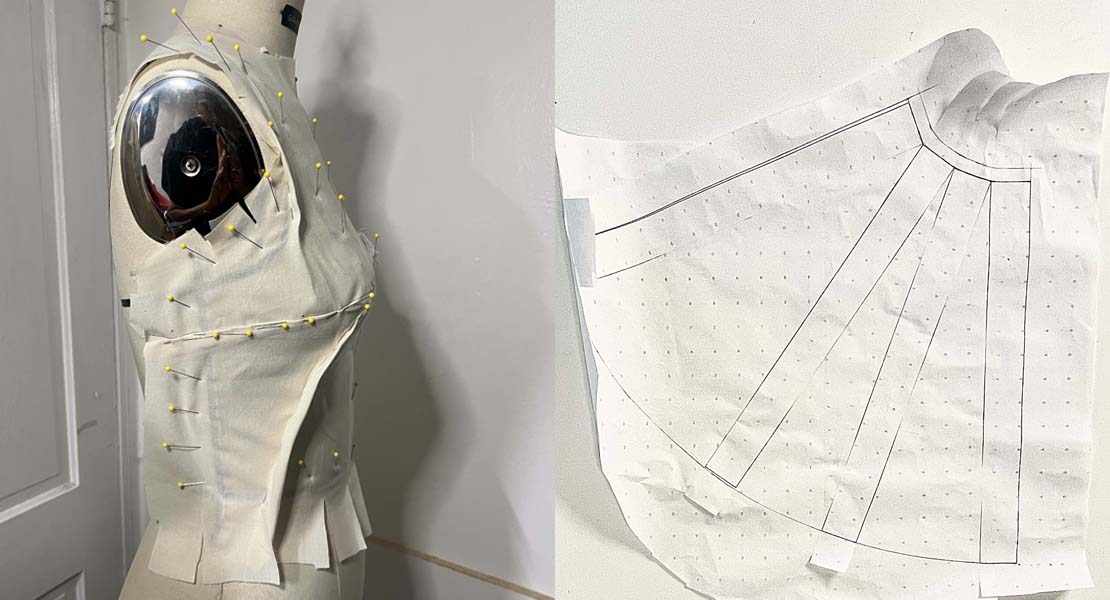
The process is methodical:
- Mark & Deconstruct: Clearly mark your final seam lines on the muslin before taking it apart.
- Transfer: Transfer these new markings onto your working paper patterns.
- True & Refine: Smooth all lines and ensure adjoining seams are the correct length.
- Finalize: Create a clean, final copy of each pattern piece with all necessary information.
2. Transferring Fit Adjustments: A Step-by-Step Guide
The most critical part of this process is accurately transferring your adjustments. This involves redrawing seamlines, adjusting darts, and ensuring every change you pinned into the muslin is reflected on the paper.
I've selected a comprehensive article from Threads Magazine that breaks this down into clear, manageable steps. We will work through its methodology.
From Muslin to Pattern, Step by Step - Threads Magazine
Please read this detailed guide, 'From Muslin to Pattern, Step by Step' by Sarah Veblen. It is an excellent, professional walkthrough of the entire process we're undertaking today. It's broken down into logical sections with clear images.
Read the following sections: 'Transfer muslin changes to the pattern': Focus on how to mark your muslin with a permanent marker before deconstruction and how to align the muslin piece with your paper pattern to transfer the new lines. 'Make the length changes': This shows how to handle adjustments that add or remove length, like rotating a dart. 'Complete the front changes' & 'Complete the back changes': Pay close attention to the use of a fashion ruler (or French curve) to 'true' the lines—connecting your adjustment marks into smooth, sewable curves rather than jagged points.
To see this process in action, the following video provides a great visual supplement. It shows a designer making similar adjustments to a bridal gown pattern after a fitting.
Sewing a Bridal Gown Part 2: Muslin Adjustments
In 'Sewing a Bridal Gown Part 2: Muslin Adjustments,' you can see how new necklines are drawn and how princess seams are taken in directly on the pattern pieces.
Watch from 01:21 to 07:36. Notice how she uses a French curve to create smooth new seamlines (neckline, armhole) and how she 'trues up' the edges of the pattern pieces so the seam allowances match perfectly when sewn.
Your Action Plan:
- Lay out your final fitted muslin (Muslin II). If there are any remaining pins, replace them with clear marks from a fine-tip permanent marker on the seam lines.
- Carefully deconstruct the muslin, pressing each piece flat.
- One by one, lay your corrected muslin pieces over their corresponding paper pattern pieces.
- Using a pencil, transfer all the new seam lines, dart points, and other adjustments from the muslin to the paper pattern. Use small, precise tick marks.
- Use your ruler or French curve to connect these tick marks, creating smooth, clean new lines for all seams and darts.
3. The Quality Assurance Step: "Walking" Your Seams
Before you finalize the patterns, you need to perform a crucial quality check. "Walking" the seams means checking that the lengths of any two seams that will be stitched together are identical. A tiny discrepancy on the flat pattern can lead to significant puckering or stretching in the final garment.
The Threads article you read earlier has an excellent, concise section on this.
From Muslin to Pattern, Step by Step - Threads Magazine
Let's return to the 'From Muslin to Pattern' article to focus on this key validation step.
Please read the section titled 'Walk and true the seamlines.' This demonstrates how to pivot one pattern piece against another along the stitch line to ensure they match perfectly. Pay attention to how small adjustments are made if a mismatch is found.
Walk these critical seams:
- Bodice side front seam to side back seam.
- Bodice center front (pleated panel) to side front seams.
- Shoulder seams (if your design has them).
- The entire waistline seam: Walk the bottom edge of all bodice pieces against the top edge of all skirt pieces. This is crucial for a smooth join.
4. Creating the Final Master Pattern
Your working pattern is now corrected, but it's likely covered in old lines, tape, and pencil marks. The final step is to create a clean "production" copy. This master pattern will be used to cut your precious final fabric.
This process involves tracing a new, clean pattern from your corrected one.
Ep. 2: Making A Muslin - DIY Couture Cocktail Dress
The video 'Making A Muslin' by Paige Handmade has an excellent final chapter showing exactly how to create a final pattern from a corrected muslin.
Watch from 12:01 to 13:47. Observe how she takes the corrected muslin apart and then lays fresh paper over it to trace the final, perfected seam lines. You can do this with either your corrected muslin pieces or your corrected paper patterns.
For each final pattern piece, you must include the following information:
- Piece Name: (e.g., "Bodice Side Front," "Skirt Front")
- Cutting Instructions: (e.g., "Cut 2 Fabric," "Cut 1 on Fold," "Cut 2 Lining")
- Grainline: A long, straight arrow showing how to align the piece with the fabric's grain.
- Notches: Marks to help you align pieces during construction. Add them to your side seams, waistline, and anywhere else that will aid in assembly.
- Seam Allowance: Clearly draw your chosen seam allowance around all edges. For a strapless gown, a 1.5cm (5/8") allowance is standard.

Conclusion
You have now translated all your iterative design work and fitting adjustments into a set of final master patterns. This is a huge milestone. Your patterns are no longer just a draft; they are the definitive blueprint for your wedding dress.
Key Takeaways:
- Final patterns are precise blueprints. They must be accurate, clean, and fully annotated.
- The process is systematic: Mark, deconstruct, transfer, true, and create a final clean copy.
- "Walking" seams is a critical QA step to ensure your garment will assemble smoothly.
- Every final pattern piece must include its name, cutting instructions, grainline, notches, and seam allowance.
In our next lesson, we will use these finalized patterns to perform another crucial task before you can purchase your fabric: calculating the final yardage requirements. With your perfect blueprint in hand, you'll be able to determine exactly how much of each beautiful silk you'll need.