Introduction
In our last lesson, we established the core placements for snares and claps, focusing on the foundational backbeat and variations like syncopation and rolls. We briefly touched on the idea that shifting notes slightly off the grid or varying their volume could change the "feel" of a pattern. Today, we will formalize and systematically explore these exact techniques. This lesson is dedicated to the two primary dimensions of rhythmic nuance: velocity variation and micro-timing.
Your goal is to learn how to use these tools to transform a rigid, mechanical sequence into a dynamic, "humanized" groove. From your background in physics, you're familiar with how ideal models (like a perfect crystal lattice) gain their interesting, real-world properties from imperfections and fluctuations. We'll apply a similar mindset here, treating the quantized grid as our ideal model and then introducing small, controlled perturbations in timing and intensity to give our rhythms life and character. We will investigate why these minute adjustments have such a profound impact by looking at the psychoacoustics of human hearing.
The Perceptual Basis of Groove
Before we start manipulating notes, let's address a fundamental question: why do timing and volume variations on the order of milliseconds matter so much to our perception of rhythm? The answer lies in the way our auditory system processes sound.
An excellent article from Treble Clef Audio, though focused on loudspeaker design, provides a clear summary of the relevant psychoacoustic principles. It explains the temporal thresholds that govern how we perceive rhythm and synchrony.
Beyond Frequency | The Time Dimension of ... - Treble Clef Audio
This article delves into the psychoacoustics of timing in music, providing a scientific basis for why micro-timing is so crucial.
Please read the sections titled "Why Timing Errors Become Audible in Music" and "The vocabulary of Timing in Music," focusing on "Example 1 — Drum Set Microtiming." As you read, focus on these key values: Temporal Window of Integration (~160-170 ms): The time during which our brain fuses successive sounds into a single event. Synchrony Window (±10–20 ms): The narrow window where we perceive different frequency components (like a kick's low-end and a hi-hat's transient) as simultaneous. Expressive Microtiming (5–50 ms): The range of intentional timing deviations musicians use to create groove. Notice the critical overlap: the delays we introduce to create "feel" fall directly within the temporal region our brain uses to construct rhythmic coherence. A 20-40 ms delay can perceptually decouple a kick drum from a hi-hat, fundamentally altering the groove.
To see how these principles manifest in a real-world musical masterpiece, we can look at a scientific analysis of one of the most famous drum grooves ever recorded: Jeff Porcaro's "Rosanna shuffle."
[PDF] TIMING AND DYNAMICS OF THE ROSANNA SHUFFLE 1 ... - arXiv
This research paper from arXiv provides a quantitative analysis of the timing and dynamic variations in a classic drum performance.
First, read the introduction to understand the scientific context for studying these "deviations." Then, jump to the section on short-scale phrasing. Observe Figure 9 and Figure 10. Figure 9 quantifies the micro-timing, showing how some intervals are consistently shorter or longer than the mathematical average, creating a "laid-back feel." Figure 10 shows the dynamics (amplitude), revealing a consistent low-high velocity pattern in the hi-hats. This is empirical proof of a master drummer using precisely the two tools we are discussing today.
Velocity: The Dimension of Dynamics
In the MIDI world, velocity is a value from 0 to 127 that typically corresponds to the loudness of a note. However, its real power lies in its use as a modulation source. A change in velocity can alter not just volume, but the entire character of a sound. A drummer hitting a cymbal harder doesn't just produce a louder sound; the sound is also brighter, with a sharper attack and different overtone structure. We can simulate this in a sampler.
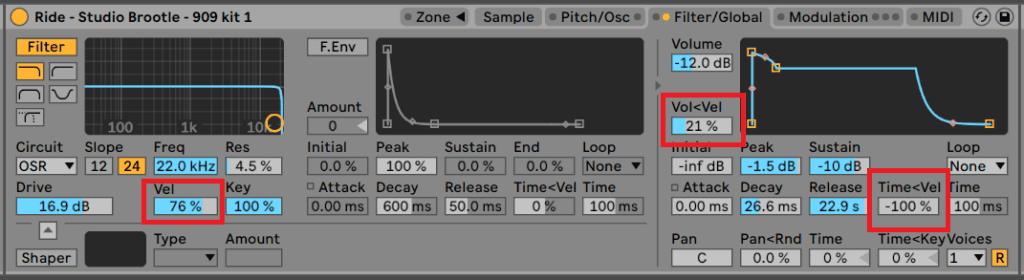
Let's watch some practical examples of how velocity programming creates accents and rhythmic energy.
Complete guide to Techno Drums Pattern (Beginner to Pro) [+free project]
The video "Complete guide to Techno Drums Pattern" by Audioreakt demonstrates several powerful velocity techniques.
Watch the following three clips to see different applications of velocity: Hi-hat accents: Notice how making the off-beat hi-hat louder gives the pattern a distinct impulse and groove. Hi-hat "crescendo": Here, a rising velocity pattern across a 16th-note subdivision creates a feeling of forward motion and energy. Open hat "shaker" effect: By creating a pattern of low-velocity on-beat notes and high-velocity off-beat notes, a simple open-hat line can be made to feel like a complex shaker pattern.
Micro-timing: The Dimension of Feel
Micro-timing refers to moving notes off the perfectly quantized grid by a few milliseconds. These small displacements are often called nudge, shift, or shuffle. As we saw from the psychoacoustic data, these shifts are not random; they are musically significant adjustments that define the rhythmic "feel."
- Pushing: Moving a note slightly early creates tension and urgency.
- Pulling: Moving a note slightly late creates a relaxed, "laid-back" or "behind the beat" feel.
- Swing/Shuffle: Systematically delaying every second note in a subdivision (e.g., every off-beat 16th note) by a set amount.
The following video is a comprehensive guide to techniques for "humanizing" drum patterns, with a strong focus on micro-timing.
How to humanize Hi-Hats on any Drum Machine | Variation techniques for your beats
The video "How to humanize Hi-Hats on any Drum Machine" by Captain Pikant offers a fantastic overview of timing variations.
Please watch the section covering timing variations. This will cover several key methods: Manual Nudging: Directly shifting individual notes. Unquantized Recording: Tapping in rhythms by hand to capture natural human timing imperfections. Partial Quantization: Tightening up a sloppy performance without making it perfectly robotic. Swing: Applying a global timing shift to off-beats.
While hi-hats are a common target for these techniques, applying micro-timing to snare and clap hits is just as important. In genres like house and techno, a slightly early clap can dramatically increase the track's drive.
Complete guide to Techno Drums Pattern (Beginner to Pro) [+free project]
Let's return to the Audioreakt video for a specific example with claps.
Watch this short clip on shifting claps. The instructor demonstrates how nudging the clap slightly before the kick creates a "snappy" effect common in melodic house and techno, pulling the listener forward into the next beat.
Advanced Humanization: Algorithmic Variation
For someone with your background, it's worth noting that these variations don't have to be static. Instead of programming one fixed velocity pattern or nudge amount, you can introduce randomness and algorithmic change. Many modern DAWs and plugins allow you to add a degree of randomness to velocity, timing, and other parameters for each note played.
A more advanced technique, also covered in the Captain Pikant video, is to use a Low-Frequency Oscillator (LFO) set to a random waveform (often called "Sample and Hold") to modulate these parameters. For instance, you could have an LFO subtly changing the fine-tuning, filter cutoff, or decay time of a hi-hat on every hit. This creates a pattern that never repeats exactly, mimicking the endless variation of a human performer. This is a topic that bridges rhythm with the synthesis concepts we will cover in Module 11.
Practical Exercise
Let's put these concepts into practice. In your DAW, create a 4-bar drum loop.
-
Foundation (Rigid Grid):
- Program a simple four-on-the-floor kick pattern.
- Add a clap or snare on beats 2 and 4.
- Program a constant 16th-note closed hi-hat pattern.
- Make sure all notes are perfectly quantized with a constant velocity (e.g., 100). Listen to how static and mechanical it sounds.
-
Introduce Velocity Variation:
- Select the hi-hat track. Create a velocity pattern. Try accenting the quarter notes (beats 1, 2, 3, 4) by setting their velocity to 110, the eighth notes in between to 90, and the remaining 16th notes to 70. Listen to the difference.
- Experiment with the "crescendo" pattern from the Audioreakt video on some of the 16th-note runs.
-
Introduce Micro-timing:
- Keep the velocity pattern you created. Now, apply a global swing/shuffle setting to the hi-hat track. Start with a small amount (e.g., 55-60%) and listen to how it imparts a bouncing feel.
- Select the clap hits on beats 2 and 4. Manually nudge them about 10-15 ms late. Listen to how this makes the groove feel more "laid back."
- Now, undo that and nudge them 10-15 ms early. Hear how this creates urgency.
-
Combine and Refine:
- Listen to your loop with both velocity and timing variations active. The combination should sound far more dynamic and engaging than the original static loop.
- Try layering techniques: maybe the hi-hats have swing, but the clap is pushed early, creating a rhythmic tension between the elements.
Conclusion
You have now moved beyond simple note placement into the fine art of crafting a groove. By manipulating velocity and micro-timing, you are controlling the two fundamental factors that give a rhythm its human feel and emotional character.
Key Takeaways:
- Groove is Perturbation: Compelling rhythms are built on small, controlled deviations from a perfect metronomic grid.
- The Perceptual Window: These deviations are effective because they operate on a millisecond scale that is highly significant to our auditory system's process of constructing rhythm.
- Velocity as Timbre: Velocity is not just about volume. It is a powerful modulation source for shaping the entire timbral character of a sound, mimicking the physics of acoustic instruments.
- Micro-timing as Feel: Pushing, pulling, and swinging notes by just a few milliseconds can fundamentally alter the emotional feel of a pattern, from relaxed and "lazy" to urgent and driving.
In our next lesson, we will focus on a specific and powerful application of velocity control: the use of ghost notes. We'll explore how these ultra-low-velocity hits can be used to add intricate rhythmic detail and subtlety to your patterns, particularly for snares and hi-hats.