Hello! Welcome to the seventh lesson in our "Deep Learning Foundations" module.
In our previous lessons, we've focused on building and improving neural networks. You learned how to diagnose overfitting with learning curves and how to treat it with powerful regularization techniques like Dropout and Batch Normalization. But what happens after you've spent hours or even days training a model to perfection? You need a way to preserve it.
This lesson addresses that crucial step. We will cover how to save, load, and checkpoint PyTorch models. Mastering this skill is essential for making your work reusable, sharing models with others, and recovering from interruptions during long training jobs.
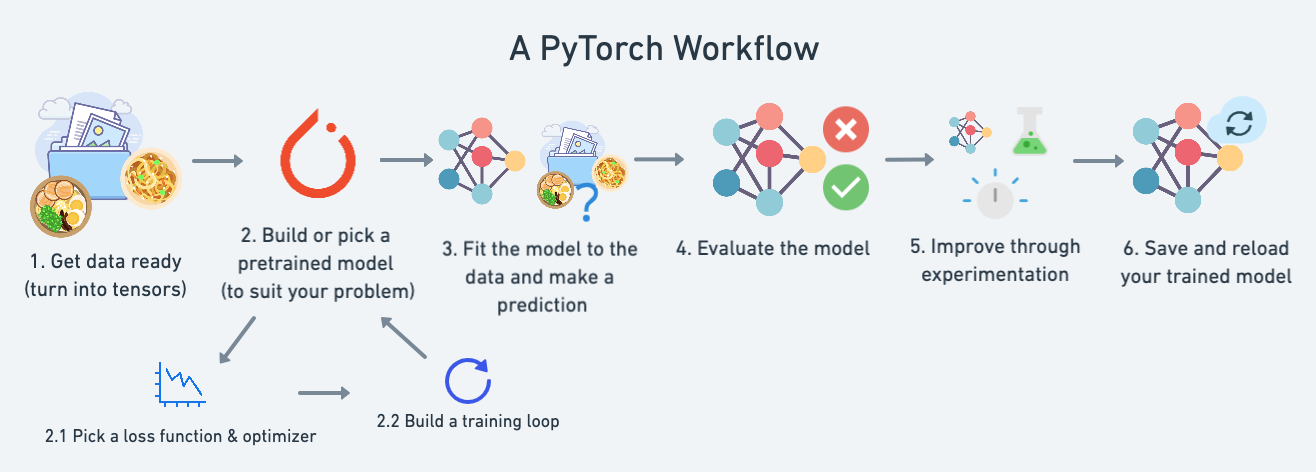
1. The Context: Saving Your Work
In any software project, you save your code. In deep learning, you need to save your trained model. This is the final step in the typical development workflow before you might deploy or share your model.
2. The Core Concept: The state_dict
Before we start saving things, we need to understand what we're saving. The most important component of a trained model is its set of learned parameters (weights and biases). In PyTorch, these are neatly contained within an object called the state_dict.
The official PyTorch documentation provides the best definition of a state_dict. Let's start by understanding what it is and why it's so central to saving and loading models.
Read the section titled 'What is a state_dict?'. Focus on the definition: it's a Python dictionary that maps each layer to its parameter tensor. Note that optimizers also have a state_dict to store their state and hyperparameters.
Think of the state_dict as the "brain" or the "DNA" of your model. It contains all the learned knowledge, but not the model's architecture (the "body"). This distinction is key to understanding the different ways to save a model.
3. Two Methods for Saving and Loading Models
PyTorch offers two main approaches for saving a model. One is flexible and recommended for production and sharing, while the other is simpler but more brittle.
Method 1: Saving the state_dict (Recommended)
This approach saves only the model's parameters. It is the most flexible and recommended method because it decouples the learned weights from the specific Python code that defined the model's architecture.
To save:
You simply save the state_dict dictionary using torch.save().
# Assuming 'model' is your trained torch.nn.Module instance
torch.save(model.state_dict(), 'model_weights.pth')
To load:
This is a two-step process:
- First, you must create an instance of your model architecture.
- Then, you load the saved parameters from the
state_dictinto this new model instance.
# Create an instance of the model architecture first
model = YourModelClass(*args, **kwargs)


# Load the state dictionary
model.load_state_dict(torch.load('model_weights.pth'))


# **Crucially**, set the model to evaluation mode for inference
model.eval()
The model.eval() call is vital. It tells PyTorch to turn off layers like Dropout and Batch Normalization that behave differently during training and inference.
Method 2: Saving the Entire Model (The "Lazy" Way)
This method saves the entire model object using Python's pickle utility. While it seems simpler, it has a major drawback.
To save:
torch.save(model, 'entire_model.pth')
To load:
model = torch.load('entire_model.pth')
model.eval()
The problem is that this method binds the saved file to the exact class definitions and directory structure used during saving. If you try to load this model in a different project or after refactoring your code, it will likely break. Therefore, this method is not recommended for any serious work.
Let's watch a video that demonstrates both of these methods with code.
PyTorch Tutorial 17 - Saving and Loading Models
This video by Patrick Loeber provides a clear, practical walkthrough of both saving methods.
Watch the segments demonstrating the 'lazy' method (02:54 - 05:20) and the preferred state_dict method (05:20 - 09:04). Pay close attention to the difference in the loading process for each.
4. Checkpointing: Saving Your Progress to Resume Training
Training a deep learning model can take hours or even days. What if the power goes out, or your program crashes? If you only save the final model, you lose all progress. This is where checkpointing comes in.
A checkpoint is a snapshot of the entire training state, saved periodically (e.g., after every epoch). It includes not just the model's weights, but everything needed to resume training exactly where you left off.
A typical checkpoint dictionary includes:
- The current epoch number
- The model's
state_dict - The optimizer's
state_dict(this is important, as optimizers like Adam have internal states) - The latest training loss
- Any other relevant information
Let's turn back to the official PyTorch docs to see the standard approach for creating and loading a comprehensive checkpoint.
Read the section 'Saving & Loading a General Checkpoint for Inference and/or Resuming Training'. Study the code for both saving and loading. Notice how everything is packed into a dictionary before saving and then unpacked after loading.
Now, let's watch a detailed demonstration of how to implement this in a training script.
PyTorch Tutorial 17 - Saving and Loading Models
Patrick Loeber's video also has an excellent section on checkpointing that walks through the process step-by-step.
Watch the segment from 09:04 to 15:19. He builds a checkpoint dictionary, saves it, and then shows how to load it to correctly restore the model, optimizer, and epoch number to continue training.
A common strategy is to save a checkpoint at the end of each epoch and also to keep track of the best-performing model on a validation set, overwriting a best_model.pth file whenever a new best is found.
5. A Critical Detail: Saving and Loading Across Devices (CPU/GPU)
A frequent source of errors occurs when you train a model on a GPU but then try to load it on a machine with only a CPU (or vice-versa). PyTorch requires you to be explicit about this device mapping.
The key is the map_location argument in the torch.load() function.
The PyTorch documentation provides clear recipes for handling device transitions. This is a must-know for practical deep learning.
Read the section 'Saving & Loading Model Across Devices'. Focus on the code snippets for the three main scenarios: Save on GPU, Load on CPU: This is very common for deployment. Notice the use of map_location=torch.device('cpu'). Save on GPU, Load on GPU: The standard case when continuing work on the same hardware. Save on CPU, Load on GPU: Less common, but good to know.
Here's a quick summary of the most common case: loading a GPU-trained model onto a CPU.
# Specify map_location when loading
checkpoint = torch.load(PATH, map_location=torch.device('cpu'))


# Now load the state_dict as usual
model.load_state_dict(checkpoint['model_state_dict'])
Failing to set map_location when loading a GPU-trained model on a CPU-only machine will result in a runtime error. This is a perfect lead-in to our next topic.
Conclusion
You now have the practical skills to manage the lifecycle of your PyTorch models. This is a fundamental part of the deep learning engineering process, enabling you to save, share, and reuse your work effectively.
Key Takeaways:
- The
state_dictis a Python dictionary containing a model's learnable parameters and is the key to flexible model saving. - The recommended method for saving is to store only the
model.state_dict(), which decouples the weights from the code. Loading requires you to first instantiate the model architecture. - Checkpoints are crucial for long training jobs. They are dictionaries containing the model state, optimizer state, epoch, and loss, allowing you to resume training seamlessly.
- When loading a model on a different device than it was trained on (e.g., GPU to CPU), you must use the
map_locationargument intorch.load()to prevent errors.
Preview of the Next Lesson:
We've just seen how critical it is to manage models between CPU and GPU. In the next and final lesson of this module, "Use GPU acceleration for training deep learning models," we will dive into how to leverage GPUs to dramatically reduce training time and tackle larger, more complex models.