Hello! In our last lesson, we established a logical folder structure for our project, completing the "blueprint" phase of our application. We've analyzed the UI, planned our component tree, and decided where our data will live. Now, it's time to bring that blueprint to life.
Today, we'll take the first and most crucial step in coding our React application: implementing the static UI. This means we will build all the visual parts of our app and populate them with initial data. We'll focus entirely on creating components and passing data down from parent to child using props. For now, our app will be a beautiful but non-interactive snapshot.
By the end of this lesson, you will be able to implement the static UI using components and props.
The "Static UI" Principle: Props Down, Data Flows
Before we start, let's solidify a core concept from the "Thinking in React" methodology. Building a static version first forces us to focus on the one-way data flow that is central to React.
Think of it this way:
- Props are data and functions passed from a parent component to a child component. They are read-only within the child.
- State is data that a component manages internally. It can change over time, typically in response to user actions.
For our static UI, we will only use props. We'll pretend state doesn't exist yet. This exercise helps us correctly map out our component hierarchy and understand how data should flow through it.
To explore this distinction further, let's turn to the official React documentation.
The "Thinking in React" guide provides a clear separation of these concepts. This section will help you understand why we build the static version first.
Please read the section titled Step 2: Build a static version in React. Then, read the Deep Dive: Props vs State that follows. Focus on how data is passed down without using state at this stage.
From Blueprint to Code: A Practical Walkthrough
Let's walk through the process of creating a component and using it to build a static UI. We'll use a movie application as an example. The goal is to display a list of movie cards, where each card shows a movie's details.
First, we need to break down the UI into components. As we discussed in a previous lesson, a complex UI is built from smaller, manageable pieces.
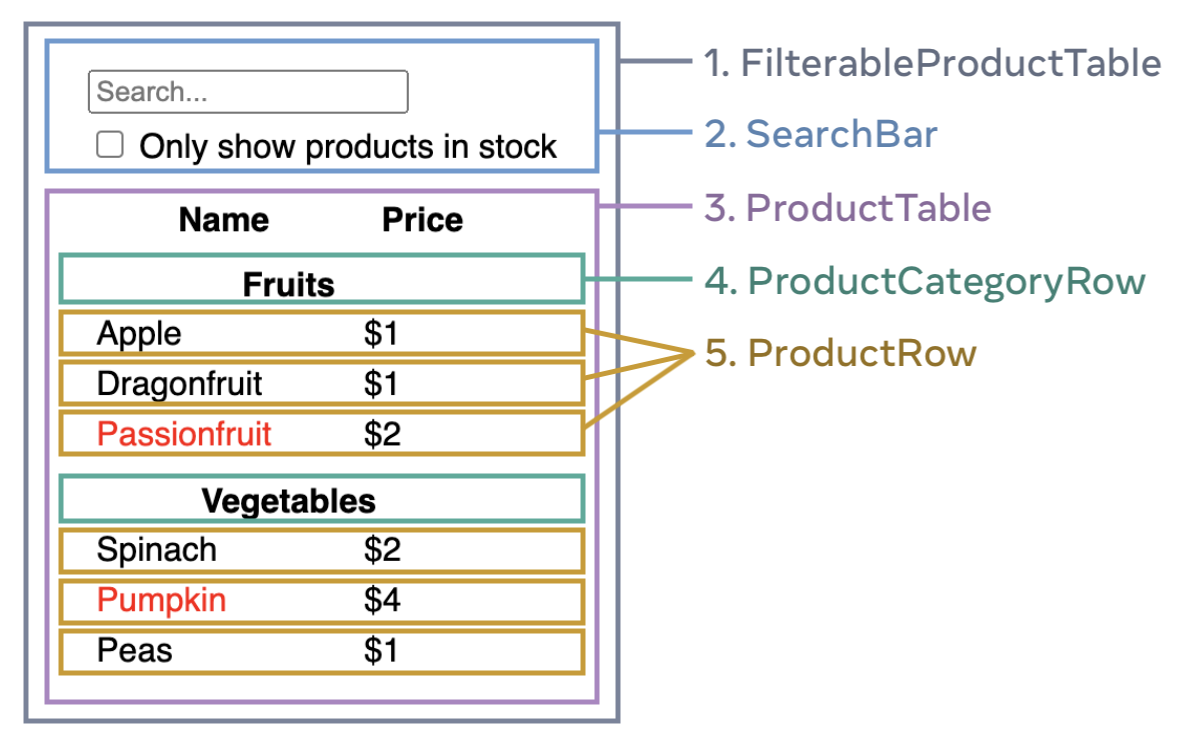
Our movie app will have a similar structure: a main App component that renders a list of MovieCard components.
Step 1: Create the Child Component (MovieCard.jsx)
The first step is to create the most granular component in our hierarchy, the MovieCard. This component will be responsible for displaying the information for a single movie.
Watch the following segment to see how to create a component file, define its structure with JSX, and prepare it to receive data via props.
Learn React With This ONE Project
This video from Tech With Tim provides a clear, practical demonstration of creating a component and passing data to it. We'll start by building the MovieCard component.
Watch from 00:19:48 to 00:26:06. Pay close attention to how a new MovieCard.jsx file is created in a components folder, how the function receives a movie prop, and how that prop's data (e.g., {movie.title}) is used within the JSX.
As you saw in the video, the key steps are:
- Create a new file (e.g.,
MovieCard.jsx) in yoursrc/components/directory. - Define a JavaScript function with the same name (by convention, capitalized). This function accepts a single argument,
props. - Return JSX that describes the HTML structure for the component.
- Use
{props.propName}to embed dynamic data into your JSX. You can also use ES6 destructuring to write({ movie })instead of(props)and then use{movie.title}directly. - Export the component using
export default MovieCard;so it can be used elsewhere.
Step 2: Use the Component and Pass It Props
Now that we have our MovieCard component, let's use it in our main App component. This involves importing it and then rendering it as if it were a custom HTML tag, passing the required data as attributes (props).
Learn React With This ONE Project
Continuing with the same video, let's see how to import and use the MovieCard component in App.jsx.
Watch from 00:26:43 to 00:28:54. Notice how MovieCard is imported at the top of App.jsx and then rendered multiple times, with different data passed to the movie prop each time.
This demonstrates the power of reusability. We defined the MovieCard once, and now we can reuse it to display any movie, just by passing different data through its props.
Rendering Lists from a Data Array
Hardcoding each component call works for a few items, but what if you have hundreds? The most common way to build a static UI is by mapping over an array of data. You've already used the .map() array method in our JavaScript module, and here's where it becomes incredibly powerful.
The pattern is simple and elegant:
- Have an array of data objects.
- Use the
data.map()method inside your JSX. - For each item in the array, return a component instance.
- Pass the item's data as props to the component.
- Always include a unique
keyprop.
Let's look at a detailed guide from MDN that walks through this exact process.
This MDN guide provides a step-by-step tutorial on componentizing an app, focusing on rendering a list from a data array. It's a fantastic text-based walkthrough of what we're learning.
Read the sections titled Tasks as data, Rendering with iteration, and Unique keys. These sections cover how to structure your data, use .map() to render components, and why the key prop is essential.
Why is the key Prop so Important?
As the MDN article highlights, the key prop is crucial. It's a special string attribute you need to include when creating lists of elements. React uses the key to identify which items have changed, are added, or are removed. This helps React update the UI efficiently.
Keys should be:
- Unique: Each key must be unique among its siblings.
- Stable: The key should not change between renders.
The best source for a key is a unique ID from your data, like task.id or movie.id. Using the array index as a key is an anti-pattern and can lead to bugs, especially if the list can be reordered or filtered.
Now, let's see this .map() pattern in action in our movie app example.
Learn React With This ONE Project
This final clip from the Tech With Tim video shows how to render the MovieCard components dynamically from an array of movie data.
Watch from 00:34:37 to 00:37:09. The video demonstrates using movies.map() to create a MovieCard for each movie in the list and explains the necessity of the key prop.
Composing Components for Complex UIs
So far, we've composed a simple parent (App) and child (MovieCard). Real-world applications involve much deeper nesting. You build large components by composing smaller ones.
Think about the DataTable example from the video below. A huge, complex table can be broken down into:
DataTable(the main wrapper)TableHeaderTableBodyTableRow(one for each data entry)TableCell(one for each column in the row)
This practice, known as composition, is fundamental. It keeps your components small, focused, and easier to manage.
Become a Master at Reusable Components in React
This video from Cosden Solutions, although focused on reusability, does an excellent job of demonstrating component composition by refactoring a single large component into smaller, more organized sub-components.
Watch from 00:13:31 to 00:17:33. Notice how the DataTable component is broken into TableHeader, TableRow, and TableCell. This illustrates how you can build a complex static UI by assembling smaller, dedicated components.
Application Exercise
Imagine you are building a social media feed. You have the following data:
const posts = [
  {
    id: 'post1',
    author: {
      name: 'Ada Lovelace',
      username: 'ada',
    },
    content: 'Thinking about creating the first algorithm. #programming #analytics',
    likes: 1815,
  },
  {
    id: 'post2',
    author: {
      name: 'Grace Hopper',
      username: 'grace',
    },
    content: 'Just found a moth in the relay. We\'re debugging!',
    likes: 1947,
  }
];
Based on what you've learned, outline the steps you would take to build a static UI that displays these posts. You don't need to write the full code, just describe the process. Think about:
- What components would you create? (e.g.,
PostCard,AuthorInfo,PostFeed) - Which component would receive the
postsarray as a prop? - How would you render the list of posts?
- What props would you pass from the list component to the card component?
- What would you use for the
keyprop?
Thinking through this process will help solidify your understanding.
Conclusion
Congratulations! You've successfully built the skeleton of a React application. By creating components and passing data down through props, you have a static but complete representation of your UI. This is a massive step.
Key Takeaways:
- A static UI is built by passing data from parent to child components via props. We do not use state at this stage.
- Components are reusable functions that return JSX. They are typically stored in their own files within a
componentsfolder. - We render lists of components from data arrays using the
.map()method. - When rendering lists, you must provide a unique and stable
keyprop to each element to help React with performance and identity. - Complex UIs are built by composing small, single-purpose components into larger ones.
Next Up:
Our application looks great, but it doesn't do anything. In our next lesson, we will bring it to life. We'll introduce state using the useState hook to give our components memory, and we'll learn how to handle user events like clicks and form inputs to make our app interactive.