Hello! In our last lesson, we built the static UI for our application by creating a series of components and passing data down using props. While our app looks complete, its pages are currently isolated. It's time to connect them.
Today, we will integrate client-side routing to transform our collection of static pages into a fluid, navigable Single-Page Application (SPA). We'll use the industry-standard library, React Router, to define the navigation structure of our app, allowing users to move between pages without the jarring full-page reloads of traditional websites.
By the end of this lesson, you will be able to apply your knowledge of React Router to connect different pages, implement shared layouts, and build a functional navigation bar.
From Multiple Pages to a Single-Page App
In a traditional multi-page website, clicking a link sends a request to a server, which then returns a brand new HTML document. This process results in a full page refresh.
In a React SPA, the browser loads a single HTML file initially. From then on, React takes control, dynamically rendering different components to give the illusion of multiple pages. This is where client-side routing comes in. React Router intercepts navigation requests and, instead of asking the server for a new page, it simply swaps out the components being displayed. This results in a faster, smoother user experience, much like a native mobile or desktop app.
Setting Up React Router
To get started, the first step is to add React Router to our project.
-
Installation: Open your terminal in the project's root directory and run the following command:
npm install react-router-domThis package provides the necessary components and hooks for routing in a web environment.
-
Configuration: We need to make the routing functionality available to our entire application. The modern and recommended way to do this involves creating a router configuration and providing it to your app. We'll do this in your main entry file,
src/main.jsx.
Let's look at a comprehensive guide that covers the initial setup and the core components we'll be using.
Ultimate React Router v6 Guide
The "Ultimate React Router v6 Guide" from the Web Dev Simplified blog is an excellent resource. We'll start with the basics to get our router configured.
Please read the section React Router Basics. It covers the three fundamental steps: configuring the router, defining routes, and handling navigation. Pay special attention to how BrowserRouter is used to wrap the App component in index.js (or main.jsx for Vite projects).
Defining Your Application's Routes
With the router set up, we now need to tell it which component to render for each URL path. We'll define our routes using a combination of createBrowserRouter, createRoutesFromElements, and the Route component. This approach is highly readable and scalable.
A key pattern for SPAs is the use of a shared layout—for example, a navigation bar that should appear on every page. We can achieve this by creating a "layout route" that renders the shared UI and an <Outlet /> component. The <Outlet /> acts as a placeholder where the content of the child routes will be rendered.
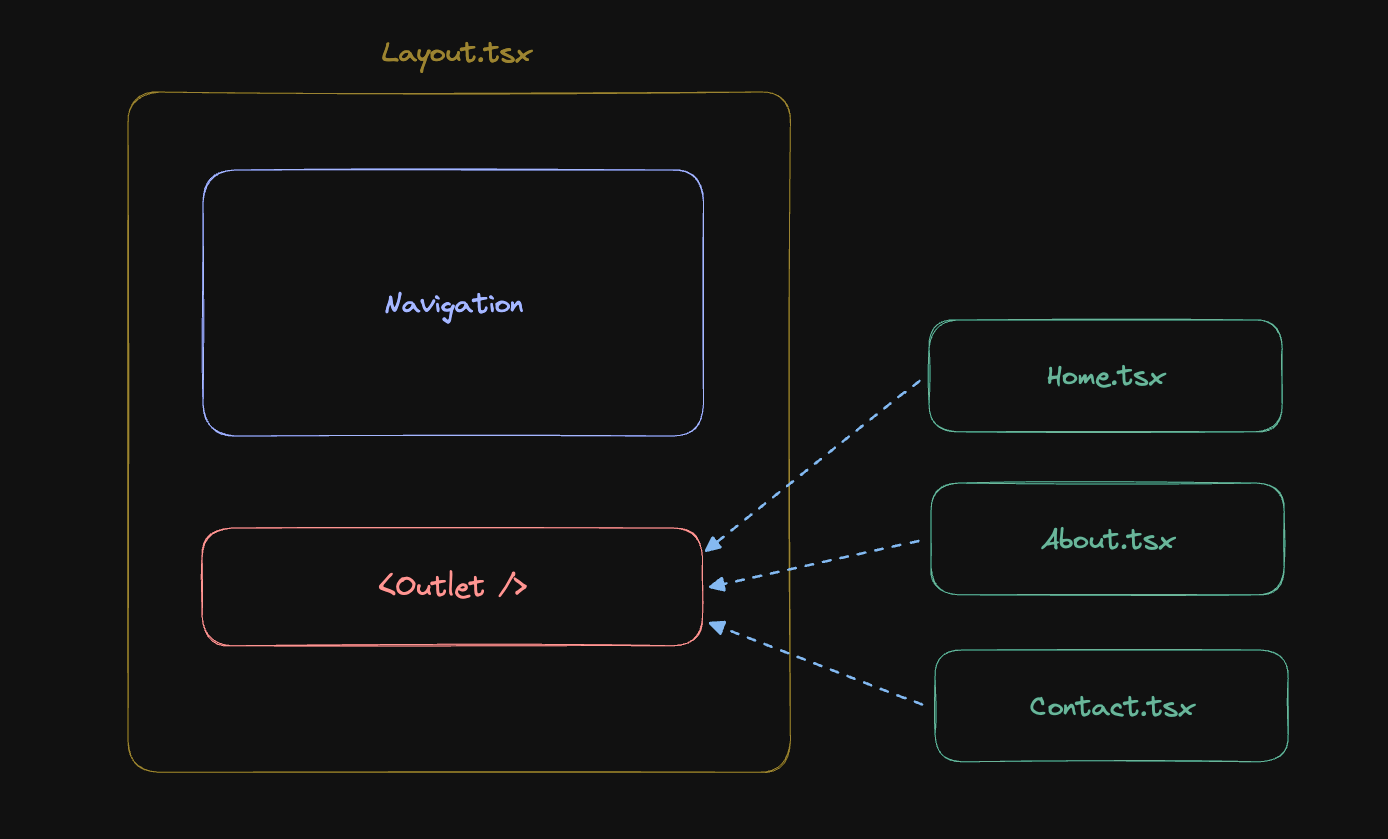
The following video provides a clear, practical walkthrough of setting up a modern route configuration with a shared layout.
React Router Complete Tutorial | React Routing For Beginners | React Router DOM Tutorial
The "React Router Complete Tutorial" from GreatStack demonstrates the latest conventions for setting up routes. We'll focus on the section that explains the modern approach using createBrowserRouter.
Watch from 00:30:18 to 00:38:44. This segment will guide you through: Creating a RootLayout.jsx component that contains shared UI (like a navbar) and an <Outlet />. Refactoring your App.jsx to use createBrowserRouter and RouterProvider. Defining your routes within createRoutesFromElements, with your page components nested inside the layout route. Understanding the index prop for the default route (your homepage).
After following this, your App.jsx (or a dedicated router.jsx file) will contain the map of your entire application's structure. For example:
// Example router configuration in App.jsx

import {
  createBrowserRouter,
  createRoutesFromElements,
  Route,
  RouterProvider,
} from "react-router-dom";

// Layout and Page Components
import RootLayout from "./layouts/RootLayout";
import HomePage from "./pages/HomePage";
import AboutPage from "./pages/AboutPage";

const router = createBrowserRouter(
  createRoutesFromElements(
    <Route path="/" element={<RootLayout />}>
      <Route index element={<HomePage />} />
      <Route path="about" element={<AboutPage />} />
      {/* Add routes for your other pages here */}
    </Route>
  )
);

function App() {
  return <RouterProvider router={router} />;
}

export default App;
Creating Navigation with Link and NavLink
Our routes are defined, but users have no way to navigate between them. We need to replace standard <a> tags with React Router's Link component to enable client-side navigation.
For navigation bars, the NavLink component is even better. It's a special version of Link that knows whether or not it is "active" based on the current URL. This allows us to easily apply styles (like changing the color or font weight) to the link corresponding to the page the user is currently on.
Let's see how to build a navigation bar using NavLink.
React Router Complete Tutorial | React Routing For Beginners | React Router DOM Tutorial
Continuing with the GreatStack tutorial, this next section focuses on creating the navigation links and highlights the key difference between Link and NavLink.
Watch from 00:38:44 to 00:44:14. Pay close attention to how NavLink automatically adds an active class to the link that matches the current URL. You'll see how to use this class in your CSS to provide visual feedback to the user.
By placing a <Navbar /> component containing these NavLinks inside your RootLayout.jsx (before the <Outlet />), you will have a persistent navigation bar across all pages of your application.
Practical Exercise
Now, it's your turn to apply these concepts.
- Create Page Components: If you haven't already, move the UI for each main section of your application into its own component file inside a
src/pagesdirectory (e.g.,HomePage.jsx,DashboardPage.jsx,ProfilePage.jsx). - Create a Layout: Build a
RootLayout.jsxcomponent in asrc/layoutsfolder. This component should render your main navigation bar and an<Outlet />. - Build the Navbar: Create a
Navbar.jsxcomponent insrc/components. Inside it, useNavLinkcomponents to create links to your main pages (/,/dashboard,/profile, etc.). - Configure the Router: In your
App.jsxormain.jsx, usecreateBrowserRouterto define your route structure, nesting your page routes inside theRootLayoutroute. - Add Styling: In your main CSS file (
index.css), add a style rule for theactiveclass to give your active navigation links a distinct appearance (e.g.,nav a.active { color: red; }).
Conclusion
You have now successfully wired your static components into a functional Single-Page Application. Users can navigate between different views seamlessly, and you have a scalable structure for adding new pages and shared layouts in the future.
Key Takeaways:
- Client-side routing with React Router enables navigation in a Single-Page Application without full-page reloads.
- The modern way to configure routes is with
createBrowserRouterandRouterProvider. - Shared layouts (like navbars and footers) are created using a parent layout route that renders an
<Outlet />component as a placeholder for child route content. - The
Linkcomponent is used for client-side navigation, whileNavLinkis a specialized version that helps style the currently active link.
Next Up:
Our application now has a solid structure and navigation. The next step is to bring it to life with interactivity. In the following lesson, we will focus on adding and managing user input through forms, covering state management for form fields and implementing form submission logic.