Hello! In our last lesson, we successfully implemented client-side routing, turning our static pages into a navigable Single-Page Application. Now that users can move around the app, it's time to let them interact with it in a meaningful way.
Today, we'll focus on one of the most fundamental aspects of web interactivity: forms. We will learn how to build forms in React to capture user input, manage that input using state, and handle submission to update our application's data. This will bridge the gap between static content and a dynamic, interactive user experience.
By the end of this lesson, you will be able to build a complete form feature, managing its state with controlled components and updating your application's data when the user submits the form.
The React Way of Handling Forms: Controlled Components
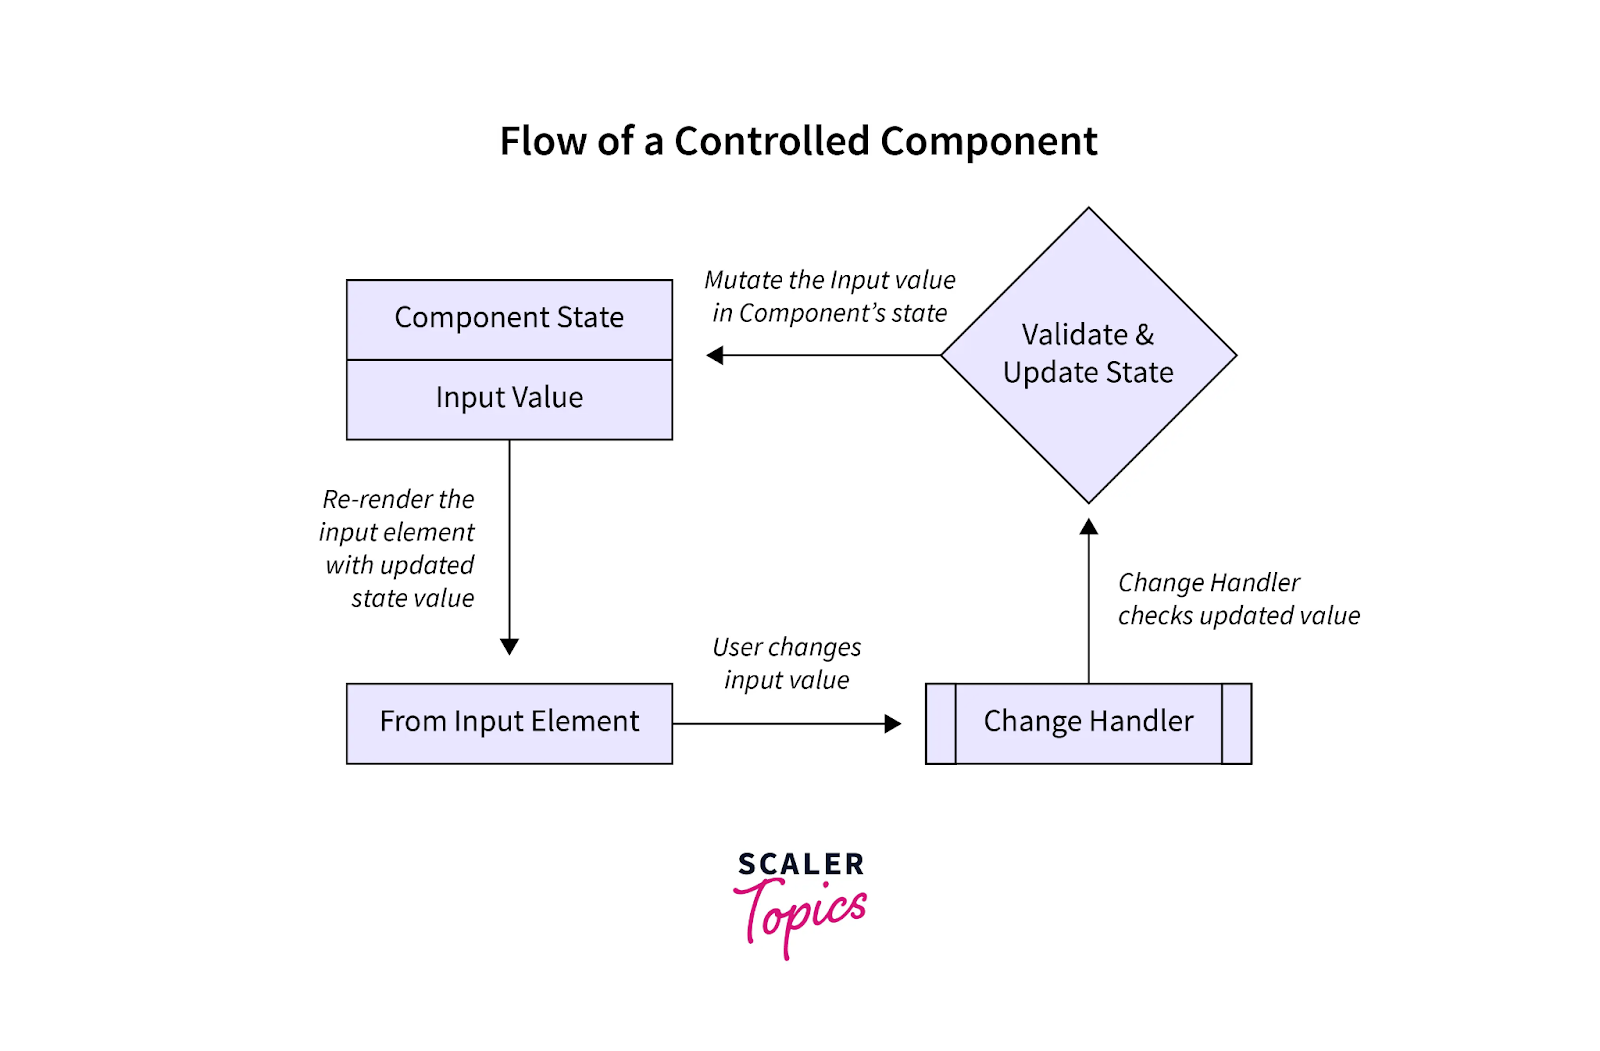
In traditional HTML, form elements like <input> and <textarea> maintain their own internal state. When you type into an input field, the browser handles updating its value. In React, we prefer a more explicit approach called controlled components.
With controlled components, the React component's state becomes the "single source of truth" for the input's value. This means:
- We store the input's value in a state variable (using
useState). - We pass this state variable to the input element via its
valueprop. - We use the input's
onChangeevent handler to call a function that updates the state.
This creates a clear, predictable flow of data. Let's see it in action.
Capturing User Input with useState and onChange
Let's start by building a simple form and making its inputs controlled. We'll need to create state for each input and wire up the value and onChange props.
The following video provides an excellent, step-by-step demonstration of how to set up state for various form elements and bind them to create controlled inputs.
Full React Tutorial #27 - Controlled Inputs (forms)
The video "Full React Tutorial #27 - Controlled Inputs (forms)" from Net Ninja clearly explains and demonstrates how to implement controlled inputs for text fields, text areas, and select dropdowns.
Please watch from 00:00:13 to 00:00:46 to understand the concept, and then from 00:03:43 to 00:06:57 to see the implementation for a text input. Pay close attention to: How useState is used to create a state variable for the input's value. How the value prop of the <input> is set to this state variable. How the onChange handler uses the event object (e.target.value) to update the state.
As you saw, the core pattern is:
import { useState } from 'react';

function MyForm() {
  // 1. Create a state variable
  const [name, setName] = useState('');

  return (
    <form>
      <label>Name:</label>
      <input
        type="text"
        // 2. Bind the input's value to state
        value={name}
        // 3. Update state when the input changes
        onChange={(e) => setName(e.target.value)}
      />
    </form>
  );
}
Trying to type in the input triggers the onChange event. The event handler, (e) => setName(e.target.value), updates the name state. React then re-renders the component, and the input's value is set to the new name from state.
Managing Multiple Inputs
When your form has multiple fields, creating a separate useState for each one is a valid approach, as shown in the Net Ninja video. However, a more scalable pattern is to use a single state object to manage all form data.
To do this, we can give each input a name attribute that matches a key in our state object. Then, we can create a single handleChange function that dynamically updates the correct property.
How to Build and Manage Forms in React?
The article "How to Build and Manage Forms in React?" from Telerik.com explains this pattern clearly. We will focus on the section about managing multiple inputs with a single useState hook.
Please read the section Understanding State in Forms, focusing on the SimpleForm example. Then, review the code snippet under Managing Multiple Inputs. Notice how the handleChange function uses the input's name and value to update a single formData state object.
Here is an example of this powerful pattern:
import { useState } from 'react';

function SignUpForm() {
  const [formData, setFormData] = useState({
    username: '',
    email: '',
  });

  const handleChange = (e) => {
    // Destructure name and value from the event target (the input element)
    const { name, value } = e.target;

    // Use the updater function form of setState
    setFormData(prevFormData => ({
      ...prevFormData, // Copy the old fields
      [name]: value    // Overwrite the field that changed
    }));
  };

  return (
    <form>
      <input
        type="text"
        name="username" // Name matches the state key
        value={formData.username}
        onChange={handleChange}
      />
      <input
        type="email"
        name="email" // Name matches the state key
        value={formData.email}
        onChange={handleChange}
      />
    </form>
  );
}
The computed property name [name]: value is the key part of this technique. It allows us to use the name string from the input element as the key in the new state object we are creating.
Handling Form Submission and Updating Parent State
Capturing input is only half the battle. The goal is to do something with that data. This is handled by the <form> element's onSubmit event.
A critical step in the submission handler is to call event.preventDefault(). If we don't, the browser will perform its default action for a form submission: sending a request to the server and reloading the page, which breaks the Single-Page Application flow.
Once we have the data, how do we get it from our Form component to the App component (or whichever parent component manages the list of data)? We use a pattern we've seen before: callback props.
- The parent component (
App) defines a function (e.g.,addItem). - The parent passes this function down to the child (
Form) as a prop (e.g.,<Form onAddItem={addItem} />). - When the form is submitted, the child calls this prop function, passing the form data as an argument (
props.onAddItem(formData)). - The parent function receives the data and updates its own state.
The following resource provides a complete walkthrough of this entire process, from handling the submit event to updating the parent's state.
React interactivity: Events and state
The MDN article "React interactivity: Events and state" is a fantastic guide that ties everything together. We'll walk through handling submission, using callback props, and finally updating the application's state.
Please read through the following sections: Handling events: Focus on the Handling form submission subsection to see how to use onSubmit and event.preventDefault(). Callback props: This section perfectly explains how to pass a function from a parent to a child to send data back up. Putting it all together: Adding a task: This section shows the complete implementation. Notice how the addTask function in the parent component receives the data from the form and uses setTasks to add the new item to the state array.
Practical Exercise
Let's apply what you've learned. In your project, you should have a page where users can add new data (e.g., a "Create Job" page or "Add Post" page). Your task is to build the form on that page.
- Build the Form UI: In the relevant page component, create a
<form>with the necessary<input>,<textarea>, or<select>fields. - Implement Controlled Components:
- Create a single state object using
useStateto hold the values for all your form fields. - Write a single
handleChangefunction that can update any field in your state object. - Add the
name,value, andonChangeprops to each of your input elements to make them controlled.
- Create a single state object using
- Create the Parent Logic: In the parent component that manages the list of items (this might be
App.jsxor a specific page component likeJobsPage.jsx), write a function to add a new item to the state array. Remember to give new items a unique ID (you can use thenanoidlibrary as suggested in the MDN article, or evenDate.now()for a simple unique value for now). - Handle Submission:
- Pass the "add item" function from the parent down to your form component as a callback prop.
- In your form component, create a
handleSubmitfunction that callsevent.preventDefault()and then invokes the callback prop with the form's data. - Attach this
handleSubmitfunction to the form'sonSubmitevent. - As a final touch, reset the form by clearing the state after submission.
Conclusion
You have now mastered a core pillar of building interactive React applications. By using controlled components, you create a predictable and manageable system for handling user input. The combination of local form state and callback props provides a robust pattern for updating your application's global state in response to user actions.
Key Takeaways:
- Controlled Components are the standard React pattern for forms, where component state is the single source of truth for input values.
- The
valueandonChangeprops work together to create a two-way data binding between your state and the input elements. - Using a single state object and a generic
handleChangefunction is a scalable way to manage forms with multiple inputs. - Form submission is handled with the
<form>element'sonSubmitevent, and you must callevent.preventDefault()to prevent a page reload. - Callback props are the mechanism for passing data from a child form component back up to a parent component to update the main application state.
Next Up:
Currently, our application's data lives only in memory and resets every time we refresh the page. In our next lesson, we will solve this by learning how to connect our application to an external API. We'll use the useEffect hook to fetch data when the component loads and learn how to send our form data to a server to be persisted.