Hello! Let's dive into making our components interactive.
In our last lesson, we established the crucial difference between props and state. You learned that props are like function arguments passed down from a parent, making them external and read-only. In contrast, state is a component's internal, private memory, which can change over time and cause the component to re-render. We covered the "what" and "why" of state.
Today, we'll focus on the "how." This lesson will teach you to initialize and update a component's state using React's most fundamental hook: useState. By the end of our session, you'll be able to bring your components to life by responding to user actions.
1. Why Regular Variables Don't Work
Before we jump into the React way, let's understand why a standard JavaScript variable isn't sufficient for managing data that should be reflected in the UI.
Imagine you have a variable name in your component. If you change this variable inside a click handler, the value of name changes in memory, but React has no idea that it needs to update the screen (the DOM) to show the new value. The UI remains unchanged.
This happens because React only re-renders a component when its props change or when its state changes. A regular variable is not part of this reactive system.
For a practical demonstration of this problem, watch the first couple of minutes of the following video.
Full React Tutorial #8 - Using State (useState hook)
The video 'Using State (useState hook)' from the Net Ninja channel clearly illustrates why simply changing a JavaScript variable doesn't trigger a UI update in React.
Watch from the beginning until 02:19. The instructor demonstrates creating a let name = 'mario' variable, attempting to change it on a button click, and showing that while the variable's value updates in the console, the component does not re-render to display the new name.
The key takeaway is that we need to tell React to "watch" a value for changes. To do this, we need to declare that value as a piece of state.
2. Introducing the useState Hook
To create state variables in a functional component, we use a special function provided by React called a Hook. The hook for managing state is, fittingly, named useState.
A "Hook" is simply a function that lets you "hook into" React features like state and lifecycle methods from within your functional components. All hooks start with the word use.
3. Initializing State with useState
Let's break down how to use useState to add state to a component.
First, you need to import it from the React library:
import { useState } from 'react';
Next, you call useState at the top level of your component, passing the initial value you want for your state. The useState hook returns an array containing two elements:
- The current state value.
- A function to update that value.
Given your background in JavaScript, you'll recognize that we typically use array destructuring to get these two elements into separate variables.
// Inside your component function
const [count, setCount] = useState(0);
Let's dissect this line:
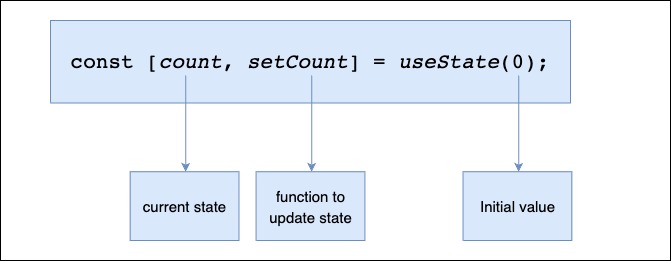
The naming convention [something, setSomething] is a strong community standard that makes code easy to read.
The video you watched earlier continues to explain exactly this.
Full React Tutorial #8 - Using State (useState hook)
Let's continue with the Net Ninja video, where the instructor introduces the useState syntax and demonstrates how to initialize state.
Watch from 02:19 to 04:11. Pay attention to how useState is imported and how array destructuring is used to create the name state variable and the setName function.
4. Updating State and Triggering Re-renders
Now for the magic. How do we change the state? You call the updater function (e.g., setCount) that you received from useState.
When you call this function with a new value, two things happen:
- React stores the new state value.
- React schedules a re-render of your component, and during that re-render,
useStatewill return the new value.
This is how your UI stays in sync with your data.
Let's see this in action with a simple counter.
import { useState } from 'react';

function Counter() {
  const [count, setCount] = useState(0);

  function handleClick() {
    // Tell React to update the state and re-render
    setCount(count + 1);
  }

  return (
    <button onClick={handleClick}>
      You pressed me {count} times
    </button>
  );
}
In this example from the official React documentation, clicking the button calls handleClick, which calls setCount(count + 1). This tells React to update the count state, which triggers a re-render, and the user sees the updated number on the screen.
The following video demonstrates this update process clearly, also showing that you can have multiple state variables in a single component.
Full React Tutorial #8 - Using State (useState hook)
This final clip from the Net Ninja video shows how to use the setter function to update state and how to manage multiple, independent state variables in the same component.
Watch from 04:11 to the end (06:37). Notice how setName and setAge are called inside the event handler to update both pieces of state, triggering a re-render with the new values.
5. Two Important Rules for useState
Working with state involves a few rules and concepts that are crucial to understand to avoid common bugs.
Rule 1: State is a Snapshot
When you call a state setter function like setCount(1), the count variable in your currently running code does not change. State behaves like a snapshot. The update will only be visible in the next render.
function handleClick() {
  console.log(count); // Will log 0 on the first click
  setCount(count + 1); // Request a re-render with the value 1
  console.log(count); // Will still log 0!
}
This is a frequent point of confusion for beginners. The React documentation has a great section explaining this behavior.
The official React documentation explains why you see the 'old' state value immediately after calling a setter function.
Read the troubleshooting section titled 'I’ve updated the state, but logging gives me the old value'. This will solidify your understanding of state as a snapshot.
Rule 2: Hooks Must Be Called at the Top Level
You can only call Hooks at the top level of your React functions. This means you cannot call useState inside loops, conditions (if statements), or nested functions. React relies on the call order of Hooks being the same in every render.
This video explains this rule very clearly.
Learn useState In 15 Minutes - React Hooks Explained
The video 'Learn useState In 15 Minutes' provides a concise explanation of the Rules of Hooks.
Watch from 02:21 to 04:25. The instructor explains why you can't put hooks inside conditional blocks and how React enforces this rule.
This whole process can be visualized with the following flowchart.

Conclusion
Congratulations! You've just learned the fundamental mechanism for creating interactive user interfaces in React.
Key Takeaways:
- You must use the
useStatehook to create a reactive state variable in a functional component. useStateis called with an initial value and returns an array with two elements: the current state and a function to update it. We use array destructuring[value, setValue]to access them.- Calling the setter function (e.g.,
setValue(newValue)) tells React to update the state and schedule a re-render of the component. - State updates are not immediate in the currently executing code; they are applied in the next render (the "snapshot" behavior).
- Hooks like
useStatemust always be called at the top level of your component.
Next Up:
In this lesson, we used the simple form setCount(count + 1). This works well, but it has a subtle flaw when you need to perform multiple updates in quick succession. In the next lesson, we will explore a more robust way to update state—by passing a function to the state setter. This is a critical pattern for when your new state depends on the previous state.