Hello! Welcome back.
In our previous lesson, we explored the theory behind React's component-based architecture. You learned that React applications are built by composing small, reusable pieces of UI called components into a tree-like structure.
Today, we move from theory to practice. Our goal is to set up a new React project using Vite and identify the key project files. You'll get your hands on the keyboard, create your very first React application, and learn your way around the essential files and folders that Vite generates for you. This lesson lays the practical groundwork for everything we'll build in the coming modules.
Why Vite? A Modern Build Tool
Before we jump in, let's briefly touch on why we're using Vite. In the past, "Create React App" (CRA) was the standard tool for starting React projects. However, as applications grew, its development server could become slow.
Vite is a modern build tool that provides an extremely fast development experience. It leverages native ES modules in the browser, which means it doesn't need to re-bundle your entire application every time you make a change. This results in near-instant startup times and incredibly fast updates when you save a file.
To get a better sense of what Vite is and the problem it solves, let's watch the introduction to a great crash course on the topic.
Vite Crash Course | Faster Alternative To CRA
This video from Traversy Media provides an excellent overview of Vite. It explains how traditional bundlers like Webpack (used by Create React App) work and contrasts them with Vite's modern approach.
Watch the first part of the video, from the beginning to 06:28. Focus on understanding the core benefit of Vite: its development speed.
Now that you have the context, let's get our environment ready.
1. Prerequisites: Checking Your Environment
To create and run a React project with Vite, you need to have Node.js installed on your computer. Node.js is a JavaScript runtime environment, and it comes bundled with npm (Node Package Manager), which we'll use to install packages and run commands.
Vite requires Node.js version 18+ or 20+. To check which version you have, open your terminal and run the following commands:
# Check Node.js version
node -v


# Check npm version
npm -v
If these commands return a version number (e.g., v20.11.0), you're all set. If you get an error or your Node.js version is too old, you'll need to install the latest Long Term Support (LTS) version from the official Node.js website.
2. Setting Up Your First React Project
With your environment ready, creating a new React project is just a single command away.
- Navigate to your desired folder in the terminal (e.g., your desktop or a development folder).
- Run the create command. We'll use
npm create vite@latest. This command will trigger an interactive setup process.
npm create vite@latest
You will be prompted with a few questions:
- Project name: You can name it something like
react-essentials-app. - Select a framework: Use the arrow keys to navigate and select
React. - Select a variant: Choose
JavaScript.
After you answer the prompts, Vite will create a new directory with your project name and give you the next steps. It will look something like this:
Done. Now run:

  cd react-essentials-app
  npm install
  npm run dev
Let's follow those instructions:
- Change into the project directory:
cd react-essentials-app - Install the dependencies: This command reads the
package.jsonfile and downloads all the necessary libraries (like React itself) into anode_modulesfolder.npm install
That's it! You now have a complete, functional React project on your machine. Before we run it, let's take a look at what Vite created for us.
3. Identifying Key Project Files
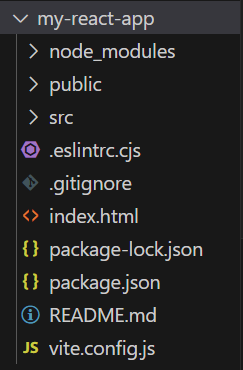
Let's explore the files and folders Vite generated. This structure is clean and minimal, which is one of Vite's strengths.
Getting started with React - Application structure
The MDN Web Docs provide a clear, text-based explanation of the Vite project structure. This will serve as a great reference.
Read the section titled 'Application structure' to familiarize yourself with the purpose of each file and directory. A visual representation is also provided below.
Here is a visual of that structure:
Let's summarize the most important files you'll interact with:
index.html: This is the main entry point for the browser. Unlike older setups, it's in the project's root folder. Vite will automatically inject your JavaScript into this file. Notice the<script type="module" src="/src/main.jsx"></script>tag, which points to our app's starting point.src/: This directory contains all of your application's source code. This is where you'll spend most of your time.src/main.jsx: This is the JavaScript entry point for your application. It finds the<div>with the ID ofrootinindex.htmland tells React to render your main application component (App) inside it.src/App.jsx: This is your root React component. It's the top of the component tree we discussed in the last lesson. Initially, it contains the boilerplate content you'll see when we run the app.package.json: This file contains metadata about your project, including its name, version, and—most importantly—its dependencies (the libraries it needs) and scripts (commands you can run, likedev,build, andpreview).vite.config.js: This is the configuration file for Vite. For now, it's very simple, just telling Vite to use the React plugin.
To see all this in action, let's watch a guided walkthrough of the setup and file structure.
Vite Crash Course | Faster Alternative To CRA
This clip from the Traversy Media video will walk you through the exact steps we just discussed: creating the app, installing dependencies, and exploring the key files.
Watch the segment from 06:28 to 10:51. This will visually reinforce your understanding of the project setup and file organization.
4. Running the Development Server
You've created the project and explored its files. Now for the exciting part: running it!
Inside your project directory, run the dev script defined in your package.json:
npm run dev
Your terminal will show you a local URL, typically http://localhost:5173/. Open this URL in your browser.
You should see the default Vite + React landing page. Congratulations, you are now running a React application locally!
A key feature you'll notice is Hot Module Replacement (HMR). Try this:
- Keep the browser tab with your app open.
- Open
src/App.jsxin your code editor. - Find the
<h1>tag that says "Vite + React" and change the text to something else, like "My First React App". - Save the file.
Look back at your browser. The page updated instantly, without a full refresh! This is HMR in action and is what makes developing with Vite so efficient.
Conclusion
In this lesson, you took a significant practical step. You moved from the conceptual model of components to a tangible, running React application on your own machine.
Key Takeaways:
- Vite is a modern build tool that provides a fast development server for React projects.
- You can create a new React project by running
npm create vite@latestin your terminal. - After creation, you must
cdinto the project folder and runnpm installto download dependencies. - The key files are
index.html(the browser entry point),src/main.jsx(the JS entry point), andsrc/App.jsx(the root component). - The
npm run devcommand starts the development server, allowing you to view your app in the browser with live updates.
Next Up:
Now that your project is set up, it's time to start writing React code. In the next lesson, we will dive into JSX, the special syntax that lets us write HTML-like structures directly within our JavaScript files. You'll learn its rules and how to embed dynamic JavaScript expressions to make your UI come alive.